Share
Using an object storage service is often the primary choice in cloud computing. Its benefits, including ease of use and small operational overhead, are extremely appealing to cloud customers. In Google Cloud, the object storage service is provided by the suitably named Google Cloud Storage service.
In this article we are going to explain how to use Google Cloud Storage via the command-line tool gsutil, and other ways to interact with Google Cloud Storage. This can be also helpful for users who are getting started with the new NetApp® Cloud Volumes ONTAP for Google Cloud.
To get started now, click the links below:
- Object storage introduction
- Meet the Google Console, SDK, and Command-line tool
- How to use the gsutil command-line tool
- Find more Google Cloud articles
What Is Object Storage?
In object storage, files are simply referenced as objects and organized into buckets—logical namespaces that are able to hold one or more objects. While a bucket can have multiple objects, an object can only belong to just one bucket. The object storage service offered by Google Cloud is called Google Cloud Storage. Google Cloud Storage comes with built-in capabilities to manage and automate bucket lifecycle rules. In Google Cloud Storage, the availability of the data can be configured by choosing a storage class for the bucket and its objects: Standard, Nearline, and Coldline. In addition, the data location can be specified, which also impacts the availability, by choosing between region, dual-region and multi-region. Google Cloud Storage comes with built-in capabilities to manage and automate bucket lifecycle rules.
Different Ways to Interact with Google Cloud Platform
Using cloud computing resources has never been easier. The number of tools and overall methods one has at their disposal to interact with these resources is useful to a range of different users.
In Google Cloud Platform, there are three different methods that can be used:
- Google Cloud Console: Using the Console, or Web User Interface, is the most typical option while interacting with Google Cloud. It lowers the barrier to entry-level users to start using GCP, and at the same time it provides a rich set of features and intuitive interface. However, it is worth noting that not all the features are available in the Console—users may often need to use either the SDK or command-line tool to perform certain actions.
- SDK: An SDK, or Software Development Kit, is often the preferred way of applications to interact with Google Cloud. Google Cloud has SDK’s available for multiple programming languages including Go, Python, and node.js.
- Command-Line Tool: While, in theory, Google Cloud’s command-line tools are part of the SDK, they are often referred to separately. Google Cloud Platform has one command-line tool gcloud that can be used to interact with any GCP service. In addition to that, Google Cloud Storage itself has also a command-line tool of its own: gsutil. This tool enables the customer to interact with GCP using all the available features at their disposal.
What would you use if you had multiple files to store in object storage in the cloud? The gsutil command-line tool of course! Now let’s see how to do it.
How to Use the gsutil Command-Line Tool
In this section we are going to explore how the gsutil command-line tool works in practice. This tool can help with the transfer of several objects, including folders, and is also well suited for automating tasks that are not so easy to achieve via the Google Cloud Console.
How to Set Up a Workspace with Google Cloud Tools
1. Start by logging in to the Google Cloud Console (the web user interface) and create a new Google Cloud Platform project with billing configured and enabled.
2. Download and install the latest version of Google Cloud SDK from the official documentation website. Depending on your machine operating system, the installation process may vary slightly, but in general should be quite straightforward.
3. You can verify that the install went successfully by opening up your machine terminal and executing the command gsutil -v. You will be greeted with the version of the gsutil installed on your machine (Fig. 1). If not, please make sure to go back to steps 1 and 2 before proceeding further.
 Fig.1 gsutil version.
4. To start using gsutil, you first need to authenticate it with your Google Cloud Platform account. Issue the command gcloud auth login and you will be directed to your browser to authenticate. Once the process is successful, both your email and active GCP project will be displayed in the terminal (Fig. 2).
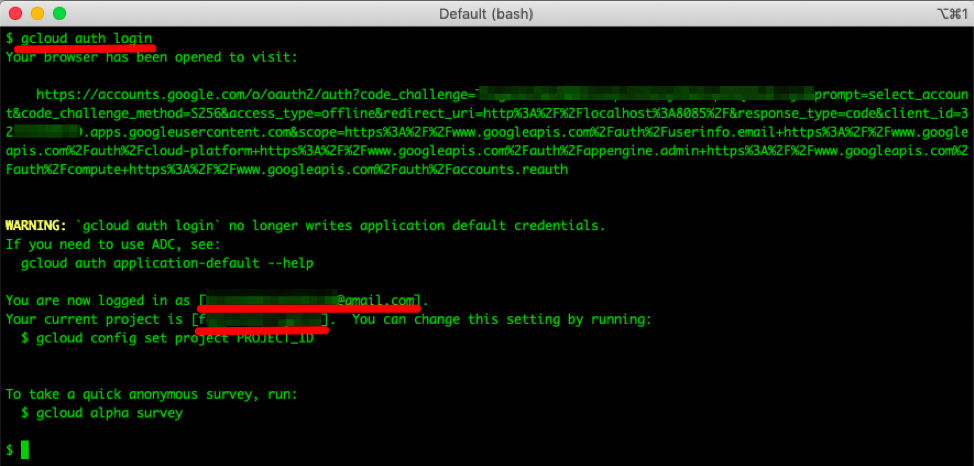 Fig.2 Authenticate to GCP using gcloud.
Creating a Google Cloud Storage Bucket with gsutil
Creating a Google Cloud Storage bucket is the first step before any files (i.e. objects) can be uploaded to Google Cloud Storage. The bucket is a virtual namespace for our objects and, as you might recall, an object can only belong to a single bucket.
1. Using your machine terminal, issue the command gsutil help mb (Fig. 2.). This help command will provide you all the syntax details of the mb (make bucket) option. You can use the help command with any of the gsutil options, which is an invaluable resource for providing information and detailed explanations on all the mandatory and optional flags.
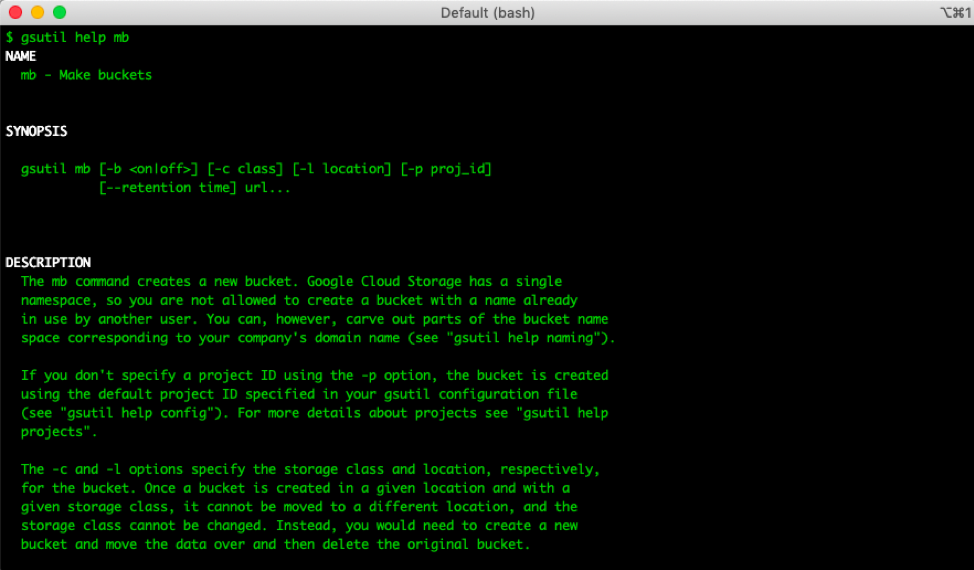 Fig.3 gsutil help pages
2. Creating the Google Cloud Storage bucket is, as you might have noticed from the previous output (Fig. 3 above), quite simple. Use the command gsutil mb gs://<YOUR_BUCKET_NAME> to create it (Fig. 4). You will need to make sure that <YOUR_BUCKET_NAME> is a unique name, not just in your GCP account but in the entire global Google Cloud Platform.
 Fig.4 Create a GCP Bucket using gsutil
Adding/Removing Data from a Google Storage Bucket with gsutil
The process of adding and removing data from a Google storage bucket is quite simple and fast, with the only potential bottleneck being the speed of your internet connection. If you are used to the terminal, you may be familiar with the concept of the commands cp (copy) and rm (remove). The Google Cloud Storage command-line tool gsutil uses the exact same concept.
1. Start by changing the directory to the folder in your local machine where the files you want to upload are located. In our example case, this would be a folder in our Desktop called “photos” (Fig. 5).
2. In order to copy all the files in the current directory to the storage bucket we previously created, we will use the command gsutil cp * gs://<YOUR_BUCKET_NAME> (Fig. 5).
One important aspect to note is that when performing an upload of multiple large files, using the flag -m, to perform a parallel (multi-threaded/multi-processing) copy, will significantly improve the performance.
Also, if you wish to include local subfolders in your upload, you will be required to use the flag -r, i.e., to perform a recursive copy.
3. You can verify the files were properly created by using the command gsutil ls gs://<YOUR_BUCKET_NAME> and list the contents of the bucket (Fig. 5).
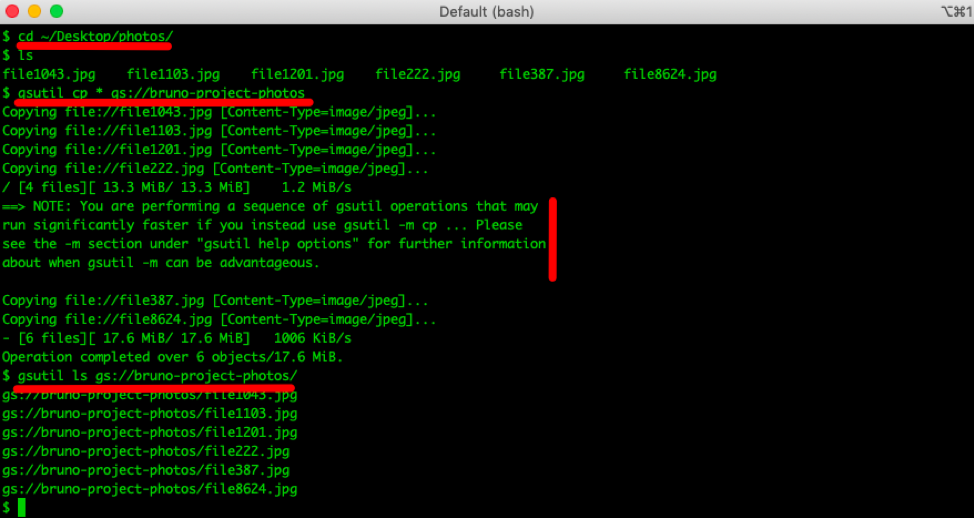 Fig.5 Copying multiple files using gsutil
4. Likewise, if you wish to remove the objects from the storage bucket, you can issue the command gsutil rm gs://<YOUR_BUCKET_NAME>/* to remove all the files inside the bucket (Fig. 6).
5. Clean up the environment by deleting the Cloud Storage bucket you created, by using the subcommand rb (remove bucket), i.e., with the command gsutil rb gs://<YOUR_BUCKET_NAME> (Fig. 6).
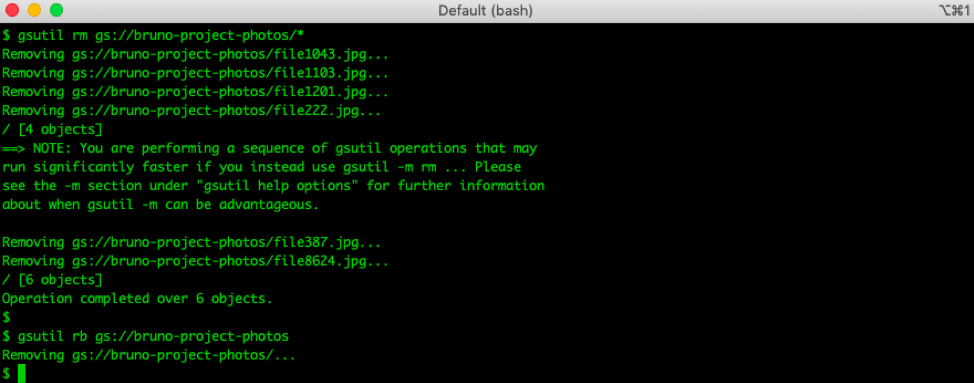 Fig.6 Removing files and bucket using gsutil
Read More on How to Use Google Cloud
You've just seen how to interact with the Google Cloud Platform's console, command-line tools, and SDK’s.
Now that you know how to install and authenticate with Google Cloud using your machine terminal, there's a lot more on Google Cloud and Google Cloud Storage with Cloud Volumes ONTAP. Follow the links below to learn how to:
- Migrate data to Google Cloud fast and efficiently
- Enhance your disaster recovery and data protection in Google Cloud
- SQL Server on Google Cloud: Managed Service Vs. Managed Storage
- Enterprise Workloads with Cloud Volumes ONTAP on Google Cloud
- File Sharing in the Cloud on GCP with Cloud Volumes ONTAP
- Google Cloud Case Studies with NetApp Cloud Volumes ONTAP

