Share
Google Cloud Persistent Disk is the block storage solution that is designed to be used with services such as Google Cloud Compute Engine, Google Kubernetes Engine, and App Engine. With Persistent Disk acting as the Google Cloud storage layer for so many critical systems, it’s important for cloud administrators to know the service’s functions inside and out.
In this blog, we take a deep dive into the capabilities of Persistent Disk and look into five functions that you can leverage to get the most out of the service.
Read on, or use these links to jump down:
- What Is Google Cloud Persistent Disk Storage?
- Google Cloud Persistent Disk Types
- 4 Common Persistent Disk Volume Operations
- 4 Lesser-Known Persistent Disk Functions
- Boost Your Persistent Disks with Cloud Volumes ONTAP
- Learn More About Google Cloud Persistent Disk and Cloud Volumes ONTAP
What Is Google Cloud Persistent Disk Storage?
GCP Persistent Disk is the primary block storage offered on GCP. It’s ideal for a wide range of applications that depend on IaaS solutions, such as Compute Engine and Google Kubernetes Engine. The persistent disks the service provides can also be used with App Engine flexible deployments, though it adds an additional layer of overhead for that PaaS service.
There is a wide range of mission-critical use cases for Persistent Disk, including databases, LOB applications, enterprise file storage, and more. The processes of attaching and detaching the disks are quite simple, and provide much-needed flexibility for deploying or migrating workloads.
Let’s take a look at some of the other standout features of the service:
Availability: Multiple copies of data are stored within a region to ensure that data is highly available and durable. This ensures that the application is not impacted by any planned or unplanned infrastructure downtime and minimizes the risk of data loss.
Encryption: Persistent disk data is encrypted by default using system-managed encryption keys. Customers also have an option to use customer-managed encryption keys with the help of Google Cloud Key Management Service (KMS). Once the disk is deleted, the keys used for encryption are also deleted so that data can’t be retrieved by anyone.
Performance: Persistent disks can offer up to 100k IOPS and 1200 read/write throughput to meet even the most demanding workload requirements. The level of performance you can expect from Persistent Disk depends on details such as disk type, size, I/O block size, the vCPU count of the virtual machine, and some other factors.
Persistent Disk offers multiple disk types to choose from, both HDD and SSD, providing a range of options for different workloads and performance requirements. We’ll take a closer look at these disk types in the next section.
Google Cloud Persistent Disk Types
There are a number of different disk types offered by Google Cloud Persistent Disk. These include:
- Standard persistent disks (pd-standard): Standard persistent disks are based on HDD and are commonly recommended for workloads that need sequential I/O. They offer a cost-effective block storage solution that can be used for workloads without high performance requirements, such as dev/test environments.
- Balanced persistent disks (pd-balanced): Balanced persistent disks provide a balance of cost and performance. Because of this, it’s recommended for general purpose workloads over the more-intensive pd-ssd and pd-extreme options.
- Performance persistent disks (pd-ssd): Performance persistent disks offer a higher tier of performance when compared to pd-balanced, with single-digit millisecond latencies.
- Extreme persistent disks (pd-extreme): The highest level of performance is offered by pd-extreme, which provides the flexibility for fine tuning and provisioning target IOPS. It is recommended for enterprise databases and workloads such as SAP-HANA.
Of these options, only pd-standard is HDD based. The rest are all backed by highly performant SSDs. There are some significant performance differences between the two types.
There is also the difference between zonal and regional disks to take into account. Based on availability and data replication, Google cloud persistent disks can be categorized as either zonal or regional.
- Zonal persistent disks are resilient against hardware failures in the same zone as multiple copies of the replicated data are available in the zone.
- Regional persistent disks offer redundancy against zonal failures as data gets replicated to multiple zones within the region. While zonal disks are suited for workloads that require low-latency single zone data access, regional disks offer higher availability across multiple zones.
4 Common Persistent Disk Volume Operations
In this section we’ll walk you through how to carry out four common operations in Google Cloud Persistent Disk:
- Creating a new persistent disk
- Attaching disk to a machine
- Creating a snapshot
- Copying volumes between regions
How to Create a New Persistent Disk
The following steps will show you how to create a new persistent disk.
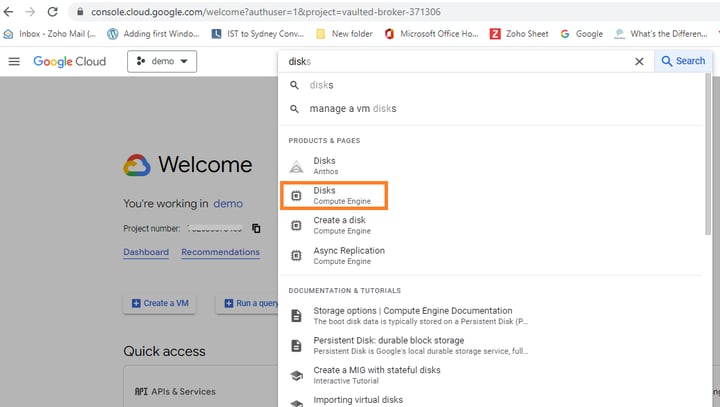
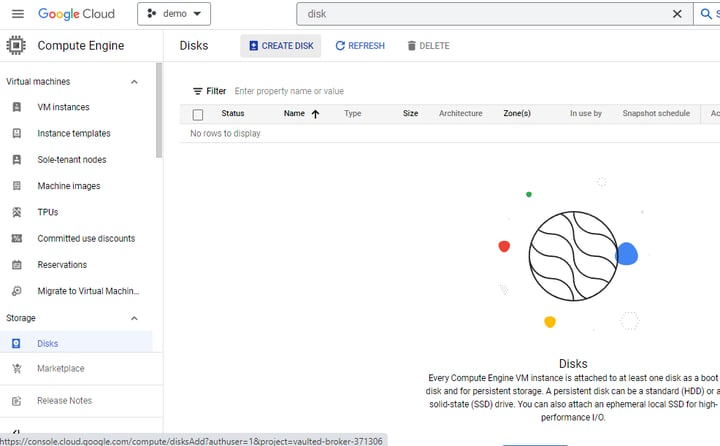
- In the Google Cloud console, search for “Disks” and select the highlighted service.
- Click on “Create disk” on the menu bar.
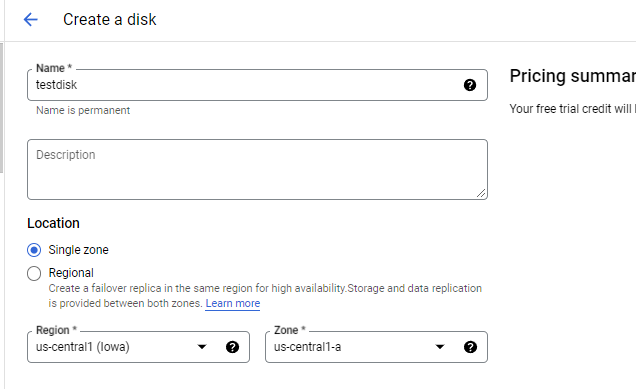
- Provide the name and location of the disk, select whether the disk should be zonal or regional, and choose your target region and zone.
- Next, you’ll scroll down to add Source details.
Since you’re creating a new disk, leave the “Disk source type” field blank. Select a disk type and the size you want to provision for it.
Setting a snapshot schedule is optional, but recommended. To set one up, tick the box to enable a snapshot schedule, then opt either for the default schedule or create a new one.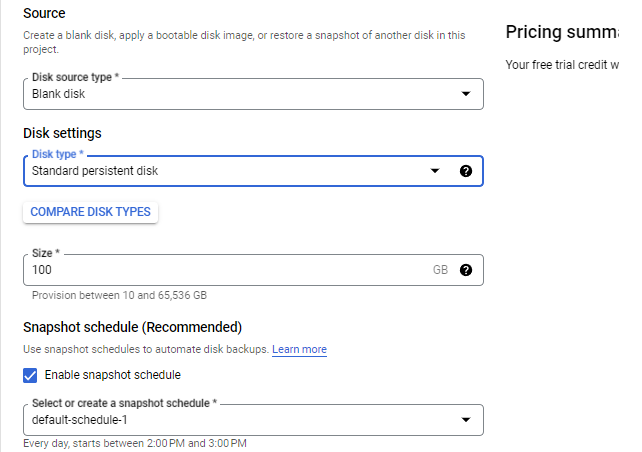
- Scroll down to the Encryption section.
Here, select whether you want to use Google-managed encryption keys, customer-managed encryption keys, or customer-supplied encryption keys.
Any labels that you want to add for management purposes can also be updated here. Click the “+Labels” button to add them.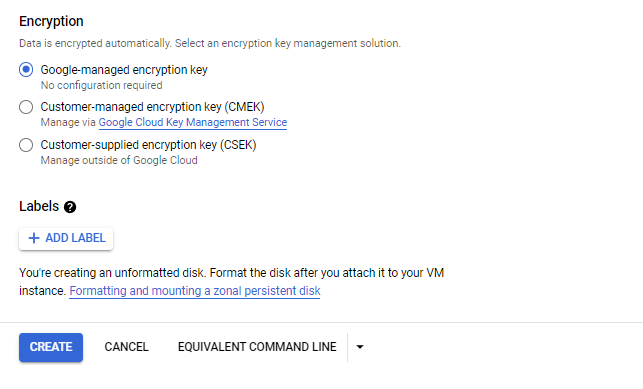
- When you’re done, click the “Create” button and Google will spin up the new disk for you.
How to Attach a Disk to an Existing Virtual Machine
Attaching a disk to an existing virtual machine is a simple, one-step operation.
- Edit the Virtual machine instance and then click on “Attach existing disks” under Additional disks section.
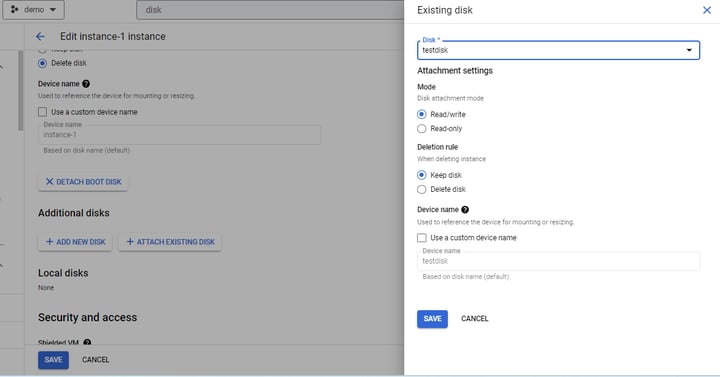
- Now, select an existing disk from the drop-down menu (this can be the disk that you created in the previous section).
- Under “Attachment settings” select a mode (either read/write or read-only) and a deletion rule (either to keep the disk or delete it when an instance is deleted).
- Under “Device name” provide a name to reference the device for mounting it to VM instances.
- When you’re done, click the “Save” button.
How to Create a Persistent Disk Snapshot
In this section we’ll show you how to manually create a snapshot for your disk.
- In the Google Cloud Console, select the disk that you want to create a snapshot for.
- Click the three-dot menu button under “Actions” to expand the menu, and select “Create snapshot.”

- In the “Create a snapshot” window, provide a name for the snapshot.
- Under “Type,” you’ll need to know what the primary reason for the snapshot is. For backup and DR purposes choose the “Snapshot” type. For long-term retention and archival purposes, “Archive snapshot” is more cost effective.
- Under “Location,” decide if you want your snapshot to be stored in a single or multiple regions. Choose a multi-regional if you want to use the snapshot across different regions for disaster recovery purposes.
When you’re done, click the “Create” button.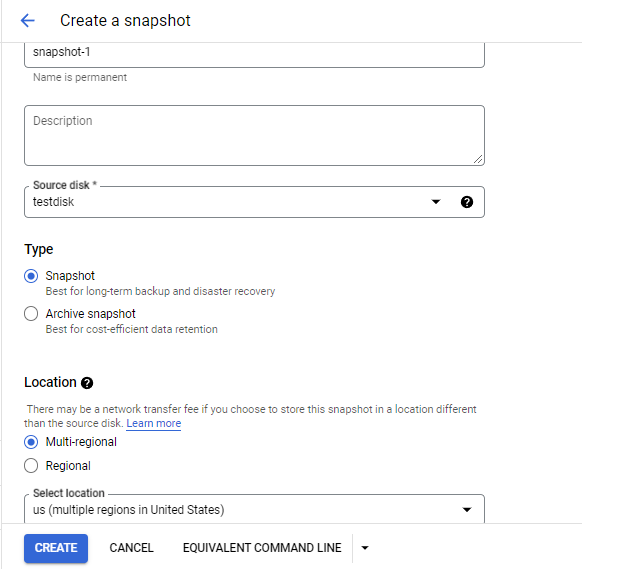
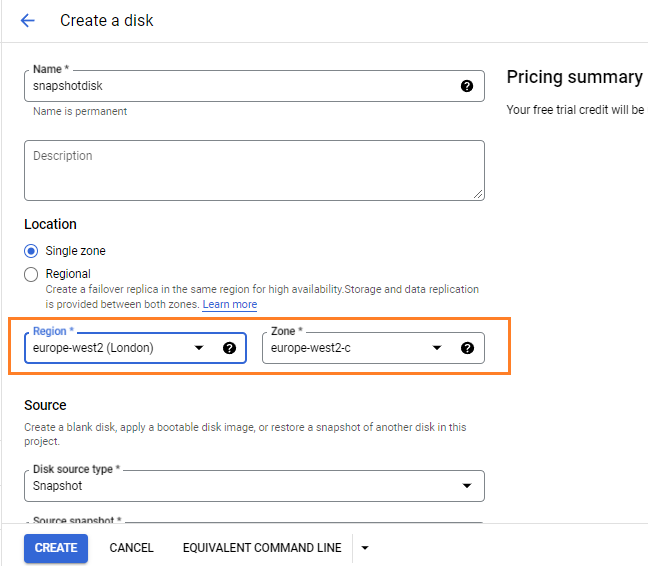
How to Copy Persistent Disks Between Regions
This section will show you how to copy persistent disks between regions.
As a prerequisite for this operation, you’ll need to have a disk in hand and a multi-regional snapshot for it. How to create both of these is explained in the previous two sections. Once you have a disk and multi-regional snapshot, you can use that snapshot to create a new disk in a different region. In effect, this helps copy the data of the disk to a different region. Let’s see how to do it.
- Select the multi-regional snapshot and then click on its “CREATE DISK” menu option.
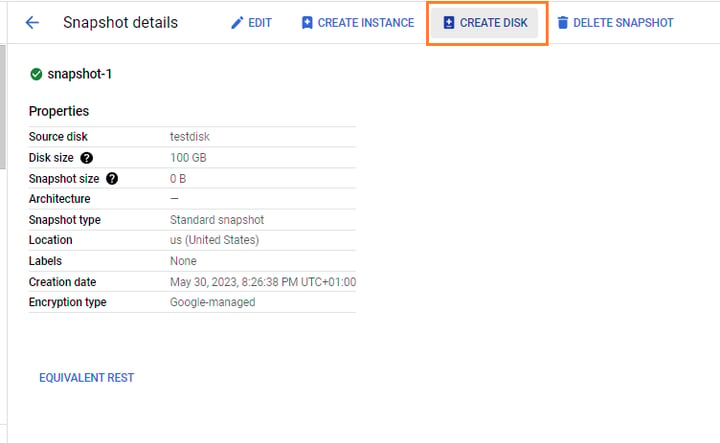
- In the “Create a disk” window, name the disk and the region where you want to create the disk. Note that in this example, we have created a new disk in the Europe region using the snapshot copy of a disk originally created in the US cloud region.
- When you’re done, click the “Create” button. Your new volume has been created in the new region, effectively copying it from one region to another.
4 Lesser-Known Persistent Disk Functions
Now that we’ve covered the basic operations of Google Cloud persistent disks, let’s explore some of the other advanced capabilities of the service that could come in handy in day-to-day operations.
Improving Your Persistent Disk’s Performance
Your disk’s performance is based on a number of factors, from the type of disk in use and the disk size, to the type of VM it is attached to and its associated limitations. While selecting the disk type, consider the maximum IOPS and throughput that can be delivered by the disk and ensure that it matches your application requirements.
Since performance also depends on the vCPU, attaching the disk to virtual machines with higher numbers of vCPUs can help improve your performance. Each VM type also has an associated network egress cap that can impact overall disk performance. Disk write operations are allocated a maximum of 60% of the maximum egress bandwidth (Gbps), and you need to consider this for disk performance optimization.
Single persistent disks can be sized up to 64 TB, and logical volumes can be a maximum of 257 TB. However, with volume sizes that large, disk operations such as mounting and snapshotting can be slower.
You can also find out more about disk performance in this post on provisioned IOPS for persistent disks.
Increasing Disk Size While the Disk Is in Use
You can increase the size of the disk without causing any downtime for the attached virtual machine. This might be relevant in scenarios where your disk size requirements have changed since your disk was first provisioned.
The ability to increase the disk size while it is being used offers flexibility to start with a smaller disk size and change configurations as your application usage increases. This helps you use the elasticity of the cloud and only pay for necessary resources at any given time.
To see how to resize a disk in use, check out our post How To Resize a Google Cloud Persistent Disk Attached to a Linux Instance.
Cloud Monitoring for Persistent Disk Volumes
Google Cloud Monitoring offers several out-of-the-box metrics for proactive monitoring of persistent disks to identify issues and optimize usage. You can monitor some common metrics such as disk throughput, IOPS, disk space usage, latency, queue length, idle time, and more.
These metrics are readily available in the metrics explorer of Cloud Monitoring. Via Cloud Monitoring, you can choose to create custom dashboards, create alerts, or visualize the performance/usage trends of the disk over time. Based on performance and usage patterns that Cloud Monitoring identifies, you can optimize your disk configuration to get even better results from your deployment.
Share Persistent Disks Between VMs
Persistent Disk allows disks to be shared between two virtual machines. Disks can be connected in a multi-writer mode so that both machines can read/write from the disks. This is achieved by setting the “multiwriter” property while creating the virtual machine.
Sharing persistent disks becomes useful in scenarios where you need to create a large, distributed, and highly available storage system. This would require the use of a scale out software to be configured so that the disk access from multiple VMs can be managed effectively. This feature is currently in pre-GA and supported only for N2 machine types with SSD persistent disks. The service is also available only in select regions.
Shared disks can offer lower IOPs when compared to normal disks and they cannot be resized. The disks require a minimum size of 10 GB and can be attached to only two VMs. There are additional limitations as well that you should consider before using shared disks. For example, you can’t take snapshots of the disks or use the default monitoring metrics. For some users, that won’t be an acceptable trade off, so it’s important to understand your deployment before you try this feature.
Boost Your Persistent Disks with Cloud Volumes ONTAP
Cloud Volumes ONTAP offers advanced data management capabilities of NetApp’s signature ONTAP software for use in Google Cloud, as well as AWS and Azure. It enhances the Google Cloud persistent disks being used in the backend with storage efficiency features to reduce costs, higher levels of data protection, and enhanced storage performance.
One particularly relevant feature is the NetApp Snapshot™ technology Cloud Volumes ONTAP uses to protect data. These copies are more effective than native snapshots since they leverage pointers instead of creating full copies of the data. That makes the process of creating snapshot copies and restoring them much faster.
Infrequently used data can be automatically transferred to a less-expensive storage tier using Cloud Volumes ONTAP data tiering.
Learn More About Google Cloud Persistent Disk and Cloud Volumes ONTAP
Together, Google Cloud Persistent Disk and Cloud Volumes ONTAP can provide better value by providing the finest storage service, performance, data protection and centralized management.
Read through this collection of case studies on enterprise deployment on Google Cloud using Cloud Volumes ONTAP to learn more.

