More about Google Cloud Backup
- Google Cloud Disaster Recovery and Data Protection with Cloud Volumes ONTAP
- Google Cloud Storage Retention Policy: A How-To Guide
- Google Cloud Automatic Backup: How to Use Schedules to Back Up Persistent Disks
- Google Cloud Compute Engine Snapshots: A How-To Guide
- Google Cloud Snapshot: Data Backup and Restoration
- Google Cloud Backup: Making the Most of Google’s Storage Tiers
Subscribe to our blog
Thanks for subscribing to the blog.
February 11, 2020
Topics: Cloud Volumes ONTAP Data ProtectionGoogle CloudBackup and ArchiveAdvanced9 minute readSnapshots
One of the first services people get acquainted with in Google Cloud Platform is Compute Engine. The service enables customers to deploy and manage Google Cloud Instances, or simply virtual machine instances, and is the cornerstone of computing in Google Cloud. But what kind of Google Cloud backup policies does using this service involve?
The storage for each virtual machine is provided by an individual Google Cloud Persistent Disk. This happens under the hood, but the word persistent is often a cause of confusion among people new to the public cloud. After all, when you terminate an instance, its storage disk is also automatically deleted by default, right? While the deletion default behavior can be changed to retain the persistent disk, one option often preferred for quick and periodic backups of a disk is a Google Cloud Snapshot.
There are different options for storage in Google Cloud, including using it in conjunction with Cloud Volumes ONTAP. Cloud Volumes ONTAP can provide additional backup capabilities for your Google Cloud instance, but it is important to understand how the native snapshot feature of persistent disks works.
In this post, we will take a look at how we can create and restore a snapshot of a Persistent Disk associated with a Google Cloud Instance.
What Are Snapshots?
Snapshot technology is designed to quickly capture the exact state of the virtual machine disk at a specific point in time. Having such a copy enables the user to quickly recover lost data or make data available to other machines by restoring from a snapshot should something change or damage the original.
The concept of snapshot copies existed long before the public cloud was created—for anyone who’s used virtual machine technology the term should be quite familiar.
Snapshots Vs. Backup
Since snapshot can be generated in a very short amount of time, they are often used to create quick backups of virtual machines. While this is quite an acceptable practice, it is important to understand the limitations inherent to snapshots.
How do snapshots work? While the snapshot can indeed provide the disk state at a given time, the reason for its fast creation process is due to the fact that a snapshot does not contain all the instance disk data. Since an instance is deployed from a baseline image (e.g. Debian 9), a snapshot is merely a delta file between that base image and any changes that occurred in the disk. Therefore, if the base image is lost, removed or accidently deleted, the snapshots are rendered practically useless.
To produce a more complete and stateful backup, you can generate a Virtual Image from a Google Cloud Instance. The tradeoff is that the time required for that process is often substantially longer and that the instance should be stopped beforehand to avoid data corruption. Because of this, Google Cloud Snapshots are usually a more appealing method for quick and short-term period backups (e.g. daily), and Images for mid or long-term backups (e.g. weekly or monthly).
Steps to Create and Use Snapshots with Google Cloud Compute Engine
To create your snapshot using Google Cloud Compute Engine, follow the instructions below.
1. Start by creating a Google Cloud Instance in Compute Engine. If you haven’t done that before, learn how to create a Google Cloud instance here.
2. With the instance up and running, you can initiate a browser-interactive SSH connection with the instance using the “SSH” button in the VM instance list.
 VM Instance list and the SSH connection option.
3. A browser-interactive SSH session will start in a new window. Since we are using a newly deployed instance, its contents are still the same as the default Debian 9 virtual machine base image. We are going to introduce some random changes to it, e.g. creating new files (file1.txt, file2.txt and file3.txt) and a new directory (mydirectory).
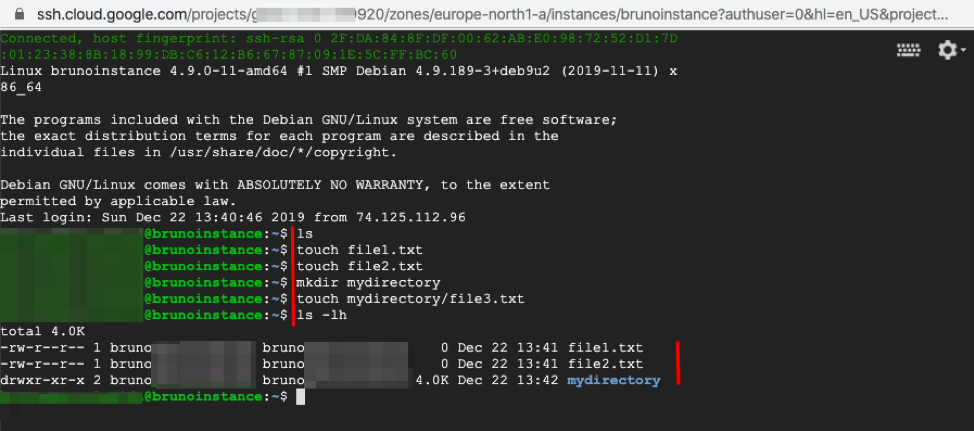 Browser-interactive SSH session and creation of new files and directory.
Creating a Snapshot from a GCP Instance
1. In the Google Cloud Platform Console, navigate to the Snapshots panel in the left-hand menu. Initiate the snapshot creation process by clicking the button “Create snapshot”.
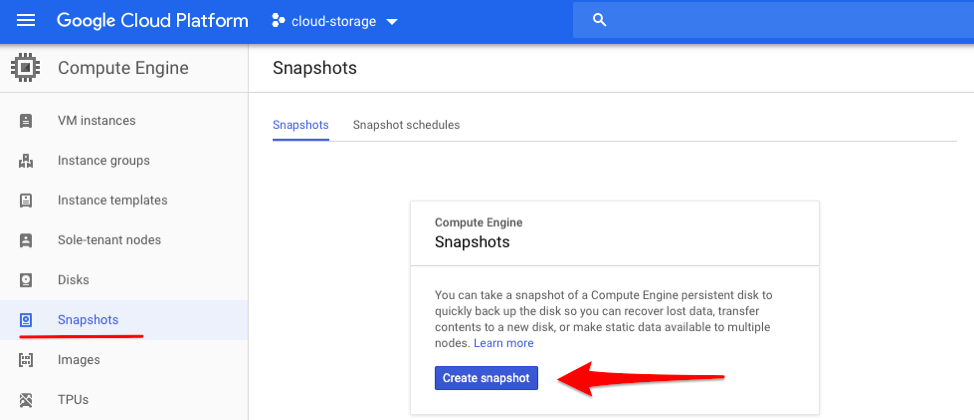 Snapshots panel.
2. To create a snapshot, you need to provide a descriptive name (e.g., brunoinstance-snapshot-1) and select the source disk. In this example the source disk will be “brunoinstance,” the one associated with the running instance we deployed. Click “Create” to initiate the process.
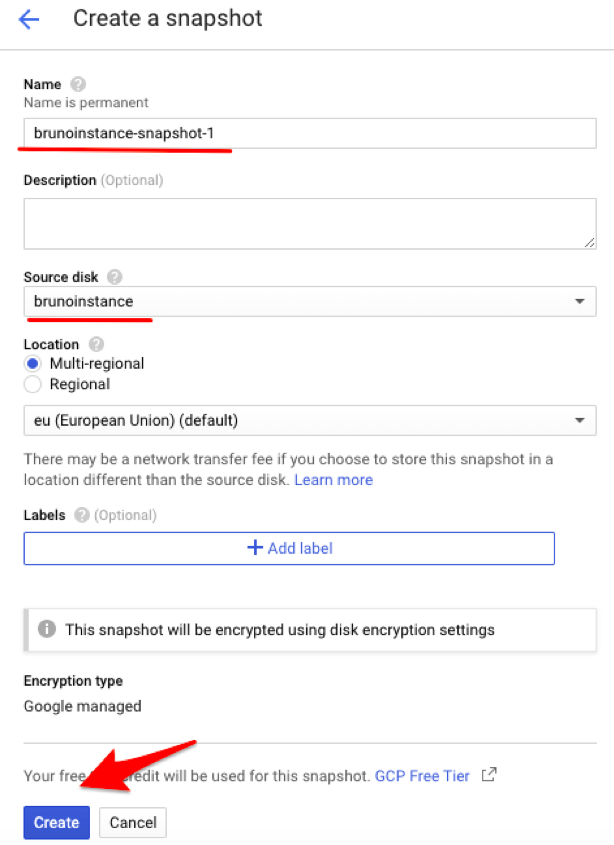 Snapshot creation dialog screen.
3. Upon completion, you will be redirected to the snapshot list page. The newly created snapshot will be visible and available in the list.
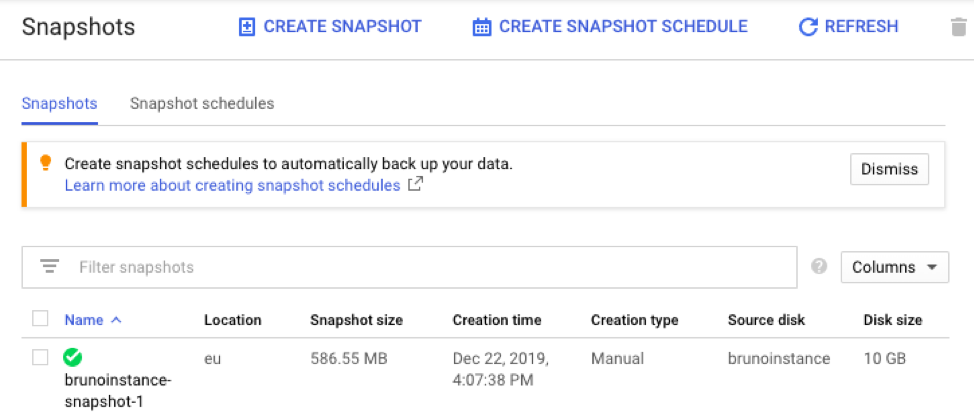 Snapshot list panel.
Introducing Additional Changes to the Instance
At this point, you might want to make some additional changes to your instance to verify that the snapshot you generated won’t include these post modifications.
1. Head back to the browser-interactive SSH session you opened previously or initiate a new one if necessary.
2. While any change to the instance is perfectly OK to demonstrate that the snapshot will not reflect new changes, as an example, you can create additional files (file100.txt and file200.txt) and remove existing files and directories (file1.txt and mydirectory).
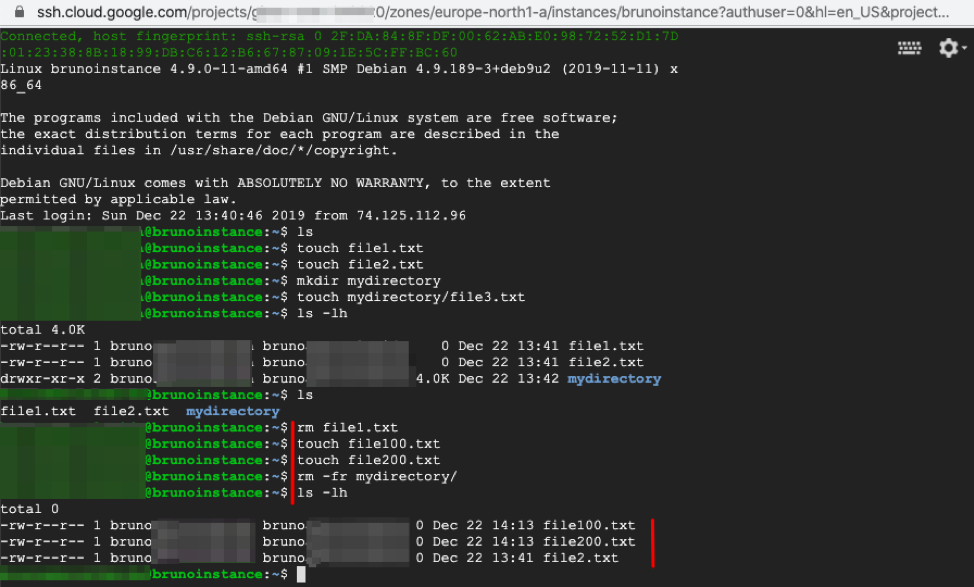 Making additional changes to the instance.
Restore a Snapshot to a New Instance or Persistent Disk
A snapshot can be restored in two distinct ways: to a new instance or to a new persistent disk. However, it can’t be restored to an existing persistent disk to ensure data integrity.
While restoring a snapshot to a new instance is the most straightforward way (similar to deploying a new instance from an image), it is often the case where the snapshot content is needed in an existing running instance.
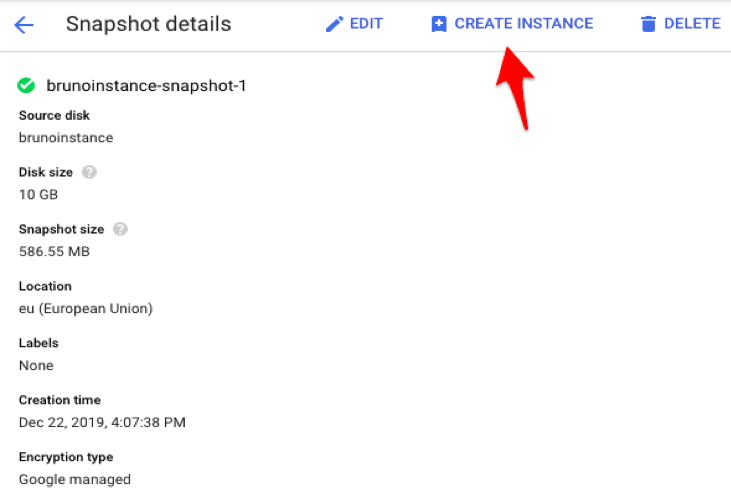 Deploy a new instance from Snapshot action.
If you require that data in an existing instance, the only course of action is to restore the snapshot to a new persistent disk and then attach it to the running instance. While slightly more complex, this process is worth learning, so below we are going to restore our snapshot to a new persistent disk and make it available in our instance.
1. Navigate to the Disks section on the left-hand panel and create a new disk by clicking the “Create Disk” option.
 Persistent Disk panel and options.
2. Provide a name for this disk (e.g. brunoinstance-restoredfromsnapshot), select the same region where your instance is located and the snapshot source (e.g. brunoinstance-snapshot-1).
3. Click “Create” at the end of the page to initiate the restore process.
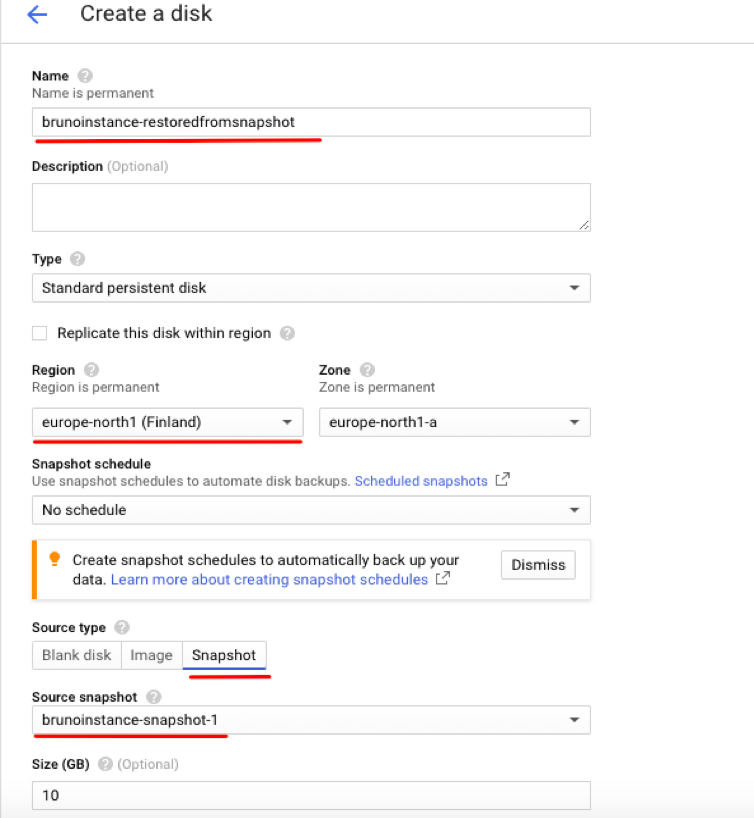 Create a new Persistent Disk dialogue.
4. Upon successful snapshot restoration you will be redirected to the persistent disk list. The newly created disk—which contains the snapshot data—will now appear and be listed as available.
 Persistent Disk list.
5. The newly created disk will now need to be attached to the instance. Navigate to the VM Instances panel, enter the details section of the running instance, and click “Edit”.
 VM instance details and edit section.
6. Within the instance edit page, find the “Additional disks” section and select “Attach existing disk.”
 Additional disks section.
7. The disk you created from the snapshot restoration will be available in the dropdown list. Select it, keeping the remaining settings as per default, then click “Done”.
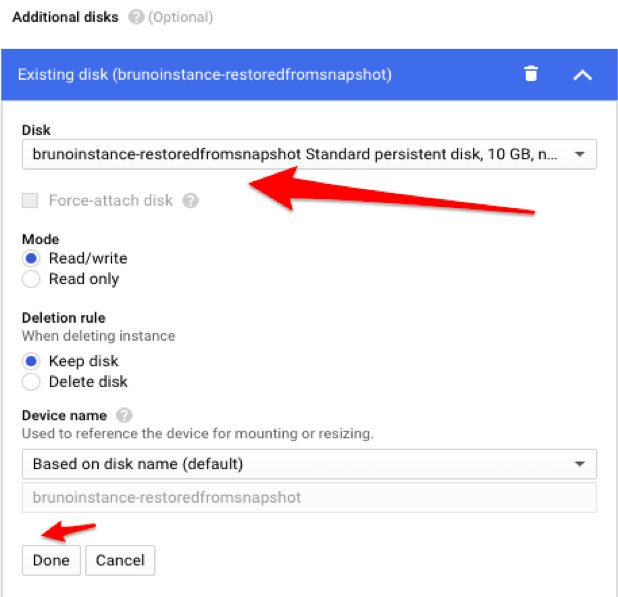 Attaching an existing disk option in the instance edit dialogue.
8. To make the changes effective, click “Save” at the end of the instance edit page.
9. Head back to the browser-interactive SSH session you had open previously or initiate a new one if necessary. Use the command sudo -i to gain full administrator privileges in the instance, since the following commands required additional permissions.
In some operative systems the new disk (/dev/sdb) will be automatically detected and visible when you issue the command fdisk -l. If that is not the case, you can force a rescan in Linux by using the command echo "- - -" > /sys/class/scsi_host/host0/scan and then verify the new disk appearing in the command fdisk -l.
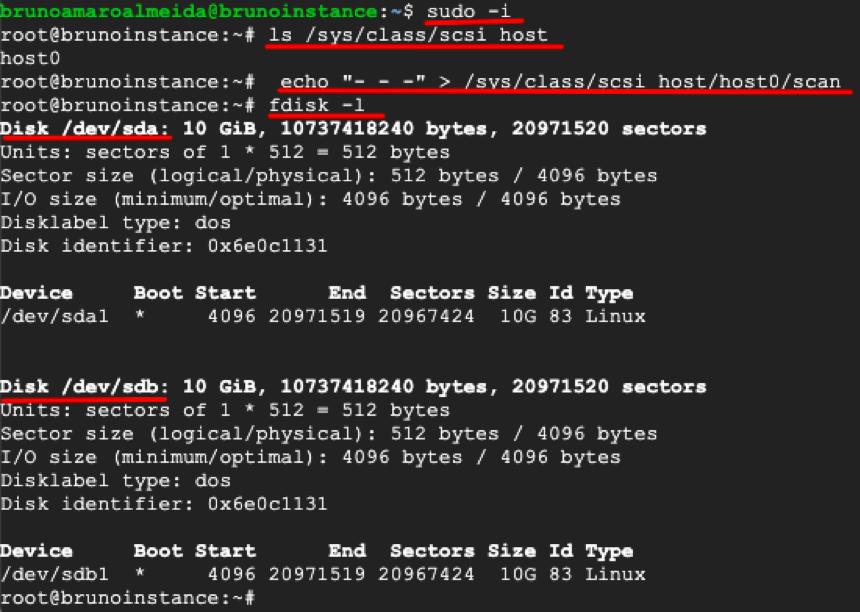 Scanning for new disks on Linux.
10. With the new disk available, you can mount it in the local filesystem in a directory of your choice using the commands mkdir /restored-snapshot (to create a directory) and mount /dev/sdb1 /restored-snapshot (to effectively mount it).
11. Browsing the contents of the disk, you can verify that the data available is the one from the instance in the moment the snapshot was generated.
 Mounting the new disk and accessing its files.
Conclusion
The snapshot capability is a great feature that enables the possibility for quick backups without disrupting the instance lifecycle. If you are using Google Cloud Compute Engine Instances, this is something you can quickly leverage while architecting your system to prevent data loss as a result of a critical operation gone wrong.
As we covered in the step-by-step, it is a simple and effective method that draws many similarities with Google Cloud Compute Engine Images. It is important to know how to use both and especially to know in which circumstances to use one over the other.

