Share
What is Azure Migration?
Microsoft Azure offers a variety of cloud services hosted on a global network of data centers. Organizations can leverage Azure services to build, deploy, and manage applications at scale.
Azure migration can help organizations keep their assets secure, optimize costs, and achieve resilience. Azure managed services can help reduce operational overheads and free up time for development and operations teams.
To ensure Azure migration is successful, organizations should leverage proven approaches and strategies. Microsoft offers a structured step-by-step process for migrating workloads to Azure, with automated tools and guidance created especially for migration projects.
In this article, you will learn:
4 Steps to a Successful Azure Migration
Embarking on a migration to Azure entails a strategic 4-step process:
- Discover and Evaluate: Initially, identify the databases and applications that are suitable and ready for migration. Evaluate the potential benefits and challenges associated with their transition to Azure.
- Migrate: Use the Azure Migrate or the Auzre Database Migration Service within the Portal to automatically migrate your workloads.
- Optimize: Post-migration, it's crucial to optimize your databases and applications to leverage Azure's capabilities fully. This step includes scaling resources, reducing costs, and enhancing performance for optimal efficiency.
- Monitor: Continuous monitoring is vital post-migration. Azure provides comprehensive tools to monitor the health, performance, and usage of your databases and applications, thus ensuring smooth operations in the Azure environment.
1. Discover and Evaluate
Before starting your migration, perform the following steps:
- Start with a comprehensive assessment of your current environment.
- Decide which servers, applications, and services to migrate.
- Engage the IT and business teams that use these services. By bringing these teams into the process as soon as possible, you can ensure they can offer migration guidance, feedback, and support.
- Create a full inventory and dependency map of the servers and services you want to migrate. These will help you determine how services communicate with each other. Modern businesses may have hundreds of applications deployed, and each application should be thoroughly researched before migration.
Here are the primary migration options for each application. You should assess each application to determine which option is best for each use case.
- Rehost—re-create your existing infrastructure in Azure. If you choose this method, the work will be minimal as only minor changes are required. This usually involves moving a virtual machine (VM) from a datacenter to a VM in Azure. This option is also known as the lift and shift approach.
- Refactor—migrate services running on VMs to a Platform-as-a-Service (PaaS) environment. This approach can reduce operational overhead, improve release agility, and keep costs low. Implementing small changes to ensure everything runs more efficiently in the cloud can significantly improve performance.
- Re-architect—some systems may need to be re-architected for migration. This is typically done to make an application cloud-native, or when adopting new software approaches like containers and microservices.
- Rebuild—if the cost of re-architecting your software is higher than starting from scratch, you may want to rebuild your application.
- Replace—in some cases, it might pay off to replace existing custom-built applications with third-party solutions. Before refactoring, re-architecting, or rebuilding your software, you should evaluate available software as a service (SaaS) that can offer alternative solutions.
Learn more in our detailed guide to Azure migration strategy
Estimate Cost Savings
Reducing costs is often a benefit and an objective of organizations migrating to Azure. Migrating to the cloud can reduce costs compared to setting up and running on-premises infrastructure. However, this is not guaranteed, and requires building a business case in advance of migration.
After completing the first assessment, use Azure's Total Cost of Ownership (TCO) calculator to estimate the actual cost of hosting your project on Azure. You can factor into the cost estimation the organization's long-term financial goals. Compare TCO in Azure to the expected cost of running the same workloads on-premises—including indirect costs like manpower, hardware maintenance and replacement costs.
Azure Migrate
Azure Migrate provides a central platform for evaluating and migrating applications and data to Azure infrastructure. Azure Migrate can:
- Assess if your on-premises servers are ready for migration to Azure.
- Estimate the size of Azure VM required for your workloads, the recommended Azure SQL configuration, or the number of Azure VMware Solution nodes after migration.
- Estimate the cost of running an existing local server in Azure.
- Determine cross-server dependencies and optimization strategies for moving interdependent servers to Azure.
Dependency analysis is important for several reasons:
- Allows you to group servers for a more accurate evaluation.
- Lets you decide which servers you need to migrate together. This is especially useful if you do not know which servers are part of a specific application designated for migration.
- Lets you determine whether servers are in use and which ones can be safely decommissioned instead of migrated.
- Enables analysis of dependencies to make sure nothing is left behind. This can help you avoid sudden outages after migration.
Learn more in our detailed guides to:
2. Migrate
Deploy Cloud Infrastructure Targets
After performing discovery and evaluation, you’ll need to identify target systems and services in Azure.
If you are migrating existing VMware systems and relational databases, there is no need to create resources in Azure beforehand—Azure Migrate and Azure Database Migration Service can create the necessary Azure resources. For other workloads, you will need to set up Azure resources and then migrate your on-premises servers to them.
Migrate Workloads
Ideally, you should start with smaller migrations rather than larger mission-critical workloads. This method can help you learn and try out the tools, processes, and procedures used for migration. Additionally, by starting small you can reduce risks when later migrating your larger workloads.
The following table provides general steps for migrating different types of resources to Azure.
|
Migration Steps for VMware Resources |
Migration Steps for Databases |
Migration Steps for Other Resources |
Learn more in our detailed guide to migrating from VMware to Azure |
Learn more in our detailed guide to migrating databases to Azure
|
Learn more in our Azure migration checklist |
3. Optimize
The next stage, after migrating your services to Azure, includes a review of the implementation. During this phase you look for possible optimization areas. Below we explain two important optimizations: right-sizing resources in Azure and optimizing costs.
Right-size Assets
Azure services that offer a consumption-based cost model can be resized via the Azure portal, through PowerShell, or by using the Azure CLI. To correctly size a service, you first need to review its usage metrics.
You can find metrics data in Azure Monitor. This service lets you configure metrics collection for each analyzed service. The service then collects meaningful data based on workload patterns, gathered across a relevant period of time. Here is how to use Azure Monitor:
- Go to Monitor.
- Choose the Metrics option and set up your chart to display the metrics for the monitored service.
Cost Management
Performing ongoing cost analysis and review can help you achieve a balance between workload demands and costs. Azure offers several tools that can help you manage costs:
- Cost analysis—lets you track usage of Azure resources and lets you manage costs across Azure and other clouds.
- Cost alerts—lets you set up alerts and get notified when Azure resources exceed preset budget.
- Budgets—lets you set policies for cost management and improve accountability for different departments using the Azure cloud.
- Azure Advisor—identifies underutilized and idle resources, and provides recommendations for optimizing costs, reducing waste and improving efficiency.
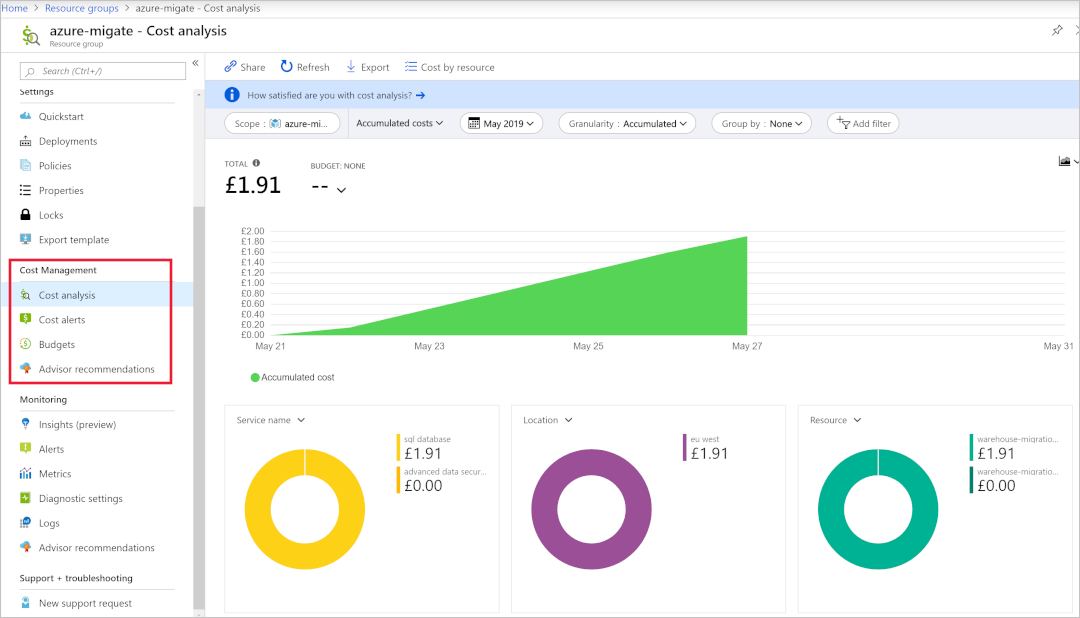 Image Source: Azure
To get specific recommendations for cost savings:
- In the Azure Portal, select the Cost Management + Billing option.
- Select Advisor recommendations and switch to the Costs tab.
- Review the Potential yearly savings and Impact areas to understand the financial impact of applying optimizations.
- Click the Costs tab in the Advisor to get specific cost saving recommendations.
4. Monitor
Once you have successfully migrated to Azure, you need to monitor the performance and health of your workloads. You can do this using Azure Monitor.
To capture information from your Azure VMs, you need to install the Log Analytics agent, which supports both Linux and Windows VMs. Once the agent is installed, you can set up reporting and alerting processes.
Azure Monitor lets you set up alerts for a variety of data sources, including health metrics, specific metric values like CPU usage, autoscale metrics, and specific strings from log files.
To set up visibility and event logging for security events, you can use Azure Sentinel. This service offers Azure-native security information and event-management (SIEM) features.
Azure Sentinel provides artificial intelligence (AI) capabilities for detecting, protecting against, and responding to security events. Your security team can use this information to triage alerts and prioritize incident response.
Azure Migration with Cloud Volumes ONTAP
NetApp Cloud Volumes ONTAP, the leading enterprise-grade storage management solution, delivers secure, proven storage management services on AWS, Azure and Google Cloud. Cloud Volumes ONTAP capacity can scale into the petabytes, and it supports various use cases such as file services, databases, DevOps or any other enterprise workload, with a strong set of features including high availability, data protection, storage efficiencies, Kubernetes integration, and more.
In particular, Cloud Volumes ONTAP assists with lift and shift cloud migration. NetApp’s data replication tools SnapMirror® and Cloud Sync service will get your data to the cloud.
Learn more about how Cloud Volumes ONTAP helps to address the challenges of cloud migration in these Cloud Migration Case Studies.

