More about Azure Migration
- Application Migration to Azure: 4 Approaches and One Migration Tool
- Azure Cloud Adoption Framework: The 9 Methodologies Explained
- 3 Ways to Create an Azure Migrate Project
- Azure Migration Step by Step: Discover, Migrate, Optimize, and Monitor
- Migrate SQL Server to Azure: Options, Tools, and a Quick Tutorial
- Migrate Databases to Azure: 3 Quick Tutorials
- 4 Ways to Migrate SQL to Azure
- Azure Migration Program: 4 Key Elements
- Azure Migrate: Key Components and a 4-Step Migration Plan
- 5 Azure Data Migration Tools You Should Be Using
- Azure Migration Tools: One-Click Migration for VMs and Data
- Azure vs AWS Pricing: A Quick Comparison
- How to Upload Files to Azure Blob Storage with AzCopy, PowerShell, and More
- Azure Managed Service Provider: How to Save Time and Reduce Cloud Overhead
- Azure Case Studies with Cloud Volumes ONTAP
- Azure Migration Strategy: Four Steps to the Cloud
- 11-Step Azure Migration Checklist
- Azure Migration: The Keys to a Successful Enterprise Migration to Azure
- Moving Clouds: Migration from AWS to Azure and Azure to AWS
- Azure Storage Replication with SnapMirror
Subscribe to our blog
Thanks for subscribing to the blog.
August 8, 2021
Topics: Cloud Volumes ONTAP AzureData MigrationDatabaseElementary6 minute read
How Do You Migrate Databases to Azure?
Azure provides several options for migrating databases from an on-premises data center or other cloud providers.
If you are running a relational database, you can perform Azure migration automatically using the free Database Migration Service (DMS). For non-relational databases, typically the process will involve exporting your existing data and importing it to Azure’s managed NoSQL database service, Cosmos DB.
For SAP databases, you will need to use SAP’s migration capabilities, which are integrated with Azure. There are two primary options - classical migration using SAP Software Provisioning Manager (SWPM), and SAP Database Migration Option (DMO).
In this article, you will learn:
- Migrating Relational Databases with Azure Database Migration Service
- Migrating NoSQL Databases to Azure
- Migrating SAP Databases to Azure
- Azure Database Migration with Cloud Volumes ONTAP
Migrating Relational Databases with Azure Database Migration Service
The Azure Database Migration Service (DMS) is an automated migration system that lets you move relational databases to destinations in Azure including:
- Single Azure SQL Database instance
- Azure SQL Database managed instance
- SQL Server running on an Azure VM
- Azure Database for MySQL
- Azure Database for PostgreSQL
- Azure Cosmos DB
DMS supports two types of migrations:
- Offline migrations—the application experiences downtime as soon as migration starts
- Online migrations—the existing database is synchronized with the new database in Azure, to minimize downtime
For both types of migrations, DMS has several prerequisites, including downloading the Data Migration Assistant to the machine running your database, creating a Virtual Network, configuring security groups and credentials on Azure, and provisioning your target database. Read more about these requirements in the Azure documentation.
Related content: read our guide to Azure migration tools
Quick Tutorial: Migrating an On-Premises Database with DMS
Step 1: Assess the on-premises database
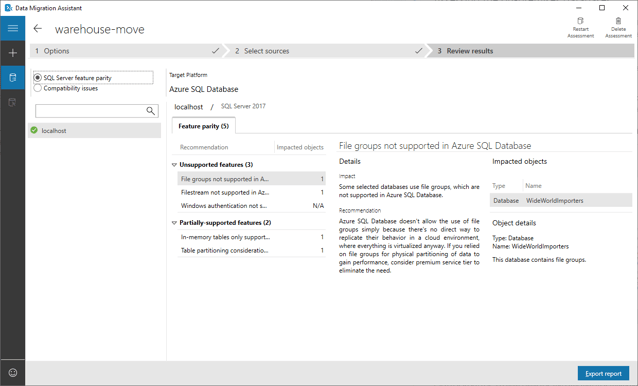
Start the Data Migration Assistant, create an Assessment project, and select the source and target servers. Choose the database you want to migrate and generate an assessment. This will include recommendations, including compatibility issues you need to address before migration. Fix the issues and rerun the report to ensure all issues are addressed.
 Image Source: Azure
Step 2: Migrate database schema
With DMS, you migrate the database schema before migrating all the data. This creates an empty database structure in Azure that matches your on-premises database and validates connectivity before a full migration.
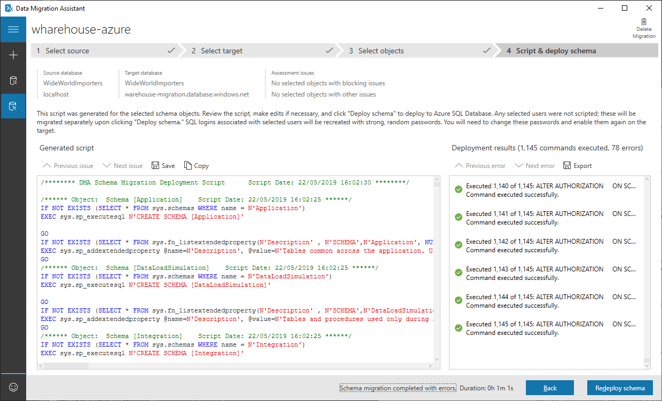
To do this, create a Migration project, select your on-premises database, and the target server on Azure. Under migration scope, select Schema Only, and choose which schema objects you want to migrate. DMS creates a migration script—click Deploy Schema to run the script. When schema migration completes, check the Azure database server to see it is configured correctly.

Image Source: Azure
Step 3: Migrate your Data with Database Migration Service
Previously, we used the Data Migration Assistant deployed locally on the on-premises server. To perform the full migration, create an instance of Azure Data Database Migration Service using the Azure portal, and indicate whether you need an online or offline migration (this affects pricing).
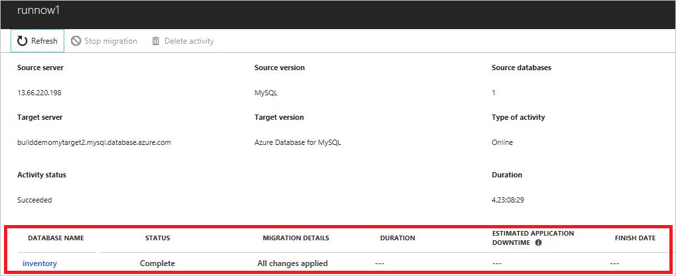
Create a new migration project, specify details of the source and target server, including authentication credentials. Map the relevant schema objects on the source server to the target server. Click the Run migration button and track the progress of your migration on the Migration Activity screen.
 Image Source: Azure
Once migration completes, make sure the target database on Azure is running and working properly, and decommission your on-premises database.
Related content: read our guide to Azure Database Migration Service (DMS)
Migrating NoSQL Databases to Azure
Cosmos DB is Azure’s NoSQL database service. It provides several APIs compatible with popular NoSQL database engines. This lets you migrate existing NoSQL databases into CosmosDB with minimal changes:
- Cassandra API—supports the Cassandra Query Language (CQL), Cassandra drivers, and Cassandra tools.
- MongoDB API—compatible with MongoDB wire protocol version 3.6 (at the time of this writing).
- Gremlin API—supports graph queries and scenarios involving dynamic data or complex relations. Enables use of the Gremlin database ecosystem of tools and extensions.
- Table API—supports a simple key/value format, used by Azure Table Storage.
Related content: read our guide to Azure NoSQL
Quick Tutorial: Cassandra Migration to Cosmos DB
Step 1: Create Cosmos DB Cassandra database
Create a new resource in the Azure portal, select a Cosmos DB account, and choose the Cassandra API. Create a new Azure Virtual Network or select an existing one, and set firewall rules to allow access.
Step 2: Create the required tables
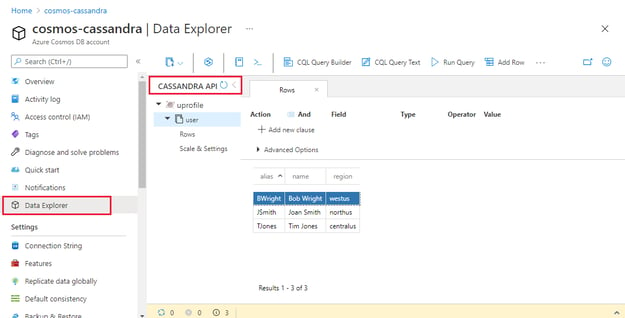
This step involves the use of Azure Data Explorer. In your Cosmos DB account, click Data Explorer, then select New Table. Specify a schema name, table name, and list of columns matching the table in your existing database, and choose a required throughput for the table. Repeat for all tables you want to import.
 Source: Azure
Step 3: Export data from existing Cassandra database
This step relies on CQLSH, a command-line tool that runs Cassandra Query Language (CQL) commands. The Azure Cosmos DB Cassandra API supports CQLSH.
Run Azure Cloud Shell and connect to your local Cassandra database using SSH. Start CQLSH, providing the username and password for your database, and run these commands to export each of your Cassandra tables:
COPY <keyspace name>.<table name>
TO '<filename>.csv';
Step 4: Import the data to Cosmos DB
For each table you want to import, access your Cosmos DB account in the Azure portal. Select Settings > Connection String and copy your Primary Connection String. Use it to connect to your Cassandra database in Cosmos DB via CQLSH.
Now, for each table you want to import, use this command:
COPY <keyspace>.<table> FROM <table and data name>
Migrating SAP Databases to Azure
There are two main options for migrating SAP databases to Azure:
- Classical migration—this uses the SAP Software Provisioning Manager (SWPM), which exports data from the source system and imports it into the target system, using a file-based migration method. After migration, at a second stage this method can upgrade the source database. The target system can be SQL Server, Oracle or DB2.
- SAP Database Migration Option (DMO)—this enables upgrades and migrations for SAP HANA databases. It performs migration and update of the source database in one step.
Quick Tutorial: Migrating SAP HANA to Azure Using Data Migration Option (DMO)
Follow these steps to migrate a SAP HANA database to Azure and upgrade it to the latest version:
- Connect to Azure via a private connection (Express Route) or VPN.
- Provision the target SAP HANA database in Azure—you can do this quickly using predefined Azure Resource Manager (ARM) templates.
- Run Software Update Manager (SUM) on the existing SAP application server. SUM creates a “shadow repository” with an export of your data for migration.
- The SAP application server automatically transfers database export files to Azure via Express Route or VPN.
For the final stage, there are two options for transferring data:
- Sequential Data Transfer—all tables are exported to file system. The complete directory is transferred to the target server in Azure, SUM is started on the target server, starts the import, and when done, performs post-processing.
- Parallel Data Transfer—data is immediately transferred once export is completed for each database file. This can minimize migration downtime.
Azure Database Migration with Cloud Volumes ONTAP
NetApp Cloud Volumes ONTAP, the leading enterprise-grade storage management solution, delivers secure, proven storage management services on AWS, Azure and Google Cloud. Cloud Volumes ONTAP capacity can scale into the petabytes, and it supports various use cases such as file services, databases, DevOps or any other enterprise workload, with a strong set of features including high availability, data protection, storage efficiencies, Kubernetes integration, and more.
In particular, Cloud Volumes ONTAP assists with lift and shift cloud migration. NetApp’s data replication tools SnapMirror® and Cloud Sync service will get your data to the cloud.
Learn more about how Cloud Volumes ONTAP helps to address the challenges of cloud migration in these Cloud Migration Case Studies.

