Subscribe to our blog
Thanks for subscribing to the blog.
August 29, 2021
Topics: Cloud Volumes ONTAP Google CloudDisaster RecoveryAdvanced8 minute read
With the vast majority of organizations relying on digital solutions to conduct their businesses, it is important to have a proper disaster recovery (DR) strategy in place.
Establishing a DR deployment for a mission-critical system is always a challenging engineering task. With public cloud providers offering resources across global geographic regions with a convenient pay-as-you-go pricing model, it is a natural fit to leverage the cloud as part of your DR solution.
Jump down using the links below as we cover:
- Discovering Cloud Volumes ONTAP’s DR Benefits
- Steps to Implement DR in Google Cloud with Cloud Volumes ONTAP
Discovering Cloud Volumes ONTAP’s DR Benefits
Cloud Volumes ONTAP, NetApp’s premier data management solution, is a great tool to significantly reduce the engineering effort required to implement a robust and flexible DR strategy, using any of the three main public cloud providers: AWS, Azure, or Google Cloud Platform.
An enterprise customer that wants to implement a disaster recovery solution in Google Cloud, will have several benefits when using Cloud Volumes ONTAP:
- Seamless data replication between storage volumes on-premises or other cloud providers to a DR Google Cloud site.
- Automated storage failover and failback processes.
- Reduced storage footprint and costs using storage optimization technologies and automated data tiering to Google Cloud Storage.
In this article, we are going to provide step-by-step instructions on how to implement a disaster recovery deployment solution in Google Cloud for an on-premises system using Cloud Volumes ONTAP.
Steps to Implement DR in Google Cloud with Cloud Volumes ONTAP
1. Checking the Prerequisites
To properly leverage Cloud Volumes ONTAP for disaster recovery, there are a few prerequisites that need to be in place.
If you are new to Cloud Volumes ONTAP or are looking to try the DR in a lab environment, you can sign up here for the “Getting Started with NetApp BlueXP Console” test drive and gain access to a time-limited sandbox environment. If you choose this option, skip the prerequisites and jump straight to step number two.
To establish a replication relation between an on-premises and Google Cloud environments for disaster recovery using Cloud Volumes ONTAP, make sure you have the following in place:
- An existing on-premises ONTAP cluster with data volumes.
- Network connectivity between on-premises and Google Cloud VPC. This can be achieved using a simple site-to-site VPN topology as illustrated in this practical example.
- A Google Cloud project with an appropriate NetApp Marketplace subscription and service account. You can refer to this setup walkthrough to ensure you have the required resources.
- BlueXP Console deployment.
2. Discovering an On-premises ONTAP Environment
We will use NetApp Cloud Volumes ONTAP to implement a disaster recovery deployment from an existing on-premises ONTAP environment to Google Cloud Platform.
2.1. The first step is to allow BlueXP Console to discover the existing on-premises environment. Select “Add Working Environment” in the canvas to begin the process.
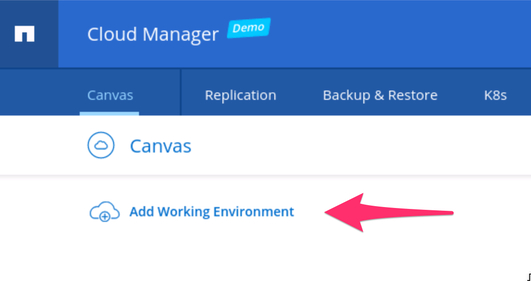 Adding on-premises environment in BlueXP Console
2.2. Fill in the information regarding your on-premises ONTAP cluster, such as the cluster management IP address and the administrator credentials.
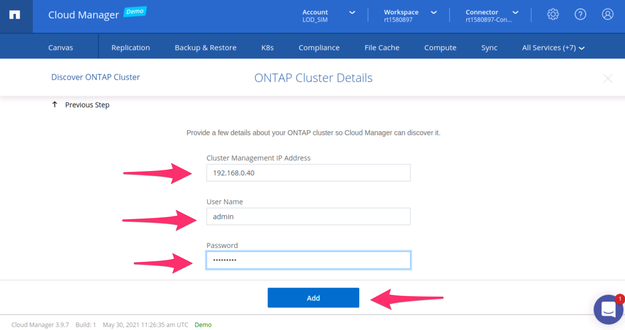 On-premises cluster management information
2.3. If successful, the on-premises ONTAP environment will become visible in the Canvas tab of BlueXP Console.
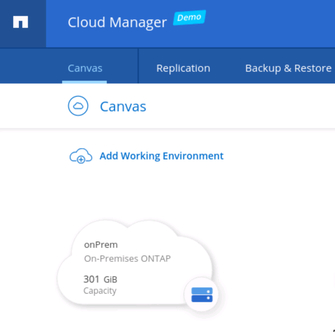 On-premises environment in BlueXP Console canvas
3. Creating a New Google Cloud ONTAP Environment
Before we are able to establish a replication relationship for disaster recovery, we need to create a new Google Cloud ONTAP environment in BlueXP Console. See the step-by-step instructions on configuring Google Cloud to work with BlueXP Console and Cloud Volumes ONTAP here.
3.1. In BlueXP Console, select the “Add Working Environment Wizard” and choose Google Cloud as the location.
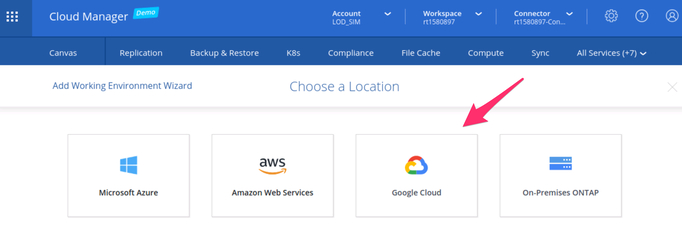 Adding a new Google Cloud environment for DR
3.2. Define your Google Cloud ONTAP environment according to your organization’s DR needs. For testing purposes or simple use cases, you can choose the single node Cloud Volumes ONTAP option.
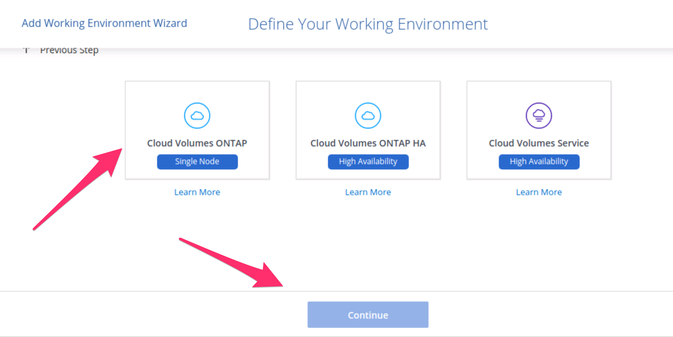 Selecting a single node Cloud Volumes ONTAP cluster
3.3. On the Details and Credentials screen, choose a new name and administrator credentials for the Google Cloud ONTAP cluster. Select a GCP service account from the drop-down list. If there are no service accounts visible, please review the prerequisite steps above that refer to preparing your Google Cloud Platform project environment for use with BlueXP Console.
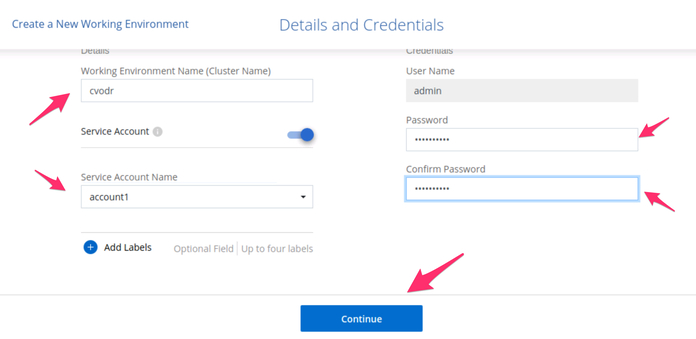 New Google Cloud ONTAP cluster information
3.4. Select the Google Cloud region and zone where the DR deployment environment is located and the proper connectivity settings. The VPC selected needs to have network connectivity (e.g. site-to-site VPN) to the on-premises ONTAP environment.
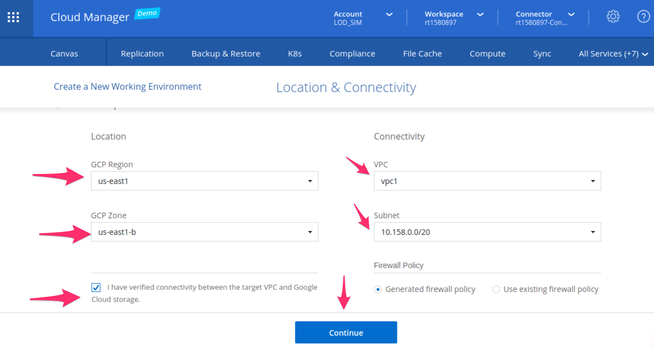 Google Cloud ONTAP cluster location and connectivity
3.5. Select the appropriate Cloud Volumes ONTAP license type you would like to use. Pay-as-you-go is a popular option that enables you to get billed using Google Cloud, but there is also the option to bring your own license.
You also have the option to sign up for a NetApp Support Site Account.
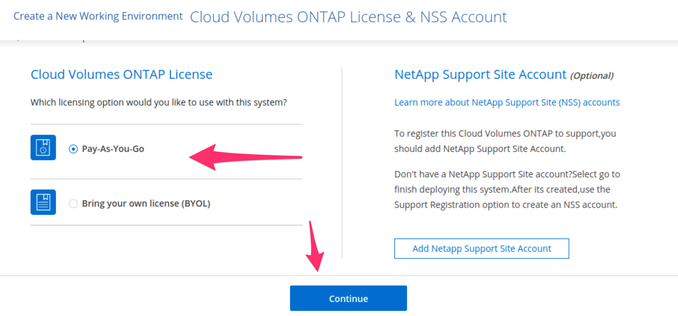 Selecting GCP cluster ONTAP license
3.6. Choosing a configuration appropriate to disaster recovery is an important part of the deployment process that has an impact in both performance and costs. BlueXP Console simplifies the process with a recommended “Cost effective DR” preconfigured package option.
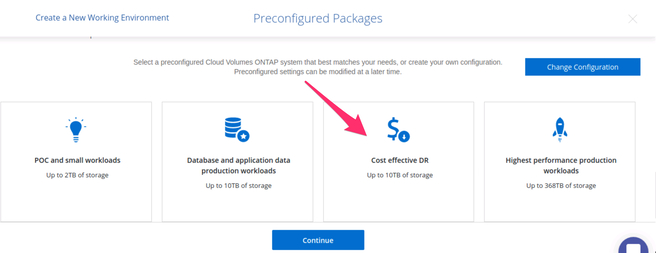 Selecting one of the preconfigured cluster settings
3.7 Based on this choice, we are led to the data tiering settings panel where we can further customize our options if needed. Review and accept the proposed settings.
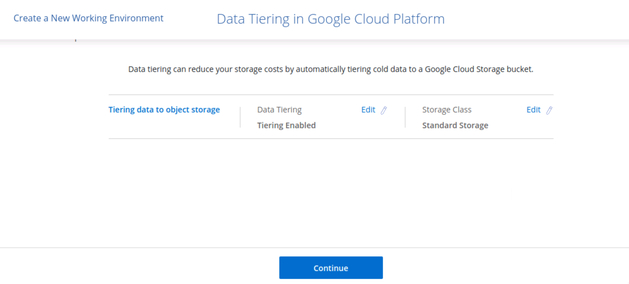 Data tiering settings panel
3.8. When asked about creating a new volume, choose to skip that step. The volume in the GCP ONTAP environment will be created automatically later on when we enable a replication relationship.
3.9. Review and approve the configuration for the new Google Cloud ONTAP environment and proceed with the deployment.
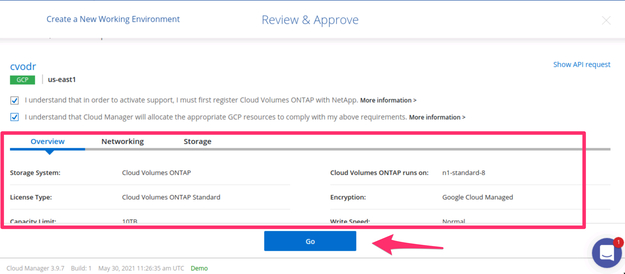 Review and approve the new GCP cluster
3.10. If successful, the new Google Cloud ONTAP environment will now be visible in the BlueXP Console canvas, alongside the existing on-premises ONTAP cluster.
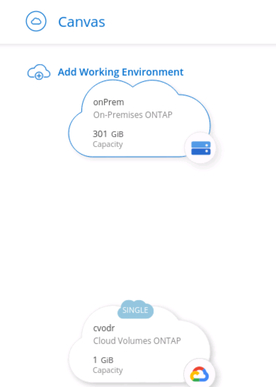 BlueXP Console canvas with two environments
4. Establishing a Replication Relationship Between On-Premises and Google Cloud ONTAP Environments
4.1. To establish a replication relationship between the two environments, open the BlueXP Console canvas and simply drag-and-drop the on-premises cluster into the Google Cloud environment.
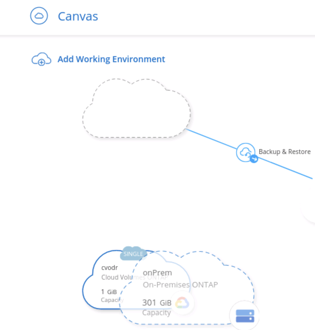 Establishing a replication relationship with drag-and-drop
4.2. From the list of existing on-premises volumes, select the source volume for the replication.
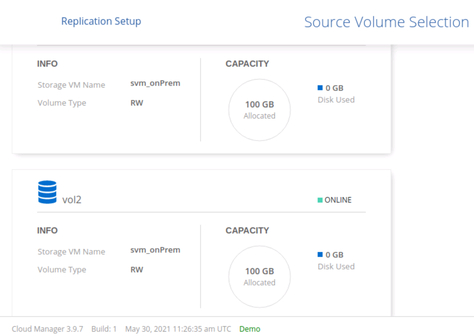 Selecting the source volume for replication
4.3. Choose the disk type (SSD or Standard), tiering preference, and a name for the replication destination volume.
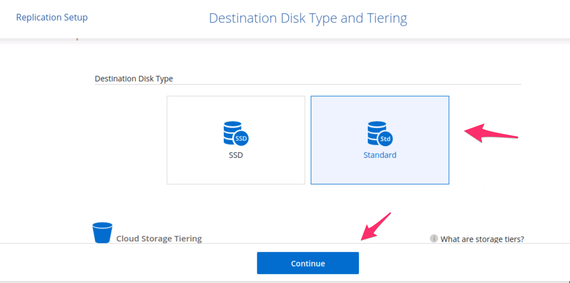 Choosing the destination disk type and tiering for DR replication
4.4. Choose the transfer rate limits. When in doubt, use the default 100 MB/s value.
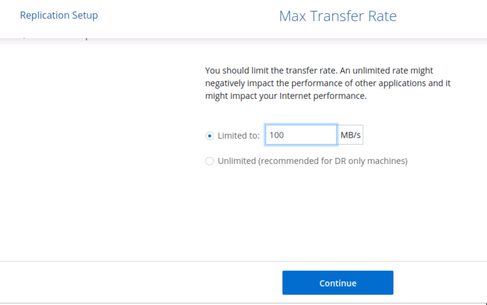 Choosing the transfer rate limit
4.5. The NetApp Snapshot™ copies automatically created by ONTAP are an integral part of how the replication technology works. When you select a replication policy, you’re defining how you want Cloud Volumes ONTAP to copy your Snapshot copies from the source volume to the destination volume.
Choosing the mirror policy will make sure that every snapshot you create is copied over to the destination, making it suitable for DR cases. The backup functionality can be combined with the mirror policy and as the name suggests, allows snapshots to be stored for backup and long-term retention purposes, enabling different points in time restoration.
The default mirror-only policy is great for the DR use case.
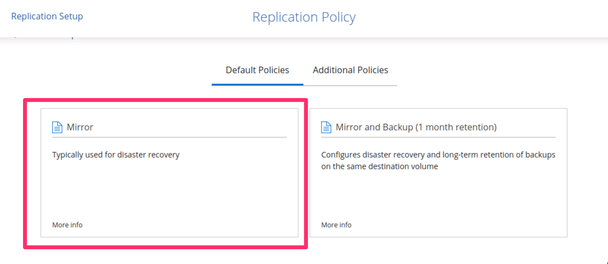 Selecting a replication policy for DR
4.6. When it comes to the replication schedule, there are multiple options available. Select the one that fulfils your recovery point objective (RPO) requirements.
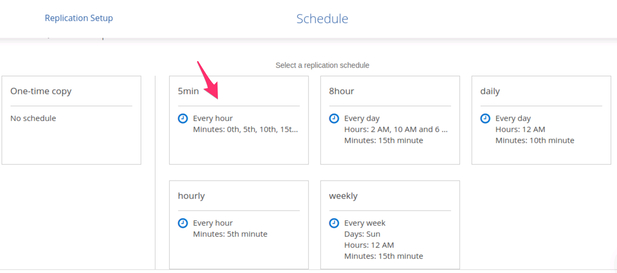 Selecting the appropriate replication schedule
4.7. Finally, review and approve the configuration for the replication relationship. Notice in the left the visual representation of the setup. The on-premises volume vol1 will be automatically replicated in Google Cloud as vol1_copy.
Tick the “I understand…” box and then click “Go” to proceed.
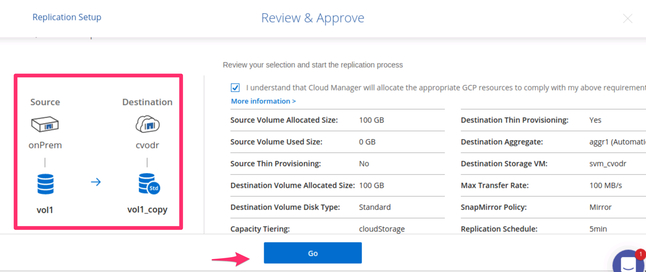 Review and approve the replication relationship
4.8. If successful, the replication relationship will now become visible in the Canvas tab of BlueXP Console. Notice the arrow direction, representing the on-premises cluster as the source for the replication, and the Google Cloud environment as the destination.
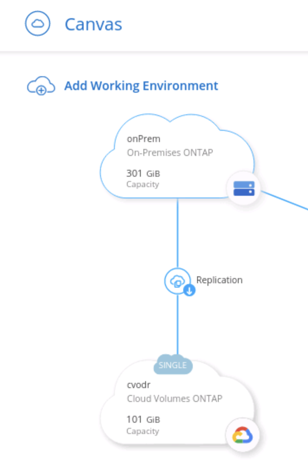 BlueXP Console canvas with the replication relationship established
5. Monitoring and Managing the Relationship Between Volume Replications
5.1. To understand the current state of the volume replication, navigate to the “Replication” tab in BlueXP Console. From this view, you are able to list and monitor all the existing replication relationships.
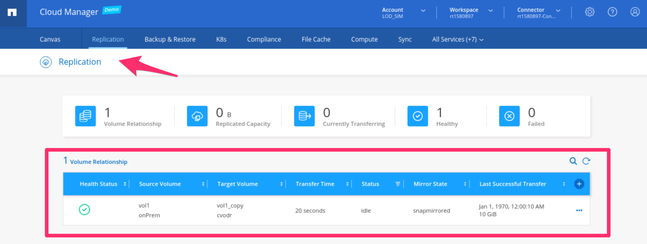 List of all the volume replication relationships
5.2. At any point, it’s possible to manage the replication relationship. You can see the menu options for managing the relationship by clicking the ellipses button (the three dots) at the right corner of an existing replication.
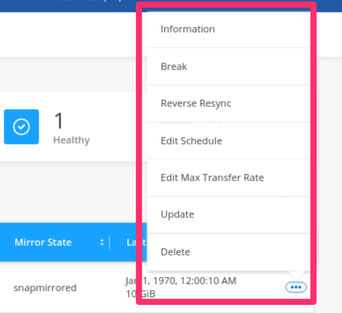 Editing an existing replication relationship
This enables you to stop the replication relationship, change the sync schedule, reverse the synchronization of data used during a failback operation and much more.
Conclusion
Cloud Volumes ONTAP is a solution that provides features catered to demanding enterprise needs. In addition to the Google Cloud DR setup shown in this article, it’s also possible to implement a similar DR strategy in AWS and Microsoft Azure DR environments. NetApp Cloud Volumes ONTAP truly shines in multicloud and hybrid cloud architectures, making it simple to implement complex strategies while gaining better protection, security and data cost-cutting efficiencies.
