Share
NetApp Cloud Volumes ONTAP is a cloud-based version of NetApp’s signature ONTAP software that provides enterprise-level storage management features and enhancements for mission-critical workloads.
This document will give you step-by-step instructions on how to set up NetApp Cloud Volumes ONTAP for use on Google Cloud.
Jump down below using these links to get started:
- Key Design Considerations
- Setting Up Your GCP Marketplace Subscription
- GCP Account and Permissions
- Deploying the BlueXP Console Connector
- Setting Up a New Cloud Volumes ONTAP Working Environment on Google Cloud
Key Design Considerations
Before you can start setting up your Cloud Volumes ONTAP deployment on Google Cloud, there are some key design considerations that you’ll have to have in place first.
- GCP account and project
To use BlueXP Console and Cloud Volumes ONTAP on Google Cloud, you’ll need an active GCP account and project.
- Supported GCP regions
To see which of the GCP regions are available with Cloud Volumes ONTAP, go to the Cloud Volumes Global Regions Map, select Cloud Volumes ONTAP, and then select Google.
- BlueXP Console deployment
There are two options for deploying BlueXP Console:- Using BlueXP Console via NetApp NetApp BlueXP.
- Using the GCP Cloud Shell.
- GCP networking considerations
Your BlueXP Console deployment needs to have network connectivity between the GCP VPC where BlueXP Console is deployed to the following two endpoints:- Network connectivity to GCP VPCs in each region where you want to deploy Cloud Volumes ONTAP. More details on this networking requirement can be found here.
- (For hybrid scenarios only) Network connectivity to a NetApp FAS/AFF appliance for replication purposes.
If you are deploying BlueXP Console using a web browser, BlueXP Console needs to have network connectivity to all of the endpoints listed here:
- BlueXP Console appliance (IP).
- NetApp NetApp BlueXP (https://auth0.com, https://cdn.auth0.com, https://netapp-cloud-account.auth0.com, https://services.cloud.netapp.com).
- In-product chat (https://widget.intercom.io).
NetApp recommends deploying BlueXP Console on a subnet / VPC that has outbound internet access for use with Cloud Volumes ONTAP.
Setting Up Your GCP Marketplace Subscription
To use BlueXP Console and Cloud Volumes ONTAP, Google Cloud users need to subscribe to Cloud Volumes ONTAP via the GCP Marketplace. This is a one-time signup that is needed in order to confirm the terms of the GCP EULA.
- Begin the set-up process by logging into the GCP management console from your internet browser.
- Using the same browser where you are signed into your Google Cloud account, go to the GCP Marketplace. Search for the NetApp BlueXP Console for Cloud Volumes ONTAP solution.
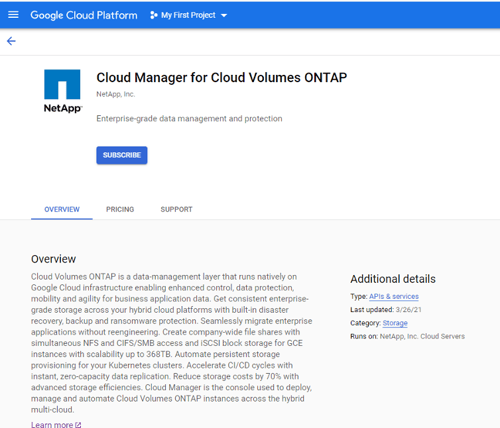
- Click "Subscribe":
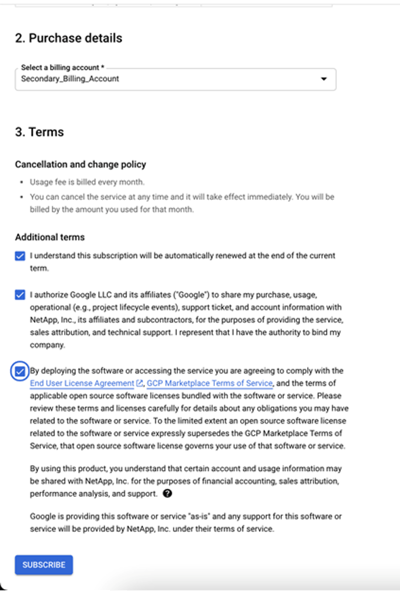
- Select the appropriate billing account and agree to the terms and conditions. When you are done click “Subscribe.”
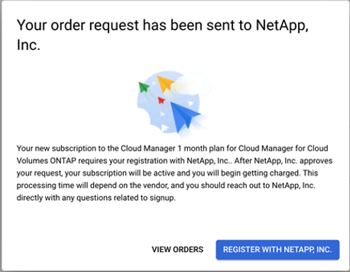
- Click “Register With NetApp Inc.” when the popup appears.
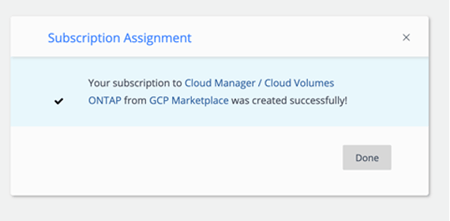
- You will be redirected to https://services.cloud.netapp.com/subscription-mapping. Click “Done” to proceed.
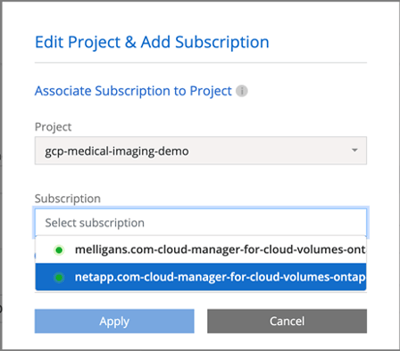
- Select the subscription from the drop-down menu and then click “Apply.”
GCP Account and Permissions
The following instructions detail how to create a GCP account with the necessary Identity and Access Management (IAM) policy. This will make it possible to use BlueXP Console with your GCP environment.
Defining GCP Permissions to Allow Connector Creation
- To begin setting up GCP permissions to create a Connector, go to the BlueXP Console policies for GCP page.
- Click the “Connector deployment policy for GCP” link, as shown below:
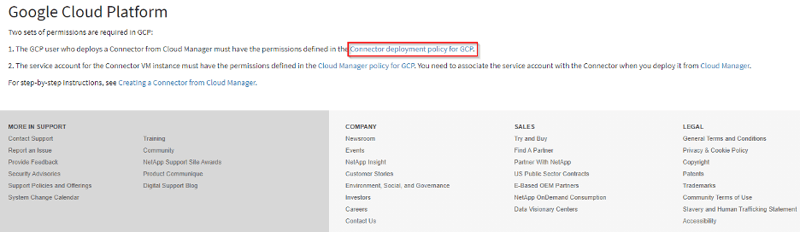
A file named “Setup_As_Service_*version*_GCP.yaml” will be downloaded. This file will be used later in the setup process to create a custom policy for the Connector deployment.
- Click the "BlueXP Console Policy for GCP" link, as shown below:
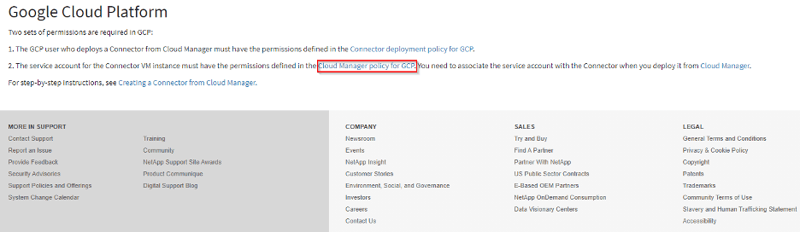
A file named “Policy_for_Cloud_Manager_*version*_GCP.yaml.” will be downloaded. This file will be used later in the set-up process to create a custom policy for the Connector Service Account.
- Create a custom role for the Connector deployment and assign it to a user.
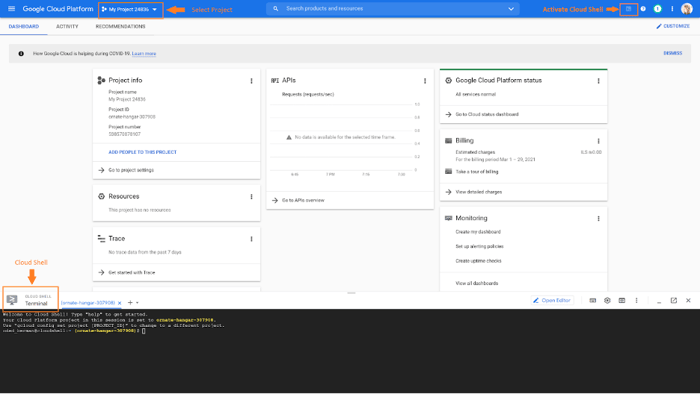
- Log in to https://console.cloud.google.com/, select the correct project and activate Cloud Shell.
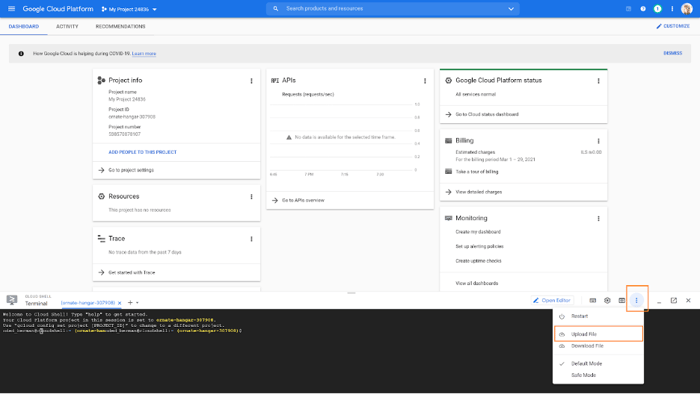
- Upload the “Setup_As_Service_*version*_GCP.yaml” permissions file you previously downloaded to Cloud Shell. You can either drag-and-drop this file from your computer to Cloud Shell or use the Upload File operation from Cloud Shell’s menu options, which are listed under the vertical ellipsis icon in the right-hand corner, as shown below:
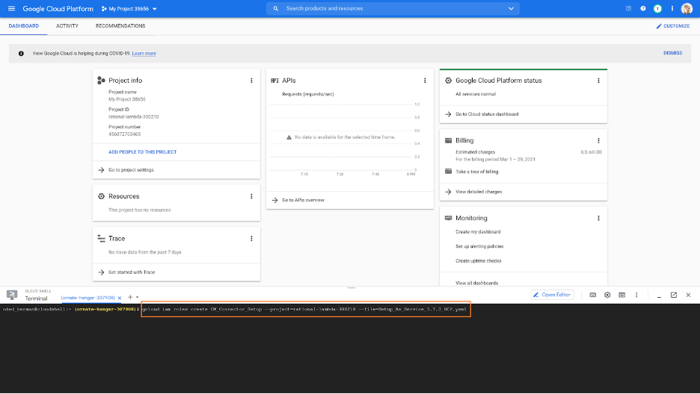
- From Cloud Shell, use the gcloud iam roles create command to create a custom role from file at the organization or project level. If the Authorize Cloud Shell box pops up, click “Authorize.” The role created using the permissions file will be titled “NetApp BlueXP.”
- To grant the new role created to the relevant user you can run the gcloud add-iam-policy-binding command or use the console’s IAM & Admin menu.
In the menu, select “IAM.” Whether you’re adding an all-new user or editing an existing one, select the “NetApp BlueXP” role.
Click on “SAVE” to proceed.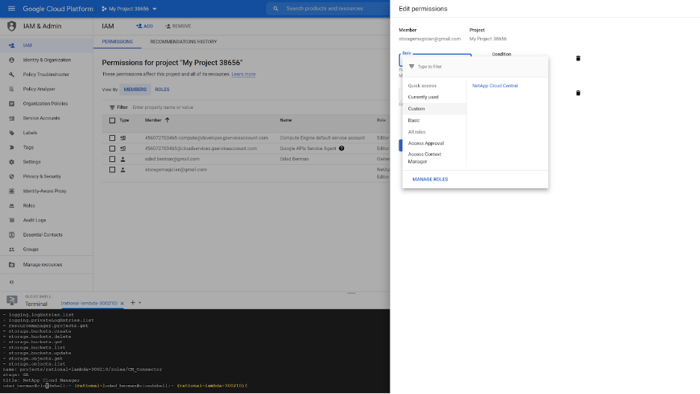
- Log in to https://console.cloud.google.com/, select the correct project and activate Cloud Shell.
- Next, set up a Service Account that will be associated with the Connector VM. You will grant the permissions required to allow the creation and management of Cloud Volumes ONTAP instances. Note that these permissions are not the same as those set up in the previous step.
- Upload the “Policy_for_Cloud_Manager_*version*_GCP.yaml” permission file to Cloud Shell. You can either drag-and-drop this file from your computer to Cloud Shell or use the Upload File operation from Cloud Shell’s menu options listed under the vertical ellipsis icon in the right-hand corner of the screen.
- From Cloud Shell use the gcloud iam roles create command to create a custom role from file at the organization or project level. If the Authorize Cloud Shell box pops up, click “Authorize.” The role created will be titled “NetApp BlueXP Console.”
- Go to the Google Cloud Console and find the IAM & Admin menu. Navigate down to Service Account. To create a new account, click on “Create service Account.”
Fill in the account details and click on “CREATE” to proceed.
Next, click on the drop menu under the Role option. Select “NetApp BlueXP Console” as the role and click on “DONE” to proceed.
 You will now have a Google Cloud user that has all the permissions required to create your BlueXP Console Connector and a service account that your Connector VM will be able to use.
Enable Google Cloud APIs
Deploying the Connector and Cloud Volumes ONTAP in GCP requires a number of Google Cloud APIs to be enabled. This section will show you how to enable the APIs.
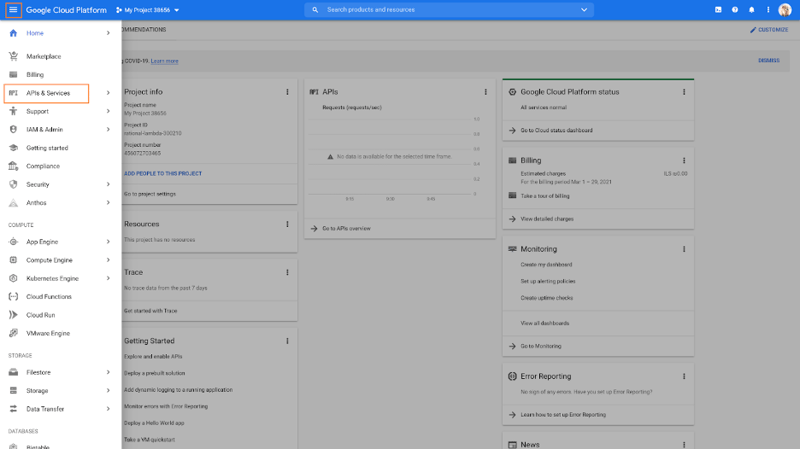
- Click the hamburger menu on the upper right-hand corner of the Google Cloud Console and select “APIs & Services.”
- On the APIs and Services tab, select “Library.”
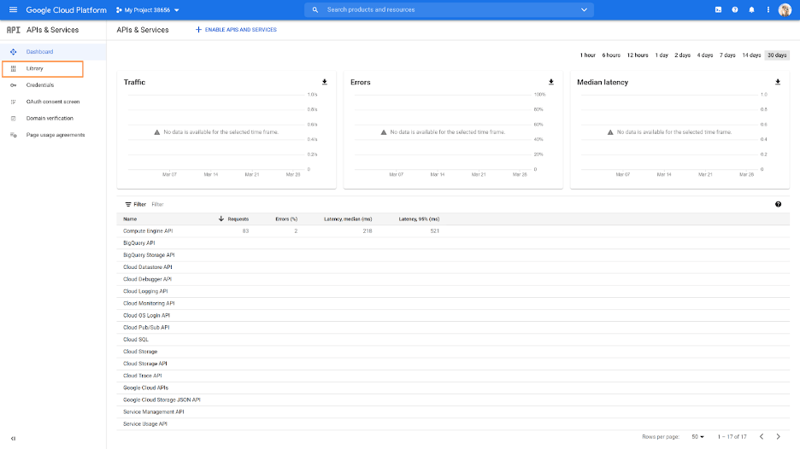
- Using the library’s search box, find and enable each of the following APIs:
- Cloud Deployment Manager V2 API
- Cloud Logging API
- Cloud Resource Manager API
- Compute Engine API
- Identity and Access Management (IAM) API
Enable these APIs by opening the page for each API and clicking the “Enable” button, as shown below. Repeat this process for all of the relevant projects in your account.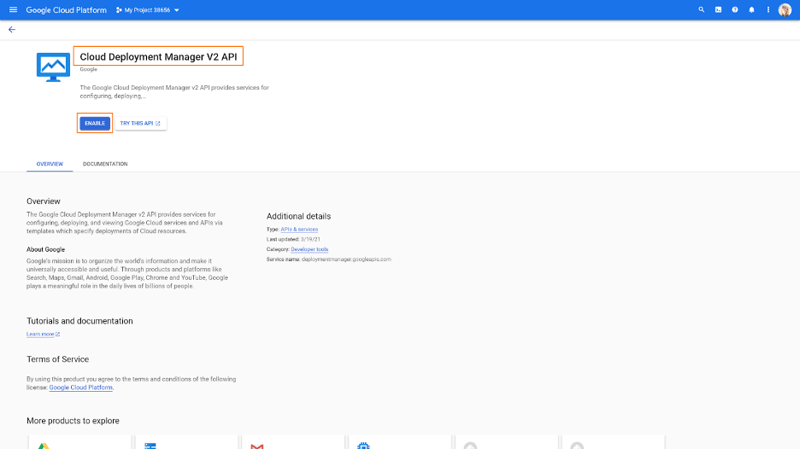
4. Now that the necessary Google Cloud APIs are enabled for your projects, the Connector can be created. This will also allow Cloud Volumes ONTAP instances to be created as well.
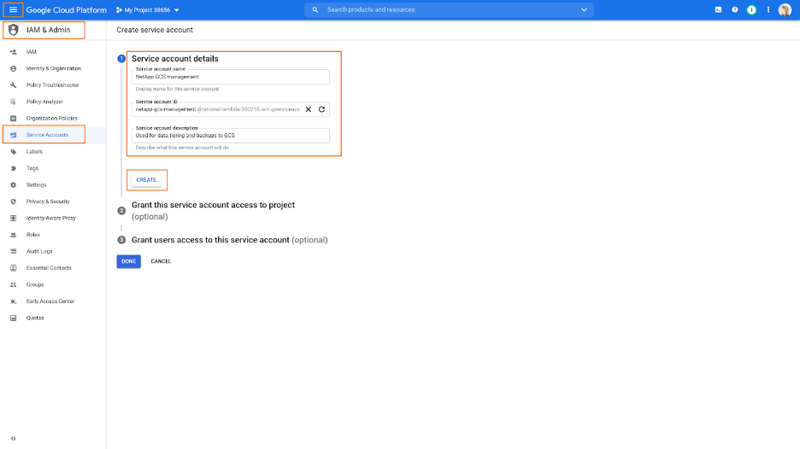
Setting Up a Service Account for Data Tiering and Backups
Although optional, it is recommended to use Cloud Volumes ONTAP’s data tiering capabilities to automatically move cold data, such as disaster recovery copies, to Google Cloud Storage in order to reduce TCO.
To set up data tiering, Cloud Volumes ONTAP requires a service account granted with a Storage Admin role. This service account will also enable you to also use the Cloud Backup service to back up Cloud Volumes ONTAP and on-premises storage volumes to low-cost object storage if needed.
-
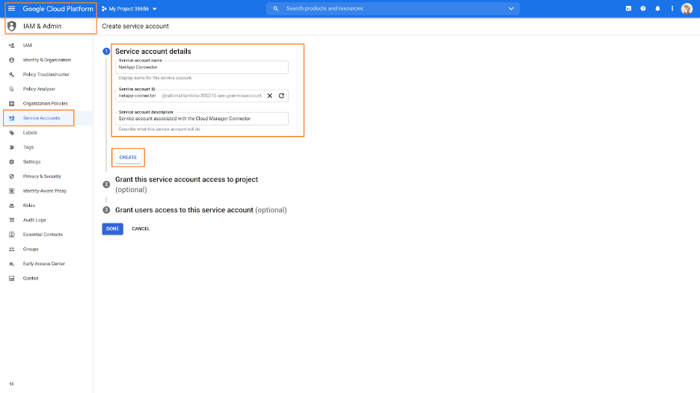
Go to the IAM & Admin menu in the Google Cloud Console. Find the Service Account tab on the left-hand panel and create a new account by selecting “Create Service Account”.
Fill in the account name, account ID, and the account description details. When you are done, click on “CREATE” to proceed.
-
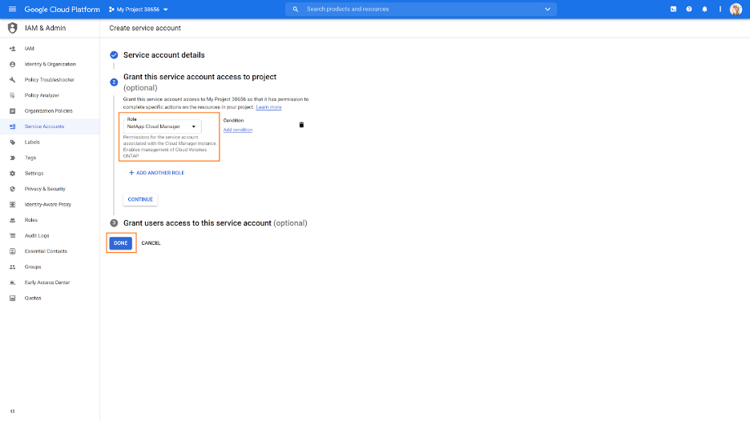
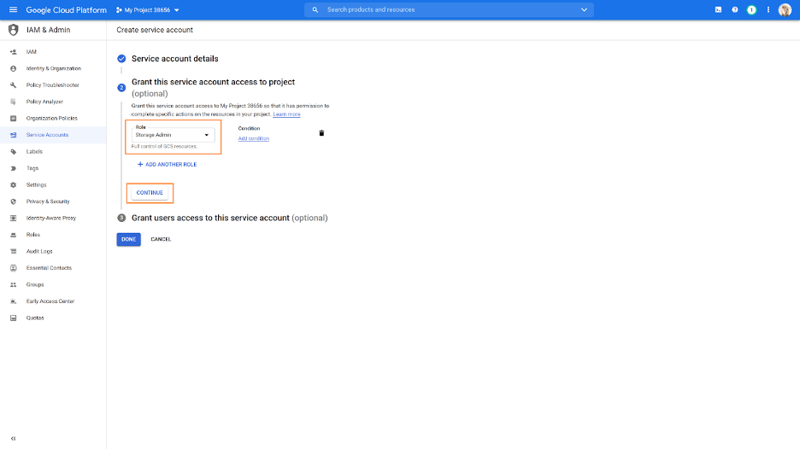
In the “Grant service account access to project” step, go to the Role drop down menu and select “Storage Admin.” The permissions granted under this role will give you full control over deploying and managing Google Cloud Storage resources.
Click on “CONTINUE” to proceed.
-
In the “Grant users access to this service account (optional)” step, add a service account user. Enter the Connector service account name that was created earlier when you set up user permissions and service account for Connector deployment.
Click on “DONE” to finish.
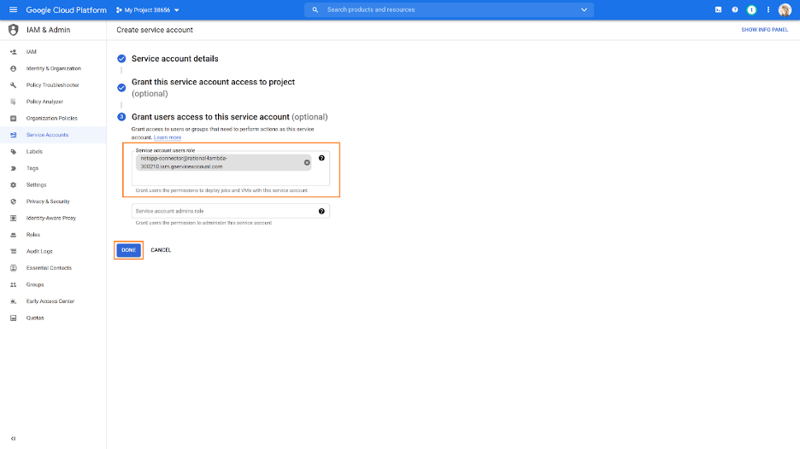
Your service account will now be set up. The service account can be selected later when you create a Cloud Volumes ONTAP instance, in the Details and Credentials screen.
Now that these requirements are all in place, you can begin deploying the BlueXP Console Connector.
Deploying the BlueXP Console Connector
In this section we will deploy the Connector in Google Cloud directly from BlueXP Console.
The Connector is part of the BlueXP Console infrastructure that allows secured management of processes and resources within Google Cloud and is required in order to use most of the features and services integrated into BlueXP Console.
For the complete list of Connector capabilities, go to Learn about Connectors in the BlueXP Console documentation center.
The Connector can be deployed in Google Cloud or in your data center. For instructions on installing the connector on-prem, refer to the instructions here.
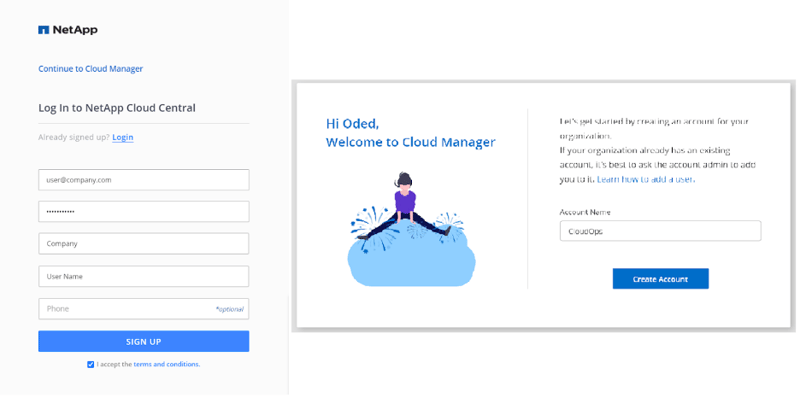
- Go to https://cloudmanager.netapp.com and log in. If this is your first time accessing BlueXP Console, you would be requested to create a NetApp Account for your organization:
-
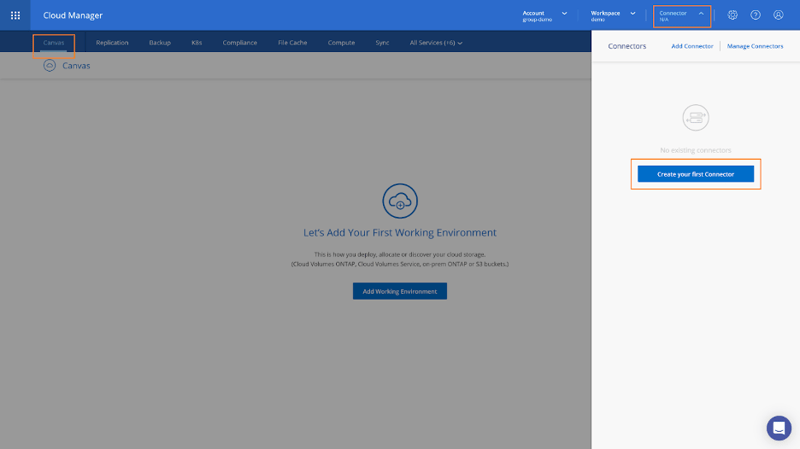
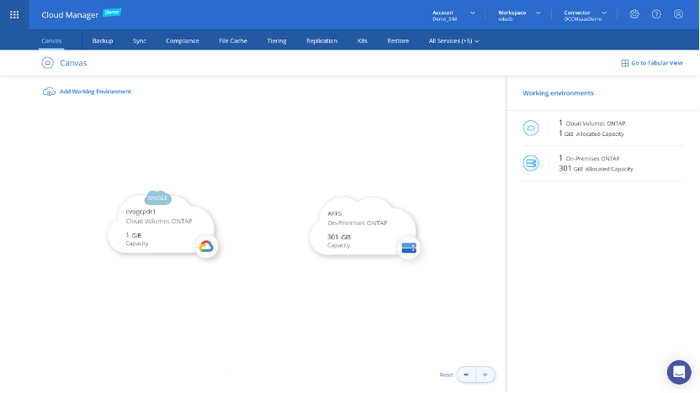
Once you have logged in, you will be situated in BlueXP Console’s home page, the Canvas tab.
Click on the Connector menu in the top-right corner to open the Connectors pane. To get started with the deployment, click on “Create your first Connector.”
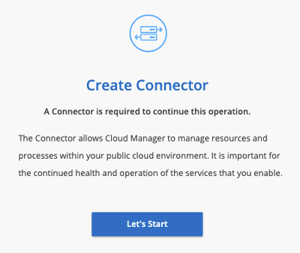
- Click “Let’s Start” to proceed.
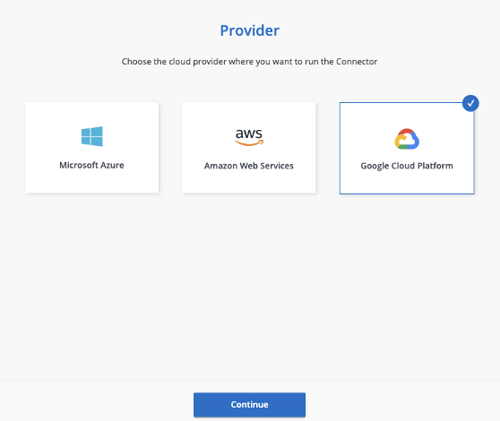
- For your cloud provider, select “Google Cloud Platform” and then click “Continue.”
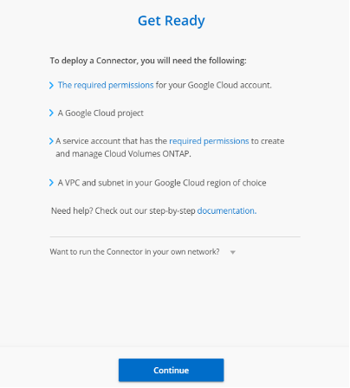
- Before continuing, make sure you have completed the steps detailed in the sections above. You must have all the necessary permissions set up for the Google Cloud user account, the proper service accounts created, and the relevant Google Cloud APIs enabled.
-
At this point you will see a prompt asking you to log in to your Google account.
Note that the form is wholly controlled by Google Cloud. NetApp will never see your sign-in credentials.
-
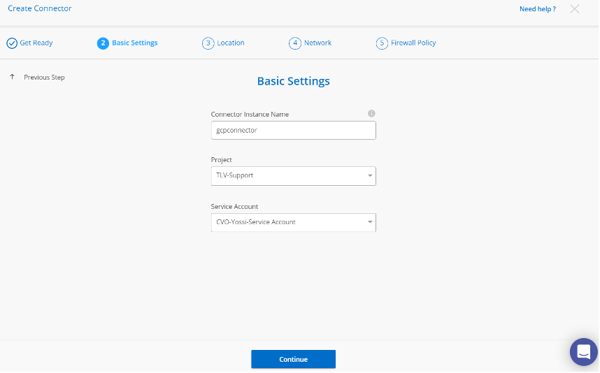
You will now need to supply your Connector name, project name, and your service account name. The service account will be the one with the NetApp BlueXP Console role that was created earlier in the setup process.
When you are done, click “Continue.”
-
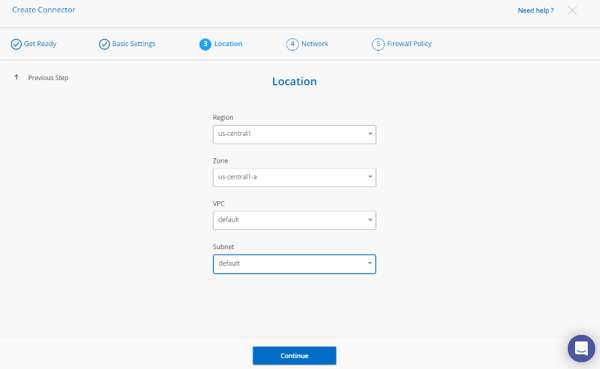
Provide the location information for your Connector. You will need to include a GCP region, zone, a VPC, and a subnet for the Connector instance.
Click “Continue” when you are done.
-
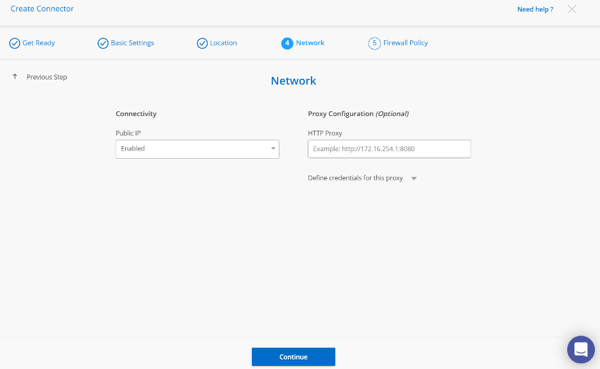
In the Network step, you will configure connectivity and proxy settings. For Connectivity, you must choose whether or not to enable the use of a public IP address.
Specifying a proxy configuration is optional and will depend on your planned usage.
-
You will now set up your firewall policy.
You can either use an existing firewall policy or create a new one. In either case the firewall policy must allow inbound access for HTTPS, HTTP, and SSH.
When you are done, click “Create.”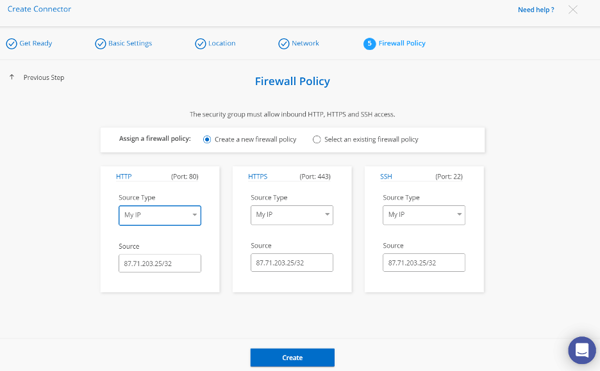
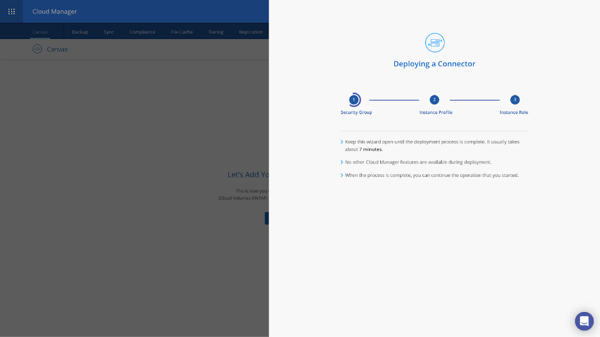
-
Your Connector deployment will commence. Make sure you do not close the page until the setup is finalized. This process will take about seven minutes.
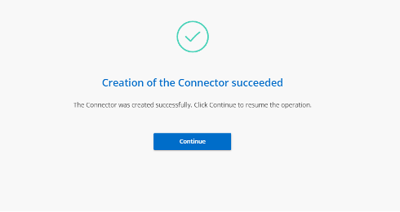
-
Once the Connector deployment completes successfully, click on “Continue.”
-
Now go to the Connectors pane and confirm that your Connector is listed as Active.
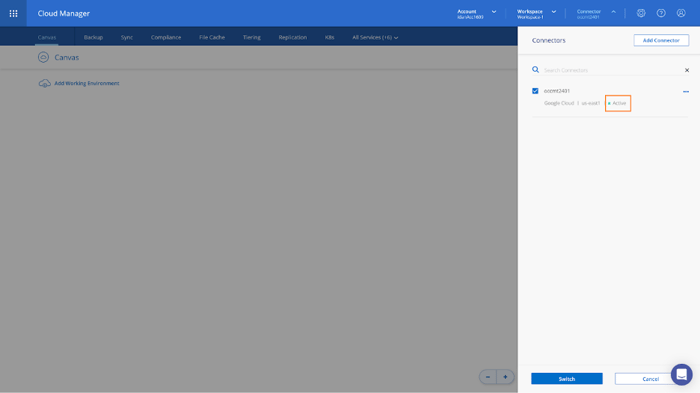
With your Connector deployed successfully, you will now be able to deploy a new Cloud Volumes ONTAP working environment.
Setting Up a New Cloud Volumes ONTAP Working Environment on Google Cloud
- To start your Cloud Volumes ONTAP instance, go to the BlueXP Console Canvas and click on “Add Working Environment.”
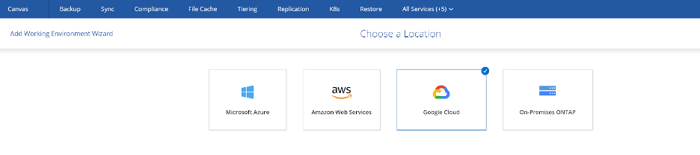
- In the Choose a Location step, select “Google Cloud” as the cloud provider.
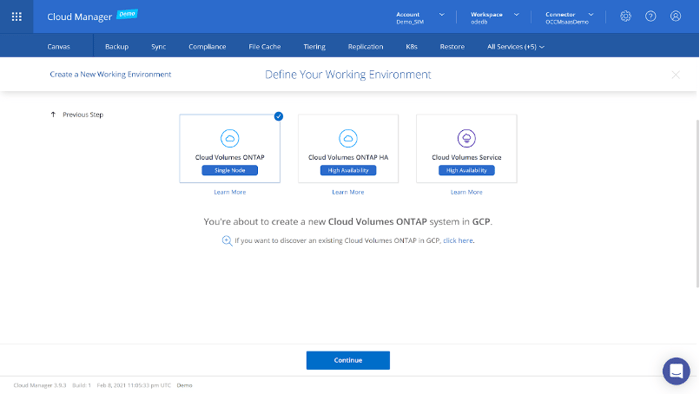
- Next, on the Define Your Working Environment step, select “Cloud Volumes ONTAP (Single Node)”.
(Note that Cloud Volumes ONTAP for Google Cloud supports two configurations: Single Node for non-mission critical workloads and HA for mission critical workloads. Click here for additional information on HA.)
When you are done, click “Continue.”
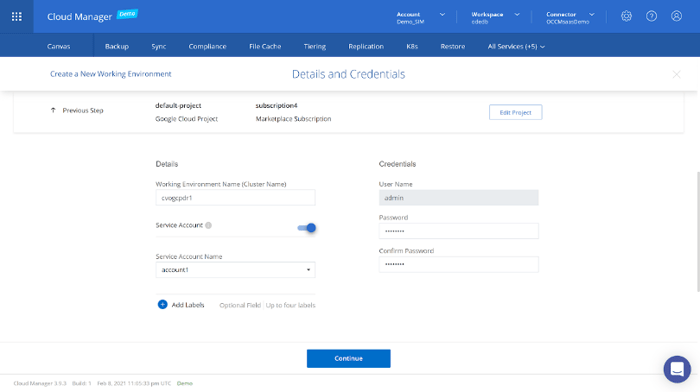
- In the Details and Credentials step, you will provide some details about the environment you are going to set up. This will include the environment’s name and its admin credentials.
Make sure to choose a Service Account that has been configured with the Storage Admin role (as shown in the section above) so you can enable Data Tiering and Cloud Backup to Google Cloud Storage.
When you are finished, click Continue.
- In the Services step, note that Cloud Backup is enabled by default. This allows you to easily implement a 3-2-1 backup strategy. Based on the default policy, Cloud Backup will back up your disaster recovery volumes on a daily basis, retaining the 30 most recent backups.
Using the top right knob Cloud Backup can be disabled, if desired. Click “Continue” to proceed.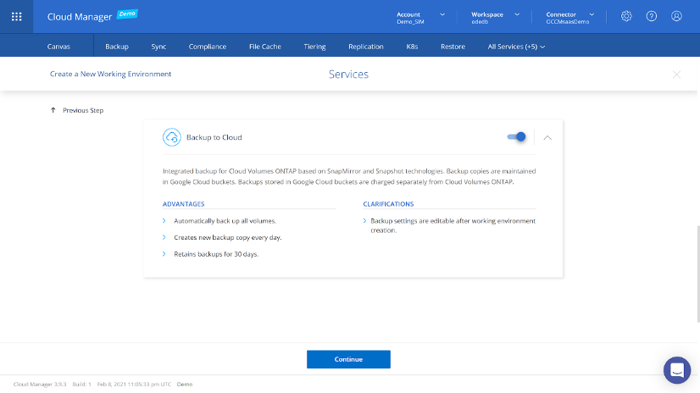
- In the Location and Connectivity step, configure several parameters for your volume:
- GCP Region
- GCP Zone
- VPC
- The appropriate subnet for connectivity
- Firewall Policy. You can use an existing firewall policy or create a new one.
Make sure to mark the checkbox after you have validated connectivity between your VPC and Google Cloud Storage.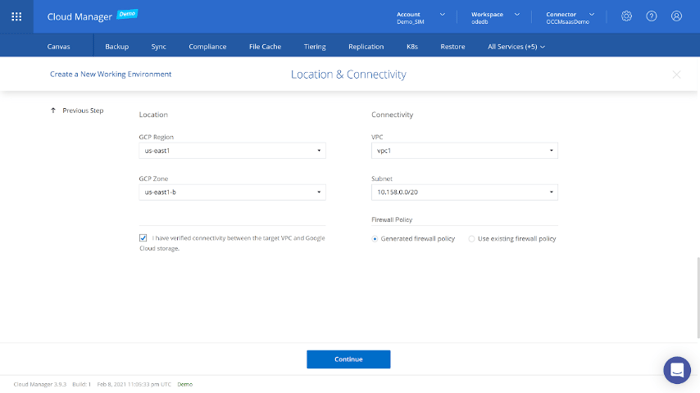
- You will need to configure the subnet where Cloud Volumes ONTAP resides for Private Google Access. If your subnet is already configured for Private Google Access, proceed by clicking “Continue.”
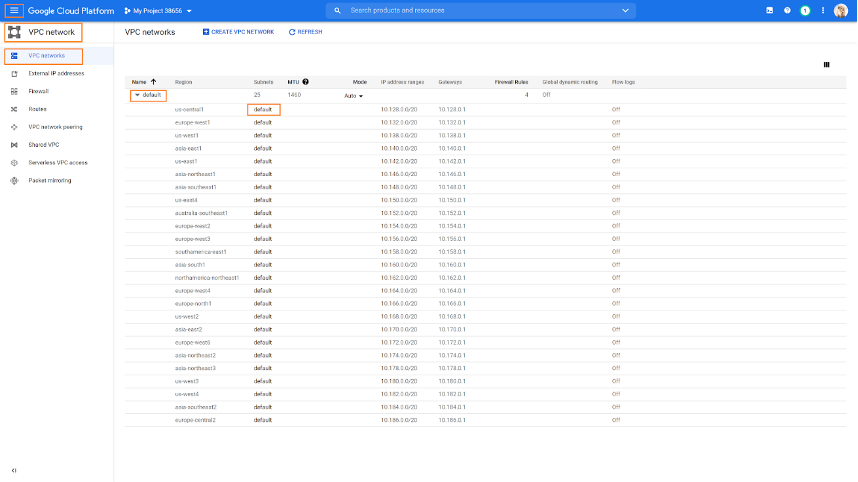
If the subnet is not configured for Private Google Access, proceed with the following steps:- Go to the Google Console and find the Networking tab. Under “VPC network” you can find Cloud Volumes ONTAP’s VPC and subnet.
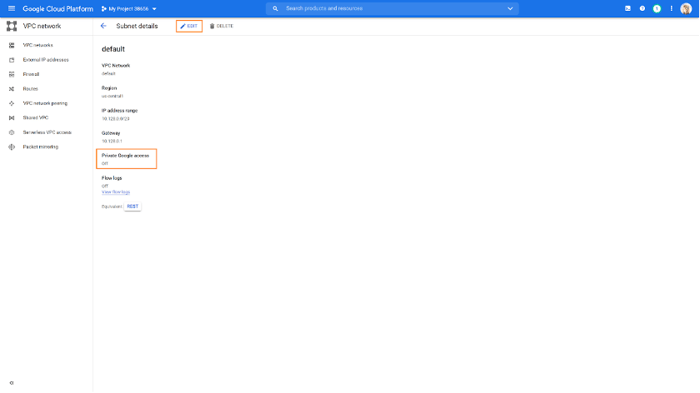
- On the subnet details page, look toward the bottom of the page for “Private Google Access” settings.
Click on “EDIT” to make changes.
-
Under “Private Google Access” select On for Cloud Volumes ONTAP’s subnet.
Click “SAVE” when you are done.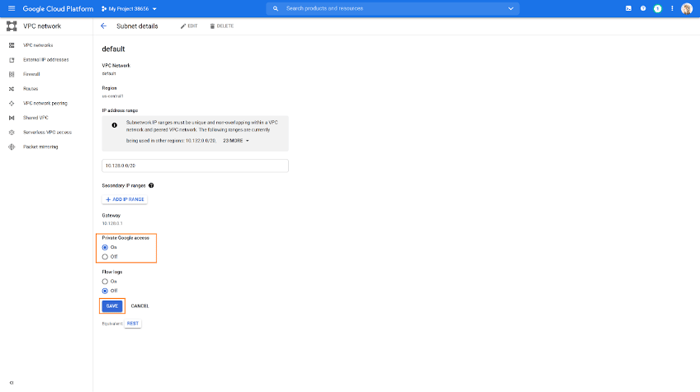
- Go to the Google Console and find the Networking tab. Under “VPC network” you can find Cloud Volumes ONTAP’s VPC and subnet.
- In the Cloud Volumes ONTAP License & NSS Account step, choose the license option you will use: Pay-As-You-Go, or BYOL (a term-based license purchased upfront).
In this step you can also choose to add a NetApp Support Site (NSS) account that you will use with this Cloud Volumes ONTAP environment. Note: An NSS account is recommended if you are choosing a Pay-As-You-Go license, but it can be added at another time. Use of a NSS account provides users with additional NetApp technical support and software updates. With BYOL, the NSS account allows you to enable your subscription.
When you are done, proceed by clicking “Continue.”

- In the Preconfigured Packages step, you have the option to select from a number of preconfigured Cloud Volumes ONTAP packages. These packages are tuned for various workloads and business objectives.
If you don’t want to use a preconfigured package, click on “Create my own configuration.”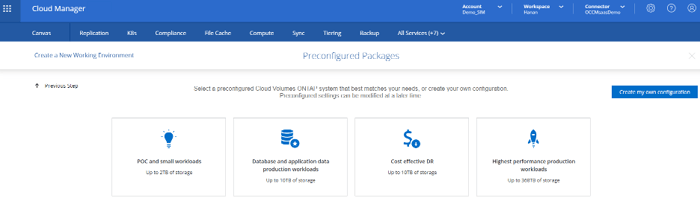
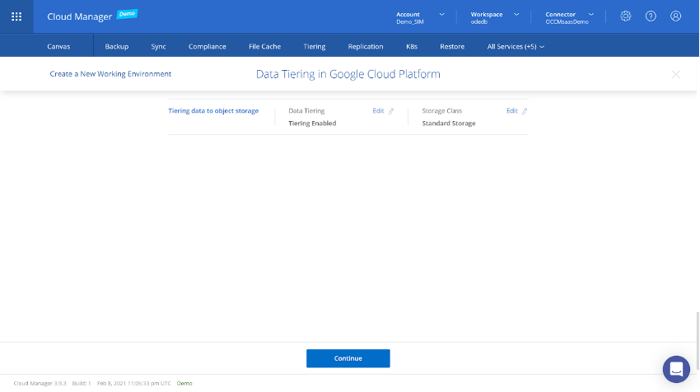
On the Data Tiering in Google Cloud page, if an appropriate Service Account was configured as described above, cold data tiering to Google Cloud Storage will be enabled by default.
The storage classes supported are Standard, Nearline and Coldline. By using data tiering in disaster recovery scenarios, costs can be significantly reduced.
When done, click “Continue.”
-
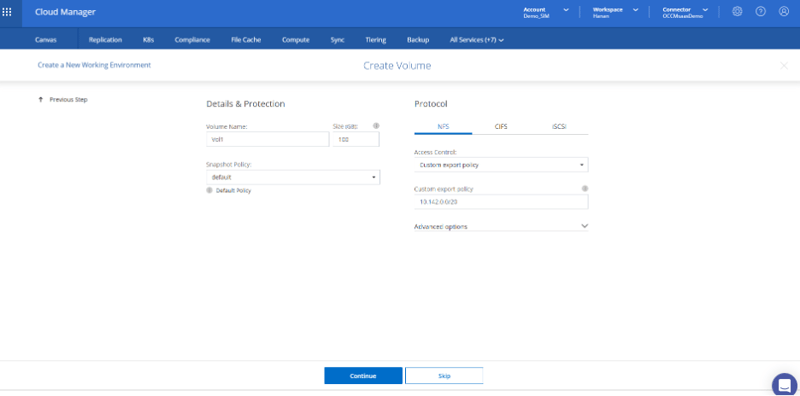
In the Create Volume step, you can create your first volume on Cloud Volumes ONTAP. If you want to create that volume later, click “Skip.”
To create a volume, add a name, define a snapshot policy, and select a protocol for it: NFS, CIFS, or iSCSI.
Click “Continue” to proceed, or “Skip.”
-
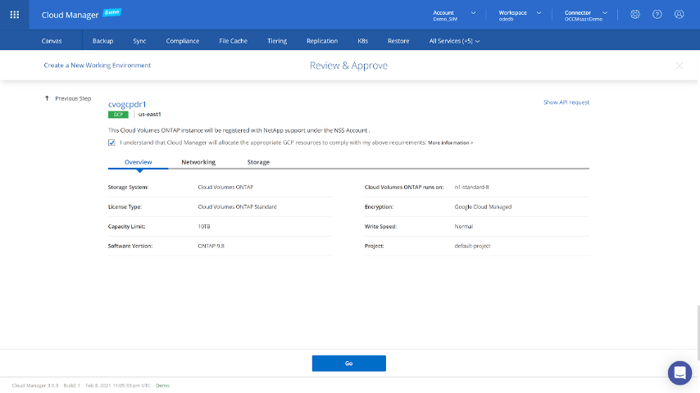
In the Review & Approve step, confirm the configuration settings.
Mark the checkbox to approve that BlueXP Console will provision the selected GCP resources on your behalf.When you are done, click “Go.”
-
You will be redirected back to the Canvas where Cloud Volumes ONTAP for Google Cloud will be shown:
Summary
With all these prerequisites in place and your first Cloud Volumes ONTAP instance up and running in GCP, you’re ready to start using Google Cloud with all the benefits of NetApp Cloud Volumes ONTAP data management.
