Share
Many enterprise customers use AWS cloud services to store, analyze, and report against vast sums of data. However, one of the main challenges these customers experience, especially in hybrid cloud management scenarios, is that these vast sums of data often need to be migrated from various data centers and remote and branch office sites (ROBOs) into a centralized AWS cloud region. Such data migrations can be expensive, time-consuming, and often tend to increase the total cost of ownership (TCO) due to data duplication in multiple places.
NetApp FlexCache® is an intelligent solution that has been designed to solve such data migration and cloud bursting challenges. NetApp FlexCache provides a writable, persistent cache of a data volume that is consistent and coherent with its original data set and stored in a remote location. Together with NetApp Cloud Volumes ONTAP®, FlexCache can easily bring data closer to applications—such as analytics workloads on AWS—without significant data migration and storage consumption costs attached.
In this guide, we will show you how to set up NetApp FlexCache with Cloud Volumes ONTAP on AWS.
Jump to the relevant step using the links below:
- NetApp Cloud Volumes ONTAP & FlexCache Introduction
- Prerequisites
- How to Set Up FlexCache with Cloud Volumes ONTAP on AWS
1. Setting up a Cluster Peering Relationship
2. Setting up the SVM Peering Relationship
3. Verify FlexCache Application Settings
4. Create a FlexCache Volume on Cloud Volumes ONTAP - Summary
NetApp Cloud Volumes ONTAP and FlexCache Introduction
FlexCache creates persistent cached copies of data volumes in remote locations with minimum effort. FlexCache can be used for data fan-in (migrating dispersed data from various locations into one centralized location) or fan-out (migrating/caching copies of data from a central location to multiple destination locations for localized consumption such as by dispersed workforces and applications).
It is important to note that a FlexCache is not a traditional cache, which is typically a duplicate copy of the source data. Instead, FlexCache copies are intelligent sparse containers of the source data, which looks and feels the same as the source data to the applications accessing them. This is achieved by only caching the file metadata initially in the destination, while the actual data blocks are retrieved only on demand, behind the scenes. This approach ensures reduced data migration between the source and the destination volumes, saving time, reducing data transfer costs, as well as avoiding unnecessary data duplicity.
Cloud Volumes ONTAP is NetApp’s enterprise-grade, cloud-native data storage, and data management solution that is available on AWS, Azure, and Google Cloud. When used in conjunction with Cloud Volumes ONTAP, FlexCache can create copies of datasets that are space- and cost-efficient in the cloud. FlexCache deployed on Cloud Volumes ONTAP for AWS enables customers to burst into AWS on-demand and leverage various AWS-based innovations without the need to move all the data from various data centers or ROBO sites.
More details on how FlexCache works in cloud-based analytics can be found here.
Prerequisites
This section highlights the prerequisites that need to be in place before we can proceed with the implementation of NetApp FlexCache with Cloud Volumes ONTAP on AWS.
- AWS Cloud subscription
- An active AWS cloud subscription with the appropriate privileges
- NetApp Cloud Manager subscription with an appropriate Connector deployed and configured on AWS.
- On-premises NetApp cluster with:
- ONTAP 9.6 or higher
- Cluster and Storage Virtual Machine (SVM) administrator privileges
- A valid NetApp FlexCache license (included from ONTAP 9.7 or higher)
- NetApp Cloud Volumes ONTAP instance with:
- Access to NetApp Cloud Manager
- A Cloud Volumes ONTAP instance deployed successfully on the AWS Cloud region of your choice. Read here about how to set up Cloud Volumes ONTAP on AWS Cloud.
- Network connectivity
- Appropriate VPN connection between the on-premises ONTAP cluster and the Cloud Volumes ONTAP instance on an AWS VPC
For additional information around supported and unsupported ONTAP features for FlexCache volumes, please refer to the ONTAP documentation. You can find sizing guidelines for FlexCache here.
How to Set Up FlexCache with Cloud Volumes ONTAP on AWS
The detailed steps involved are as follows. Note that we will be using the GUI to set up Cloud Volumes ONTAP FlexCache volumes for the purpose of this article.
1. Setting up a Cluster Peering Relationship
Setting up NetApp FlexCache with Cloud Volumes ONTAP on AWS starts with configuring cluster peering between the on-premises and Cloud Volumes ONTAP clusters.
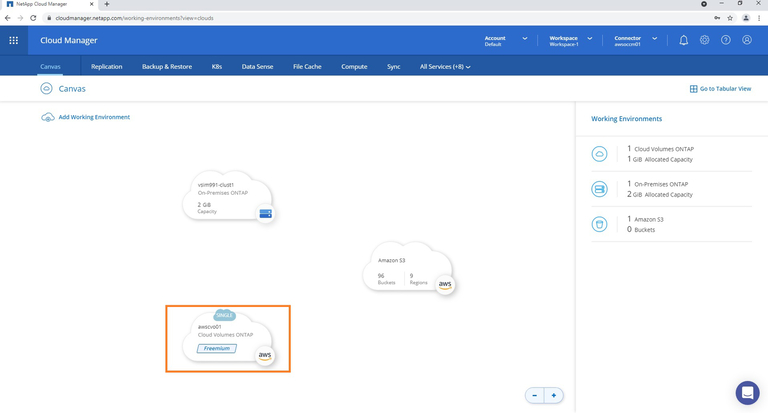
1.1 Go to the NetApp Cloud Manager. On the Canvas start page, double click the AWS Cloud Volumes ONTAP instance you see among your working environments:
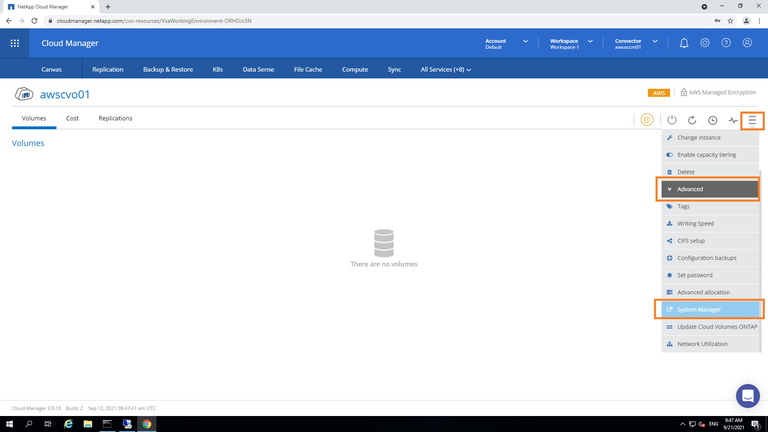
1.2 Once inside the working environment for the AWS Cloud Volumes ONTAP instance, click on the burger menu icon on the right, as shown below. This will open a drop-down menu.
Click on the “Advanced”, and then select “System Manager” from the options presented. This will open the NetApp System Manager view for the Cloud Volumes ONTAP instance.
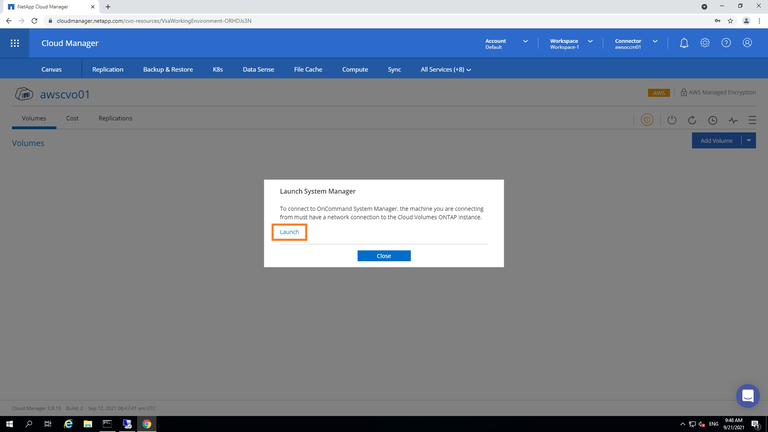
1.3 In the following pop-up window, click on the “Launch” link. Ensure the networking connectivity exists from your workstation to the Cloud Volumes ONTAP instance deployed on your AWS Cloud VPC.
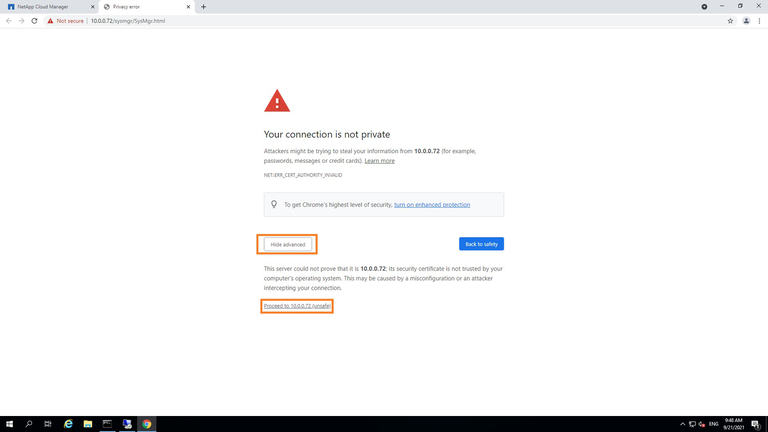
1.4 If you are prompted to confirm an insecure connection due to the use of default SSL certificates on the Cloud Volumes ONTAP instance, click on “Advanced” and then on “Proceed to <ip address>,” as shown below.

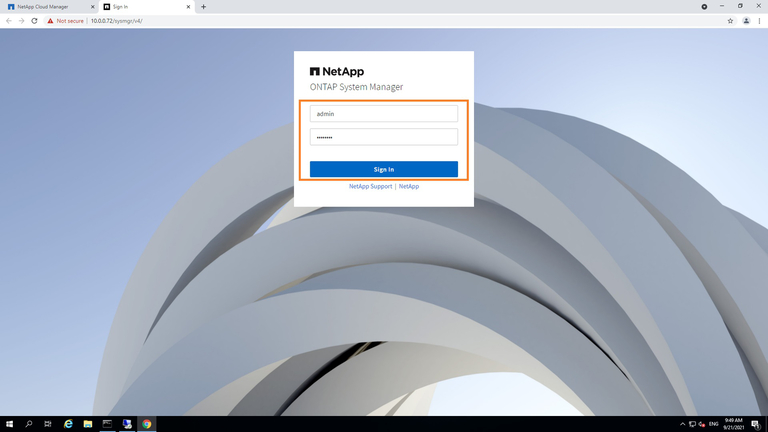
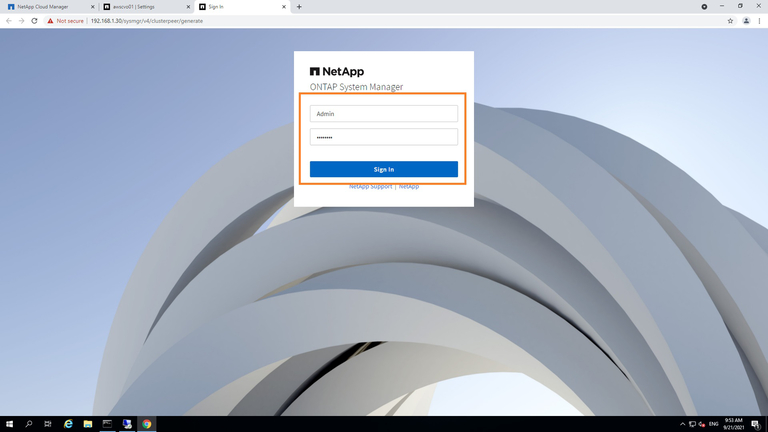
1.5 Log in to System Manager using the appropriate credentials.
1.6 In ONTAP System Manager, go to the menu on the left. Click on the “Cluster” option and select “Settings” from the submenu presented.
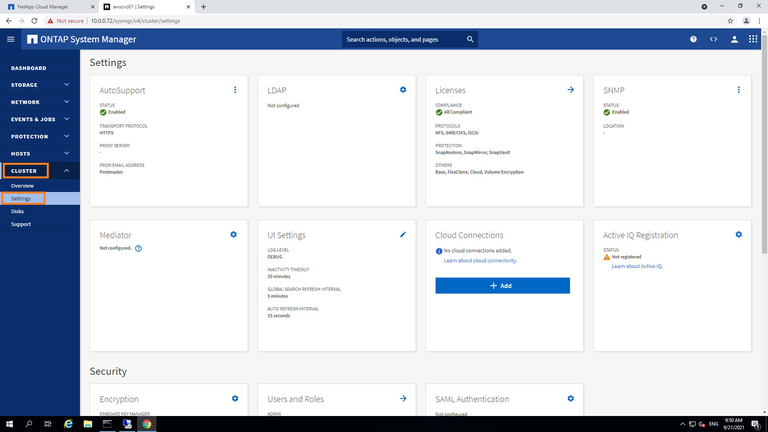
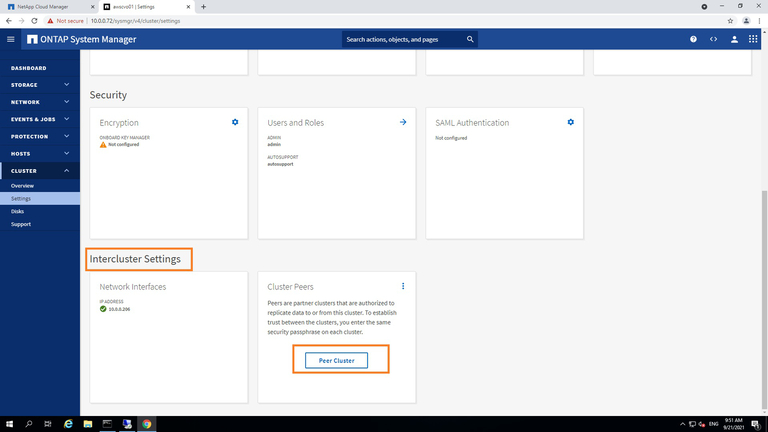
1.7 On the Setting screen, scroll down until you reach the “Intercluster Settings” section. Click “Peer Cluster” as shown below in order to begin the cluster peering process.
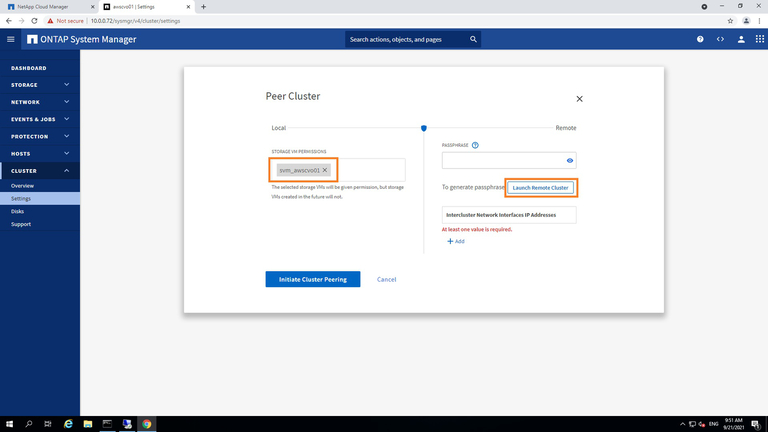
1.8 From the Cluster peering window, make sure you select the appropriate SVM to use with the Cloud Volumes ONTAP instance.
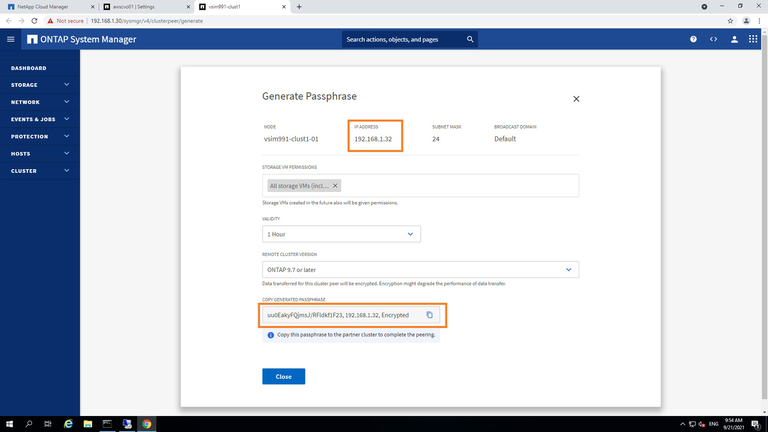
When you are done, click the “Launch Remote Cluster” link to launch the System Manager view for your on-premises cluster. This will generate an authentication passphrase.
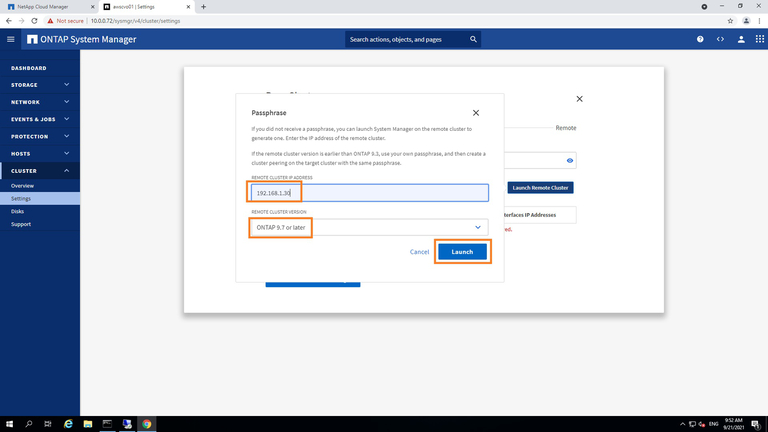
1.9 Provide the IP address of the on-premises cluster and select the appropriate ONTAP version of the cluster. Note that this IP address needs to be the cluster management IP of the on-premises cluster and should be fully reachable from the AWS-based Cloud Volumes ONTAP instance.
When you’re done, click “Launch.”
1.10 Similar to earlier, if you are prompted to confirm an insecure connection due to the use of default SSL certificates on the on-premises ONTAP instance, click “Proceed,” as shown below.
1.11 Now log in to the System Manager using your appropriate credentials.
1.12 From the on-premises ONTAP instance, verify and note down the Cluster Management LIF IP and the generated passphrase.
These will both be needed later.
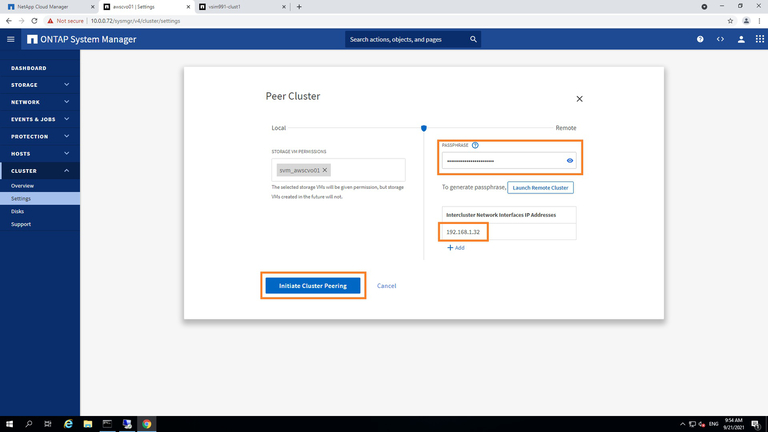
1.13 Now, go back to the System Manager view of the Cloud Volumes ONTAP instance. Here you will paste or type in the passphrase generated in the previous step.
Add / verify the Intercluster network interface IP address and click the “Initiate Cluster Peering” button to start the peering process.
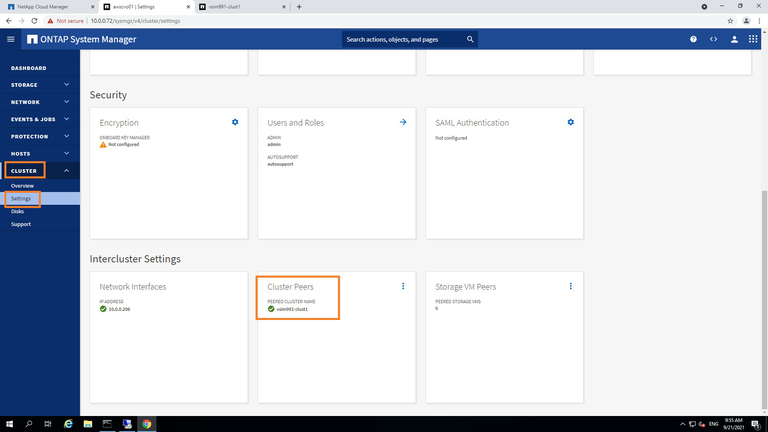
1.14 Once complete, verify the peering is in place by navigating to the Intercluster settings section, as shown below.
2. Setting up the SVM Peering Relationship
Now that the cluster peering is set up between your on-premises ONTAP cluster and the Cloud Volumes ONTAP cluster, the next step is to set up the Storage Virtual Machine (SVM) peering between the two clusters.
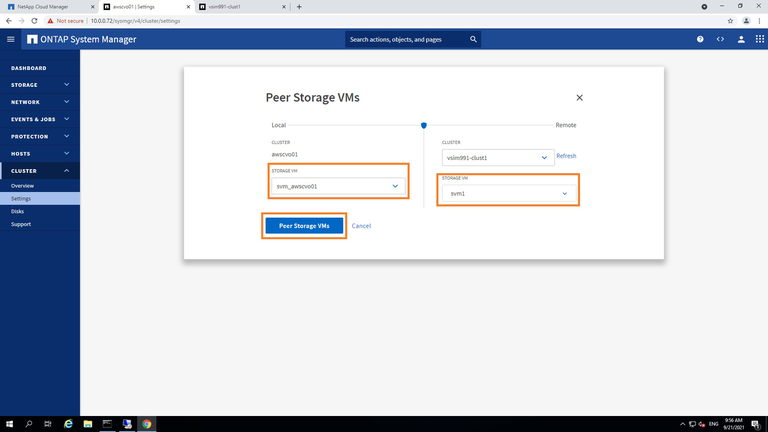
2.1 In the System Manager Settings window, go to the “Storage VM Peers” option under “Intercluster Settings.”
Click the three dots to expand the menu and select the “Peer Storage VMs” option.

2.2 Select the appropriate Storage VM names for the local (Cloud Volumes ONTAP) instance and the remote (on-premises ONTAP) instances and click “Peer Storage VMs” to begin the SVM peering process.
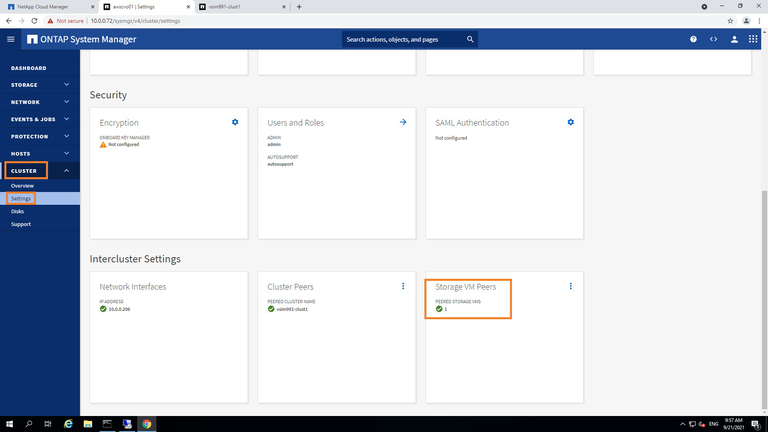
2.3 Once complete, you will be able to review this by going from Cluster -> Settings -> Intercluster Settings, as shown below.
3. Verify FlexCache Application Settings
We will now verify that FlexCache is enabled to leverage the SVM peering relationship set up earlier.
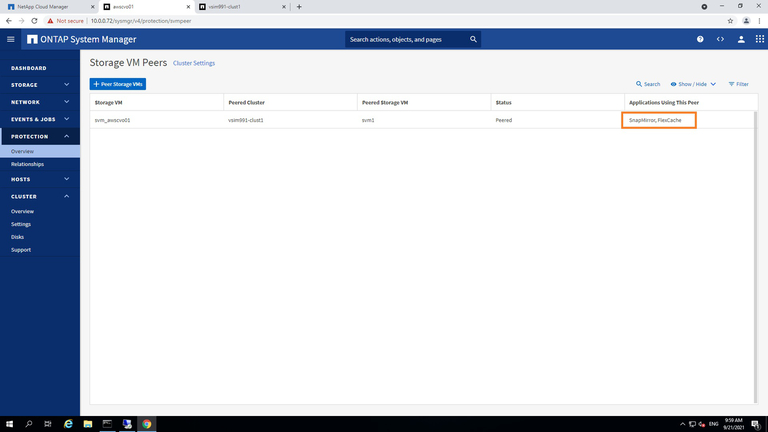
3.1 In the Settings page of System Manager, find the “Storage VM Peers” menu under the Intercluster Settings.
Expand the menu by clicking the three vertical dots and select “Manage Storage VM Peers” from the options presented.
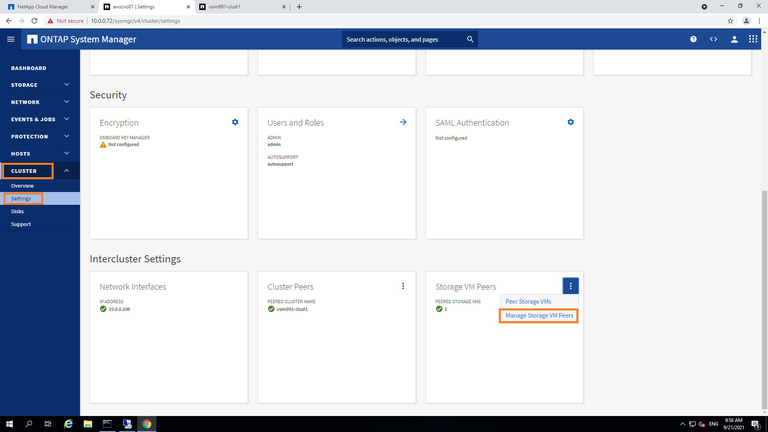
3.2 This will take you to the Storage VM Peers view. Here, you can verify that FlexCache is already enabled as a valid application that can use this SVM peering as shown below.
4. Create a FlexCache Volume on Cloud Volumes ONTAP
Now that both cluster and SVM peering are set up between the on-premises and AWS Cloud ONTAP instances and FlexCache is enabled, we will go ahead and create the FlexCache volume on the Cloud Volumes ONTAP instance on AWS.
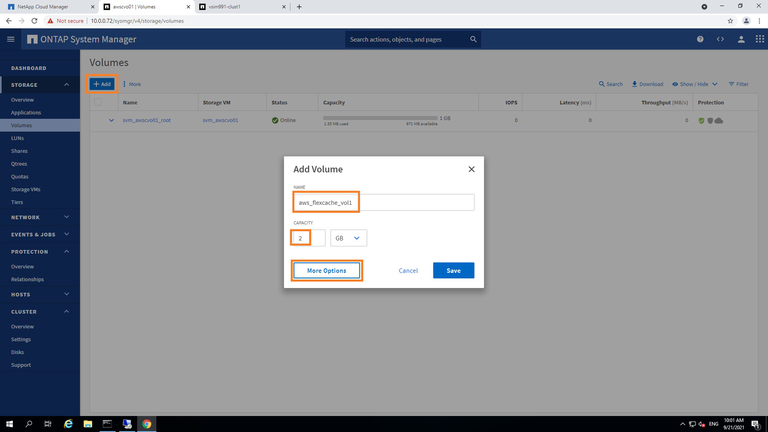
4.1 On the left-hand menu of the System Manager view for the AWS Cloud Volumes ONTAP instance, click the “Storage” menu option.
In the expanded menu, select “Volumes.”

4.2 Click on “+Add” and type a name for the FlexCache volume and select the size. Note the sizing considerations referenced in the prerequisites section above.
When you are done, click the “More Options” button.
4.3 Check the checkbox to add this volume as a FlexCache volume for a remote volume. This will enable you to edit the cluster settings below, where you can select the on-premises cluster name, the appropriate SVM name, and the source volume on the SVM for which you’ll use to create the FlexCache volume.
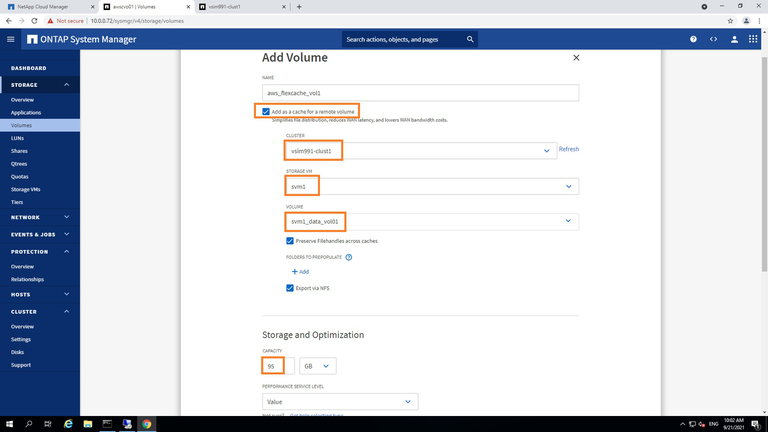
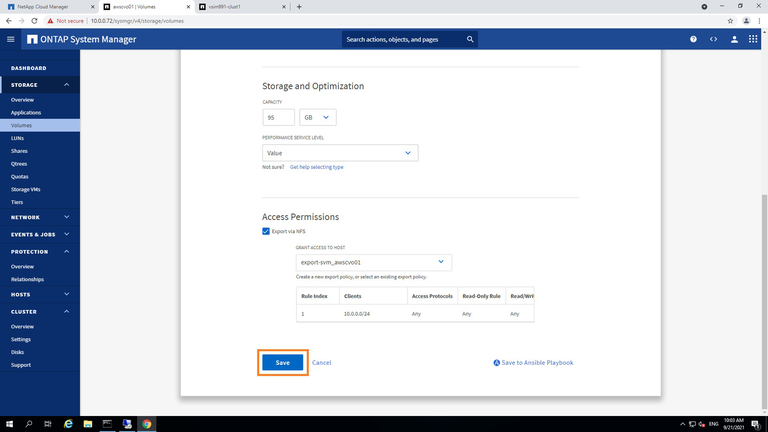
4.4 You can review the rest of the settings and options on this page as needed. For the purpose of this demonstration, we will leave them all set as default.
When you’re done, scroll down to click “Save.”
4.5 This will now create the FlexCache volume on the Cloud Volumes ONTAP instance on AWS Cloud as a cache volume for the on-premises source data volume. You can view the details by clicking on the name of the FlexCache volume, as shown below.
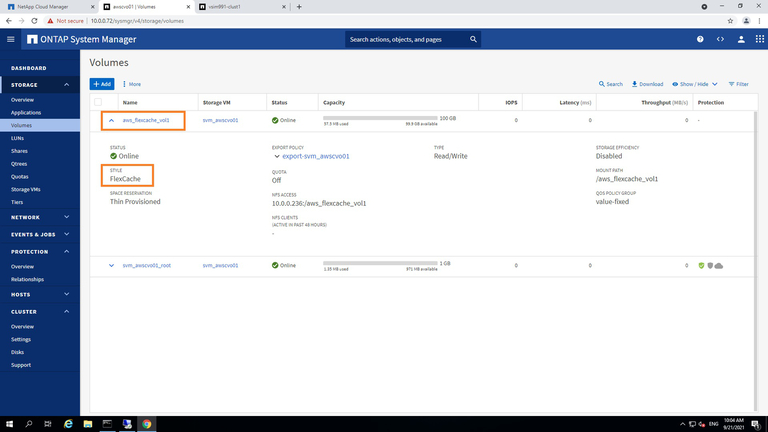
4.6 And you’re done. You now have a working FlexCache volume on NetApp Cloud Volumes ONTAP running on AWS.
When comparing the System Manager view of the source volume (on-premises) and the destination FlexCache volume (on AWS Cloud), you can see the space consumption difference between the two volumes due to the inherent benefits of FlexCache.

Summary
NetApp FlexCache and NetApp Cloud Volumes ONTAP on AWS provides a convenient way for the customers to burst, migrate and access various datasets generated across various on-premises or other cloud locations into a centralized AWS cloud location without the need to do a clunky and expensive data migration, whether it’s to take advantage of AWS big data services or to move data between repositories in a multicloud storage deployment.
This article illustrates how simple it is to set up FlexCache on Cloud Volumes ONTAP on AWS. If you are implementing NetApp FlexCache in production, it is important to note a number of best practice recommendations such as turning off the last accessed time updates (atime-updates) on the origin volume in order to avoid invalidations on files that are cached when there is only a read at the origin. Please refer to the NetApp Technical Report 4743 for the full list of these best practices.