Share
Multicloud architectures have become the go-to deployment option in digital transformation strategies as they reduce vendor lock-in while offering workload availability and resilience. But while these deployments offer myriad benefits, they are often complex to configure, such as in the case of running a stateful multicloud solution in Kubernetes on AWS and Azure.
In this article, we’ll take a look at how to deploy a multicloud setup to host a stateful application.
Use the links below to jump down to the section on:
- Why Deploy a Kubernetes Cluster Across Multiple Clouds?
- How to Set Up a Multicloud Kuberentes Cluster on AWS and Azure
- Summary
Why Deploy a Kubernetes Cluster Across Multiple Clouds?
Though multicloud setups differ in complexity, there are several use cases that may require Kubernetes cluster nodes to be deployed across different cloud services. Some such use cases include:
- Reducing geographic latency and related performance constraints
- Regulatory or compliance factors
- Disaster recovery requirements
- Specific capabilities such as custom hardware or access to certain vendor-managed services
How to Set Up a Multicloud Kubernetes Cluster on AWS and Azure
In this section we will show how to deploy and configure a multicloud Kubernetes cluster running on AWS and Azure cloud. We’ll be using an AWS EC2 instance to install the Kubernetes control plane, while the worker nodes of the cluster will be set up on a total of three VMs—one in AWS and two in Azure.
1. Configuring the Master Node on AWS
We begin with configuring the master node to host the Kubernetes control plane. This node will be an Amazon EC2 instance and will be responsible for scheduling and managing pods in containers. The procedure involves creating the EC2 instance, deploying Docker, installing Kubernetes, and initiating the kubelet service on the node.
Prerequisites
- An AWS user account with permission to deploy resources
- The AWS CLI client with SSH enabled
We also assume that the reader is familiar with the AWS CLI tool, common CLI commands, kubeadm, and the kubectl tool.
To deploy the Kubernetes control plane, follow the steps below.
1.1 Setting Up the EC2 Instance
The first stage will be to set up your Amazon EC2 instance.
1.1.1. First, log in to the AWS Portal
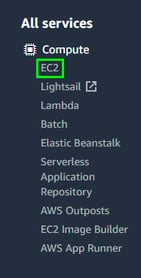
1.1.2. In the portal, click on “Services,” then select “EC2” under theCompute services category.
1.1.3. Now go to the panel on the left side of the EC2 console and select “Instances.”
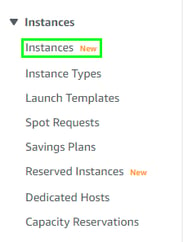
1.1.4. On the Instancespage, click on “Launch Instance.”

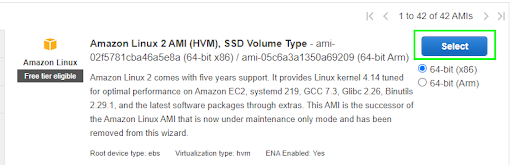
1.1.5. The next page lists a number of machine images that can be used for various workloads. For the purpose of this tutorial, we use the “Amazon Linux 2 AMI” image, as it simplifies provisioning since there are no manual steps required to install OS and storage.
You can also opt for any machine image (other than the one we used for this guide) running a Linux distribution for setting up the workload.
Once you pick an image of your choice, click “Select.”
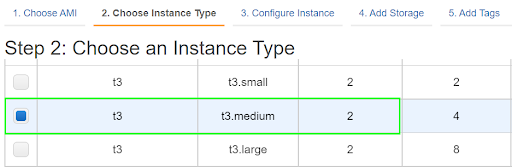
1.1.6. Next, select the Instance type you would like to use.
Quick Tip: The Kubernetes control plane is moderately resource-heavy, so it requires an instance with at least 2 vCPUs. In this exercise, we used the t3.medium instance that supports workloads with moderate resource consumption. The instance also automatically persists stateful data on AWS EBS, eliminating the need to configure a storage bucket, such as Amazon S3, separately.
Special Note: As noted above, Amazon AMIs come with pre-configured storage, which eliminates the effort required for setup. For other instances, it is required to connect the instances to storage systems manually for statefulness.
1.1.7. For the Configure Instance, Add Storage, and Add Tagssettings, accept the default configurations and skip to the next step.
1.1.8. In the Security Groupsettings menu, click on “Create a new security group,” which initiates a security group with the default settings.

Quick Tip: Choosing the default security group settings means your instance will be exposed to the public internet. We can use this setting to connect to other internet services like Azure. While this is suitable for a test cluster, like the one used for this exercise, in production clusters it presents a security vulnerability. As a result, for production instances, it is highly recommended to set appropriate security group rules that allow access from only whitelisted IP addresses.
1.1.9. Click“Review and Launch” to verify the configuration details of the EC2 instance.

Once done, verify the instance configuration settings. This redirects to a key-pair creation page. The AWS console can create private and public RSA keys if a pair doesn’t exist. Create these keys, download them, and keep them safe as these will be used for secure access to the EC2 endpoint.
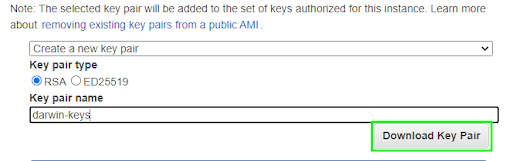
Click “Launch” to activate the instance.
1.2 Setting up the Kubernetes Master Node
Now we will show you how to set up Kubernetes on the master node.
1.2.1. First, connect a CLI client to the EC2 instance via SSH.
This is done by first changing the client's current directory to the folder hosting the keys.pem file generated in step #9 above.
To ensure this file is not publicly viewable, run the following command:
$ chmod 400 darwin-keys.pem1.2.2. Connect to the instance via SSH using the public DNS, as shown:
ssh -i "darwin-keys.pem" ec2-user@ec2-18-132-193-221.eu-west-2.compute.amazonaws.com1.2.3. This returns the prompt asking to continue connecting. Typing yes establishes a permanent connection with the instance as a host, which is shown by the prompt:

Quick Tip: Clicking yes on the default fingerprint prompt is an easy way to identify and verify the host being connected to. However, this also makes it easy for malicious actors to carry out man-in-the-middle attacks since they can reroute the SSH connection to a different host by changing the public key. When setting up production environments, it is recommended to leverage a script argument to choose a fingerprint using the command:
$ nmap --script ssh-hostkey <host_ip_address> --script-args ssh_hostkey=sha2561.2.4. Now, install Docker as a container runtime for the host by running the command:
$ sudo yum install docker -y1.2.5. Initiate Docker using the command:
$ sudo systemctl start docker1.2.6. Then activate the Docker runtime on the EC2 host using the command:
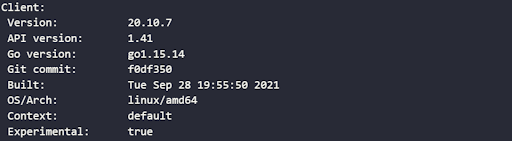
$ sudo systemctl enable docker1.2.7. It is always a recommended practice to ensure an installation is correctly complete. The installation can be verified by running the command:
$ docker --versionThe configuration details are returned with a response similar to:
1.2.8. To install Kubernetes on the host, first download and set up the repositories using the command:
$ cat <<EOF > /etc/yum.repos.d/kubernetes.repo
> [kubernetes]
> name=Kubernetes
> baseurl=https://packages.cloud.google.com/yum/repos/kubernetes-el7-x86_64
> enabled=1
> gpgcheck=1
> repo_gpgcheck=1
> gpgkey=https://packages.cloud.google.com/yum/doc/yum-key.gpg https://packages.cloud.google.com/yum/doc/rpm-package-key.gpg
> EOF
This command above creates a kubernetes.repo directory and downloads the binaries to set up the kubectl, kubeadm and kubelet services.
1.2.9. The next step is to prepare and install the kubectl and kubeadm tools for cluster management:
$ yum install -y kubectl
$ yum install -y kubeadm
1.2.10. Initialize the Kubelet service by running the command:
$ kubeadm init
This command does three things:
a. Sets up the Kubelet environment and configuration file then starts the Kubelet service, initializing the Kubernetes cluster.
b.Outputs the command to set up Kubeconfig files which help manage information about Kubernetes cluster entities. These files need to be set up to start using the cluster. To do so, create a directory, copy files from/etc/kubernetes/admin.conf to the new destination directory and then change ownership to assume privileges. This involves the following commands in the following order:
$ mkdir -p $HOME/.kube
$ sudo cp -i /etc/kubernetes/admin.conf $HOME/.kube/config
$ sudo chown $(id -u):$(id -g) $HOME/.kube/config
c. kubeadm also triggers the join command that is used by worker nodes looking to join the cluster. Copy this output as it will be used by the worker nodes to connect with the control plane.
kubeadm join --token 2246a6.83b4c7ca38913ce1 10.147.114.12:6443 --discovery-token-ca-cert-hash sha256:ef25f42843927c334981621a1a3d299834802b2e2a962ae720640f74e361db2a
1.2.11. To verify that the cluster is up and running, use the command:
$ kubectl get pods --all-namespaces -o wideThe command returns details of the active nodes with an output similar to:

2. Configuring Worker Nodes in Azure and AWS
Once we are done setting up the master node, the next step to complete the multicloud setup is to configure the worker nodes. This stage goes through the steps to run Kubernetes on two Azure virtual machines and one AWS EC2 virtual machine. The VMs will act as the cluster’s worker nodes, responsible for hosting the pods that run containerized applications.
Prerequisites
- An Azure account with permissions to create resources
- The Azure CLI tool and a CLI client installed on the workstation
- An AWS account with permissions to setup an EC2 instance
We also assume that the user is conversant with basic CLI commands and tasks of MS Azure.
2.1 Creating the Azure Virtual Machines
To create Azure VMs, first log in to the Azure portal
2.1.1. From the list of Azure services, select “Virtual Machines.”

2.1.2. On theVirtual Machines page, click on “Create.”

2.1.3. On the Create a virtual machinepage, enter a Virtual machine name and choose the region you wish to deploy the service to.
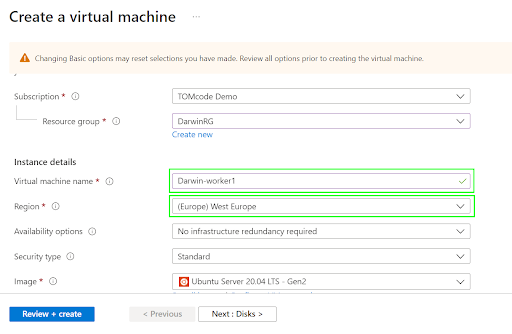
2.1.4. For theDisks, Networking, Management, Advanced and Tags sections, accept the default settings and skip to the next step.
Click on “Review + Create” to verify the details of the virtual machine and initiate its creation.
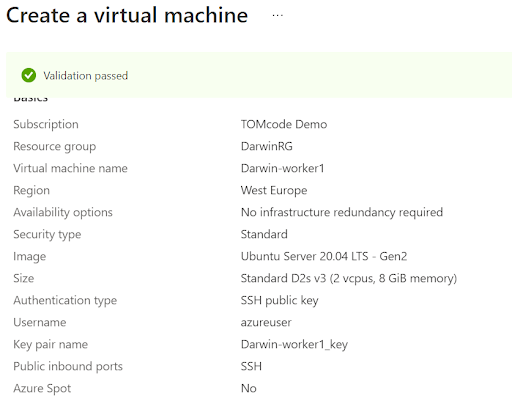
Quick Tip: Using the default networking setting exposes the virtual machine to the public internet via SSH. This is only recommended for testing purposes, and it is strongly recommended to apply appropriate DNS configurations for production clusters.
2.1.5. Once all settings are deemed valid, click “Create.” This will open up a key generation pop-up.
Click “Download private key and create resource” in the pop-up window to continue.
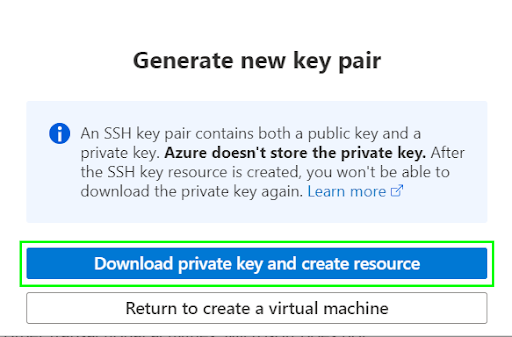
This is the final step of this stage, which creates the virtual machine and generates an SSH key-pair that can be used to connect with the VM from a CLI client. Follow and replicate the same steps listed above to configure the second Azure VM. This will ensure both nodes are ready for Kubernetes deployment.
2.2 Creating the AWS EC2 Virtual Machine
To create the third worker node, log into the AWS console.
2.2.1. Since we are configuring a worker node, a t3.small instance would suffice. Start with creating an EC2 instance and name it darwin-worker3.

Note: Creating a EC2 VM will essentially follow the same steps as creating any other EC2 instance. You can also follow step 1.1 outlined above for creating the EC2 VM instance.
2.2.2. Once the instance is up, connect it to the CLI client using SSH and the key pair created when spinning up the instance. Once the connection is successful, expect a prompt similar to:

Once done, we will proceed to follow the steps to install docker and download Kubernetes binaries.
2.3 Installing Docker and Kubernetes on the Nodes
The final stage to configuring your worker nodes is to install Docker and Kubernetes on the newly created VMs.
2.3.1. First, connect each instance to the CLI client using SSH keys. To do so, first locate the keys’ directory, then ensure they are not publicly accessible using the command:
$ chmod 400 darwin-worker1.pem2.3.2. Now create a secure shell connection to the VM using the command:
ssh -i ~.ssh/darwin-worker1 azureuser@20.93.162.157Note: Here darwin-worker1 is the Azure public key pair that you obtained after configuring the VM. You can use the same key for the second Azure VM or use the specific key that you obtain after setting up the second Azure VM. For the AWS EC2 VM, the key pair would be the one that you obtain after configuring the EC2 VM.
Additionally, note that in the command above azureuser@20.93.162.157 is the Azure private IP DNS name. Make sure that you use the right DNS name for each of the VMs.
Repeat both the above steps for the remaining two VMs.
2.3.3. Once the host connects to the CLI client, redo the steps covered in the Setting Up the Kubernetes Master Node stage to install Docker and download the Kubernetes binaries on each worker node for both VMs.
This essentially means that we are installing kubeadm on all the nodes to ensure they can join the cluster. We are also installing the kubectl service to enable the execution of Kubernetes commands on these nodes from the CLI client.
2.3.4. Before joining the worker nodes to the cluster, it is important to set the master node’shostname and add the worker nodes’ public IP addresses to the EC2 (master) instance’s hosts file:
$ hostnamectl set-hostname master-node
$ cat <<EOF>> /etc/hosts
  10.147.114.12 master-node
  20.93.162.157 Darwin-worker1 worker-node1
  51.124.216.131 Darwin-worker2 worker-node2
  172.31.187.41 Darwin-worker3 worker-node3
  EOF
This command sets the node’s hostname to master-node. Besides this, the cat command does the modification on the hosts file to enable the connection of Azure and EC2 instances without having to specifically set up a DNS service.
2.3.5. Locate the kubeadm join script that you copied down from running the kubeadm init command back when you were setting up the master node. Run this command on each worker node to join the cluster.
$ kubeadm join --token 2246a6.83b4c7ca38913ce1 10.147.114.12:6443 --discovery-token-ca-cert-hash sha256:ef25f42843927c334981621a1a3d299834802b2e2a962ae720640f74e361db2aOnce executed, the respective node starts communicating with the cluster and returns a successful message similar to:

This concludes the setting up of the multicloud cluster with one master (EC2) and three worker nodes (two Azure VMs and one AWS EC2 VM).
3. Troubleshooting the Multicloud Cluster Setup
The multicloud cluster connection can be verified using the command:
$ kubectl get nodesWhich returns a result similar to:

This output indicates a successful connection between the control plane running in the EC2 instance and the Azure and AWS VMs deployed to run Kubernetes workloads. The cluster can then be used to run any containerized application.
Running a Sample Application
As the last part to test and ensure the setup has been configured correctly, let’s run a deployment using a container image that uses NGINX to return all requests.
1. First, use the create command to create the deployment, as follows:
$ kubectl create deployment hello-node --image=k8s.gcr.io/echoserver:1.4This command creates a deployment that manages a pod which runs a container based on the image at k8s.gcr.io/echoserver:1.4.
When the deployment is complete, it will return a prompt similar to:
deployment.apps/hello-node created.
- Confirm the successful deployment by running the command:
$ kubectl get deploymentsExpect an output similar to:

You can also check the cluster events to confirm a successful deployment:
$ kubectl get events
Which returns a response similar to the output shown below:

- The Kubernetes dashboard provides a GUI for three deployment and management of applications. To connect the cluster to the Kubernetes dashboard, first enable the dashboard by running the command:
$ kubectl apply -f https://raw.githubusercontent.com/kubernetes/dashboard/v2.4.0/aio/deploy/recommended.yaml- To access the dashboard, first forward the cluster configuration to an access port using a command of the form:
$ kubectl --kubeconfig ./admin.conf proxy --address='0.0.0.0' --port=8002 --accept-hosts='.*'
- The above command establishes a dashboard UI that can be accessed in a browser using a URL that takes the format:
http://<master-node-IP>:8002/api/v1/namespaces/kube-
system/services/https:kubernetes-dashboard:/proxy/
In our case of this demo, the URL we use is:
http://10.147.114.12:8002/api/v1/namespaces/kube-
system/services/https:kubernetes-dashboard:/proxy/
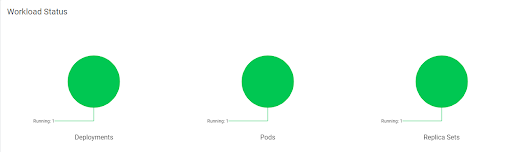
The URL returns the workload status, as shown:
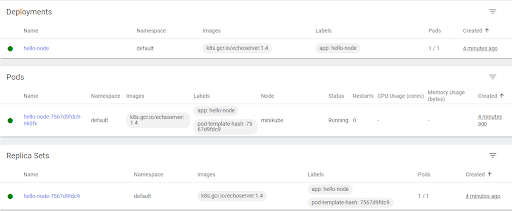
And the summary of various resource objects:
- As the pod is only accessible to an internal IP address, to make it accessible to the public internet, expose the pod by running the command:
$ kubectl expose deployment hello-node --type=LoadBalancer --port=8080The above command instructs the application code within the k8s.gcr.io/echoserver:1.4 image to only listen on TCP port 8080.
- View the service created by running the command:
$ kubectl get services
With an output similar to:

Quick note: The cloud provider (AWS) assigns the IP address (in our case - 18.117.253.148) to access the service.
Now the service can be accessed using the client URL http://<external-ip>:<node-port>. For this demo the address would be http://18.117.253.148:31571, which directs to a page listing the details of the request, as shown:
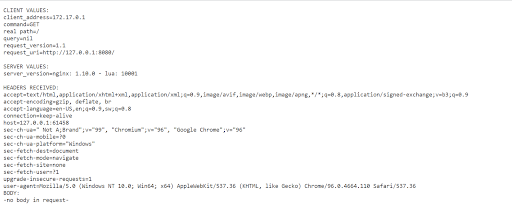
Once the service is validated to be working as intended by verifying the output (as shown above), the service is ready to host an application.
Summary
Orchestrating an ecosystem supported by different cloud offerings poses distinct complexities. Firstly, it is difficult to implement a cohesive framework since multicloud environments involve integration between different vendor solutions, service tiers and standards. As a result, the complexity also pans out to managing costs, implementing a centralized performance monitoring mechanism or embracing a comprehensive security posture.
To help with this, NetApp’s Cloud Manager enables organizations to centrally manage multicloud environments that run on Cloud Volumes ONTAP storage volumes on AWS, Azure, and Google Cloud. This makes transferring data between persistent storage for Kubernetes on AWS, Azure, or Google Cloud much easier, and provides a host of additional data management benefits including enhanced data protection, instantly provisioned and writable clone volumes, and zero-data loss high availability.

