Subscribe to our blog
Thanks for subscribing to the blog.
October 15, 2020
Topics: Cloud Volumes ONTAP AWSCustomer Case StudyMaster10 minute read
Block-level storage is essential for applications that require full control over how data is stored and accessed, which is necessary to make these operations as efficient as possible. When using Amazon EBS, or any other block-level storage solution—including Cloud Volumes ONTAP—block-level devices will appear on an Amazon EC2 host as physical volumes the same way that local SSDs appear for on-premises servers. These physical volumes can then be formatted, combined, and allocated as required.
LVM (Logical Volume Manager) is a storage abstraction layer built into the Linux kernel that enables multiple physical volumes to be grouped together and treated as a single logical volume. These LVM groups make managing and working with block-level storage significantly easier, and provide features such RAID, snapshot backups, data encryption, and much more. With LVM, storage volumes can also be hot-swapped without downtime, which can be used to migrate data from Amazon EBS to Cloud Volumes ONTAP.
In this article, we’ll provide an overview of LVM, storage and data management via Cloud Volumes ONTAP, and the benefits of using them both together. We’ll also provide a practical demonstration with LVM commands to perform a zero-downtime migration from Amazon EBS to Cloud Volumes ONTAP.
Use this link to jump down to the how-to section, and get started with migrating to iSCSI storage hosted by Cloud Volumes ONTAP.
Overview of Logical Volume Manager (LVM)
LVM is a mature and integral part of Linux that is both easy to use and feature rich. Physical disks and partitions are made available to LVM by marking them as a Physical Volume (PV). One or more physical volumes are combined to create a Volume Group (VG), which acts as a container for multiple Logical Volumes (LG). End users of the storage can work with these logical volumes, rather than accessing the physical volumes directly.
Thanks to the architecture of LVM, storage management operations are very easy to perform, cutting out otherwise difficult tasks for admins. For example, creating a storage volume across multiple disks works out of the box, with optional support for a variety of RAID levels (LVM with RAID works the same way as it does with physical volumes). Making new disks available to a logical volume simply involves adding new PVs to the volume group it is hosted on. Volume groups can also be split apart or merged with other volume groups.
Advanced features of LVM include the ability to create instant, storage-level snapshots. Specialized applications, such as database services, are able to flush data to disk and pause write I/O activity prior to a snapshot backup, and while still remaining online. The LVM snapshot appears to users just as any other logical volume would, and can be mounted and accessed as normal.
Migrating to Cloud Volumes ONTAP
Cloud Volumes ONTAP is NetApp’s data management solution for hyperscaler cloud environments, namely AWS, Azure, and Google Cloud Platform. Cloud Volumes ONTAP provides sophisticated features to provision and manage storage across your enterprise. For example, whereas LVM snapshots are local to the machine on which they are created, snapshots created using Cloud Volumes ONTAP exist server-side, and can be rapidly made available to any other host.
Cloud Volumes ONTAP HA also provides high availability across Availability Zones, with zero data loss and minimal downtime in the case of a failover. This means that your data and snapshots are both stored safely in multiple locations. Cloud Volumes ONTAP provides many other features, such as transparent Data Compression and Deduplication, the ability to instantly clone snapshots to create writable volumes for testing, cross-region data replication, and a whole lot more.
In these next sections, we will look at a practical demonstration of setting up and connecting to iSCSI storage hosted on Cloud Volumes ONTAP, and how Amazon EBS disks can be migrated to this storage without downtime using LVM.
Setting Up an Amazon EC2 Host Machine
For the purposes of this demonstration, we will use a t2.micro instance running Red Hat Enterprise Linux 8. As well as the root drive, an additional 32GB Amazon EBS disk has also been attached to the machine as /dev/xvdb. We will start by setting up an LVM environment that makes use of this disk. All of the following commands should be executed as the root user.
We will start by ensuring that lvm has been correctly installed:
$ yum install lvm2
The following commands will perform the LVM setup we will use:
$ pvcreate /dev/xvdb                # Create an LVM Physical Volume
  Physical volume "/dev/xvdb" successfully created.
$ vgcreate /dev/data /dev/xvdb      # Create an LVM Volume Group
  Volume group "data" successfully created
$ lvcreate -L +10G --name files data     # Create an LVM Logical Volume
  Logical volume "files" created.
$ mkfs -t ext4 /dev/data/files      # Create a filesystem
mke2fs 1.45.4 (23-Sep-2019)
Creating filesystem with 2621440 4k blocks and 655360 inodes
Filesystem UUID: 14f21bbd-bd48-4ea7-ae67-2a780304061d
Superblock backups stored on blocks:
       32768, 98304, 163840, 229376, 294912, 819200, 884736, 1605632

Allocating group tables: done
Writing inode tables: done
Creating journal (16384 blocks): done
Writing superblocks and filesystem accounting information: done

$ mount /dev/data/files /mnt             # Mount the logical volume
$ touch /mnt/my_file.txt            # Create a test file
We now have LVM serving out a logical volume that we can read and write to. Although we have used a single physical device in this setup, we could have added as many disks as we require when creating the volume group. As we will see later, this can also be done after the volume group has been created.
Setting Up Client-Side iSCSI Initiators
In order for our Amazon EC2 host to make an iSCSI connection to Cloud Volumes ONTAP, we will need to perform some client-side setup. This typically involves installing the following package:
$ yum install iscsi-initiator-utils
The initiator name of the client will be required in the next step, in order to control the LUNs that the host can connect to within Cloud Volumes ONTAP. Execute the following command to find the initiator name:
$ cat /etc/iscsi/initiatorname.iscsi
InitiatorName=iqn.1994-05.com.redhat:495e218bce4c
Deploying Block-Level iSCSI Storage
After deploying Cloud Volumes ONTAP, it’s very easy to get up and running with iSCSI storage that you can connect to from Amazon EC2. In this section, we will look at how this can be achieved using NetApp Cloud Manager.
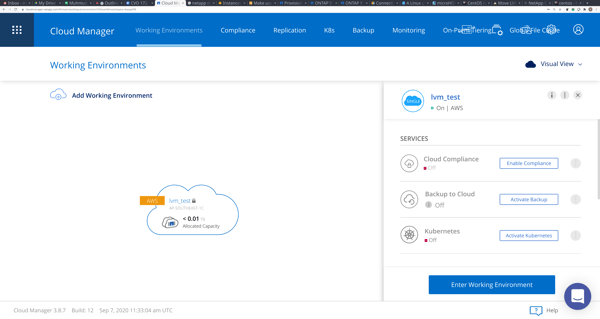
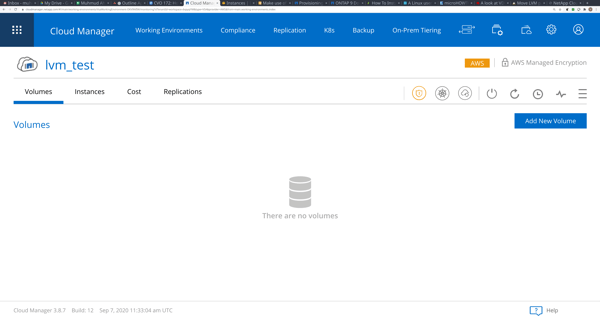
We must first create a new storage volume that will act as a container for our block-level storage allocations, or LUNs. From the Working Environments dashboard, we can double-click the Cloud Volumes ONTAP environment we wish to deploy the volume to, and then click Add New Volume.
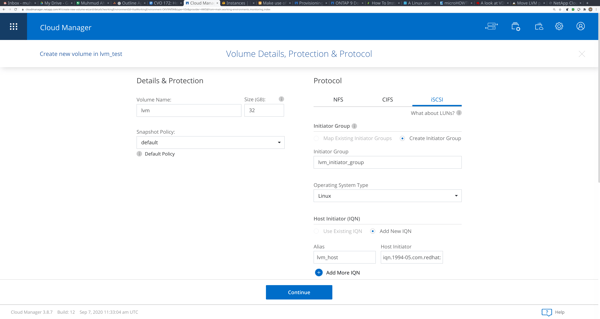
Cloud Manager will bring up a wizard interface that allows us to configure the new storage. As well as specifying a name for the storage volume and it’s initial size, we will also configure iSCSI as the access protocol. For iSCSI volumes, Cloud Manager will automatically create a new LUN for us within volume. For the host initiator, we should enter the value we retrieved from our Amazon EC2 host in the previous section.
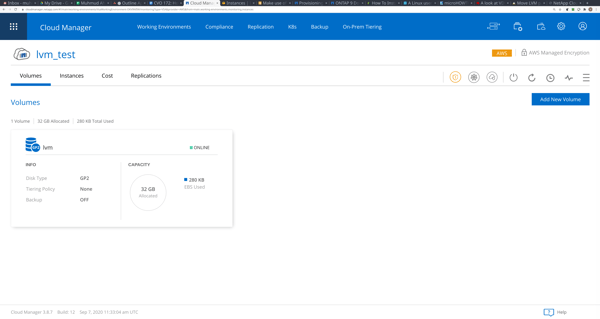
The next screen will allow us to further configure the deployment of this volume, such as by selecting the underlying Amazon EBS disk type we wish to use. After completing the wizard, we will return back to the detail view of the Cloud Volumes ONTAP deployment we are using, and should see the new volume displayed there.
Finally, in order to make a connection from our Amazon EC2 host to the LUN within this volume, we will need to find the right IP address to connect to. In Cloud Manager, we can do this by clicking on the burger menu on the right side of the screen, and selecting Information. This will show us various pieces of information related to this Cloud Volumes ONTAP deployment. The value we require is Data (iscsi).
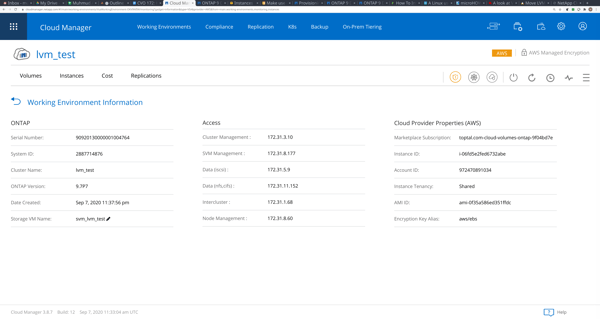
iSCSI Connections to Cloud Volumes ONTAP
We are now ready to make a connection to our new Cloud Volumes ONTAP iSCSI device from the Amazon EC2 host we set up earlier. This can be performed using the following instructions, as described in the NetApp documentation:
$ systemctl enable iscsid # Ensure the iscsid service starts on boot
Created symlink /etc/systemd/system/multi-user.target.wants/iscsid.service → /usr/lib/systemd/system/iscsid.service.
$ systemctl start iscsid  # Start the iscsid service

$ # Discover available LUNs in Cloud Volumes ONTAP
$ iscsiadm --mode discovery --op update --type sendtargets --portal 172.31.5.9
172.31.5.9:3260,1028 iqn.1992-08.com.netapp:sn.7a4ec4d5f1b311eaabc2cd82e2abaf13:vs.2

$ # Make a connection to all LUNs this host has access to
$ iscsiadm --mode node -l all
Logging in to [iface: default, target: iqn.1992-08.com.netapp:sn.7a4ec4d5f1b311eaabc2cd82e2abaf13:vs.2, portal: 172.31.5.9,3260]
Login to [iface: default, target: iqn.1992-08.com.netapp:sn.7a4ec4d5f1b311eaabc2cd82e2abaf13:vs.2, portal: 172.31.5.9,3260] successful.

$ # Verify that an iSCSI session has been started
$ iscsiadm --mode session
tcp: [1] 172.31.5.9:3260,1028 iqn.1992-08.com.netapp:sn.7a4ec4d5f1b311eaabc2cd82e2abaf13:vs.2 (non-flash)
A new physical device should now be available on our host. We can verify this using the fdisk command:
$ fdisk -l
Disk /dev/xvda: 10 GiB, 10737418240 bytes, 20971520 sectors
Units: sectors of 1 * 512 = 512 bytes
Sector size (logical/physical): 512 bytes / 512 bytes
I/O size (minimum/optimal): 512 bytes / 512 bytes
Disklabel type: dos
Disk identifier: 0xd00a186f

Device     Boot Start     End   Sectors Size Id Type
/dev/xvda1       2048     4095       2048   1M 83 Linux
/dev/xvda2 *     4096 20971486 20967391 10G 83 Linux


Disk /dev/xvdb: 32 GiB, 34359738368 bytes, 67108864 sectors
Units: sectors of 1 * 512 = 512 bytes
Sector size (logical/physical): 512 bytes / 512 bytes
I/O size (minimum/optimal): 512 bytes / 512 bytes


Disk /dev/sda: 32 GiB, 34363932672 bytes, 67117056 sectors
Units: sectors of 1 * 512 = 512 bytes
Sector size (logical/physical): 512 bytes / 4096 bytes
I/O size (minimum/optimal): 4096 bytes / 65536 bytes
Live Migration to Cloud Volumes ONTAP
Using LVM, we can now perform a live migration of all data stored on the Amazon EBS disk we originally provisioned and our new iSCSI storage. The following commands can be used to achieve this:
$ # Create a new LVM Physical Volume for the iSCSI device
$ pvcreate /dev/sda
  Physical volume "/dev/sda" successfully created.

$ # Add the Physical Volume to our Volume Group
$ vgextend data /dev/sda
  Volume group "data" successfully extended

$ # Move all data from the Amazon EBS disk to the new iSCSI device
$ pvmove /dev/xvdb /dev/sda
  /dev/xvdb: Moved: 0.00%
  /dev/xvdb: Moved: 9.53%
  /dev/xvdb: Moved: 18.48%
  /dev/xvdb: Moved: 27.38%
  /dev/xvdb: Moved: 36.33%
  /dev/xvdb: Moved: 45.27%
  /dev/xvdb: Moved: 54.22%
  /dev/xvdb: Moved: 62.42%
  /dev/xvdb: Moved: 71.37%
  /dev/xvdb: Moved: 80.31%
  /dev/xvdb: Moved: 89.26%
  /dev/xvdb: Moved: 98.16%
  /dev/xvdb: Moved: 100.00%

$ # Remove the Amazon EBS disk from the Volume Group
$ vgreduce data /dev/xvdb
  Removed "/dev/xvdb" from volume group "data"

$ # Unmark the Amazon EBS disk as a Physical Volume managed by LVM
$ pvremove /dev/xvdb
  Labels on physical volume "/dev/xvdb" successfully wiped.
We have now successfully completed a zero-downtime migration to Cloud Volumes ONTAP. It should be noted that while the move is being performed, data can be read and written to the LVM logical volume without issue.
A Block Storage Customer Case Study
One company that relies on Cloud Volumes ONTAP for block storage is one of the largest tire and rubber companies in the world. With global operations, this US-based enterprise manufactures several automotive and industrial components, and owns and operates on the largest international automotive repair chains.
Having relied on NetApp storage systems for some time, this company was moving to a hybrid cloud strategy to reduce the costs of running their production workloads on AWS. Cloud Volumes ONTAP allowed the company to establish significant cost savings by leveraging several features, such as:
- Uptime and business continuity using the AWS high availability configuration.
- NetApp Snapshot™ technology that was faster and more cost- and space-efficient than native EBS snapshots.
- Space efficiencies for significant cloud data storage cost reductions.
- Instant, zero-capacity data clones to speed up dev/test and lower costs.
- Automatic storage tiering to send infrequently used data to less-expensive Amazon S3 until needed.
- DR and seamless replication between regions with SnapMirror® data replication.
Conclusion
LVM gives you exactly what it says: logical volume management. It’s a powerful solution for managing physical disks under the Linux operating system. As we have seen, LVM can be used to seamlessly migrate existing Amazon EBS storage to Cloud Volumes ONTAP, without requiring downtime. Using LVM in conjunction with Cloud Volumes ONTAP gives you complete control over how you manage data storage from the enterprise level down to an individual host.
While this blog looked at how you can use LVM and iSCSI storage on AWS, Cloud Volumes ONTAP support for LVM also extends to block storage on Azure and Google Cloud, allowing you to take advantage of the entire public cloud.

.png?width=75&height=75&name=yuval-on%20demand%20(1).png)