Share
The agility of the cloud is best utilized when you have the right DevOps practices in place—be it for implementation of CI/CD pipelines or enabling Infrastructure-as-code through cloud automation.
Infrastructure configurations in the cloud can be managed programmatically, just like your application code, thanks to IAC. There are different tools to enable these capabilities and the platform-agnostic nature of Terraform makes it a popular choice for DevOps engineers building their DevOps or IaC pipelines. In an earlier blog we introduced the NetApp BlueXP Console Terraform provider. In this blog, we will demonstrate how easy it is to deploy a BlueXP Console Connector and Cloud Volumes ONTAP using our native NetApp BlueXP Console Terraform provider.
Use the links below to get started:
- How Do You Automate Cloud Volumes ONTAP with Terraform?
- Prerequisites
- Deploying the Connector and the Cloud Volumes ONTAP Instance
How Do You Automate Cloud Volumes ONTAP with Terraform?
Cloud Volumes ONTAP brings the NetApp ONTAP storage system to the public cloud as a software-defined storage system available in AWS, Azure, and GCP. This software-defined storage can be easily consumed as cloud storage in a DevOps pipeline using its powerful API driven interface or through the BlueXP Console GUI.
Unlike the previous options for using thinly-wrapped API calls for automation, BlueXP Console Terraform provider offers a fully supported native module for IAC. It supports the deployment of every component of Cloud Volumes ONTAP, from connectors and aggregates to volumes and CIFS. The deployment can be either single node or highly available, using either pay-as-you-go or BYOL licensing.
Hashicorp’s Terraform allows you to build repeatable and consistent infrastructure resources both on-premises and across public cloud platforms using IAC. As a native provider, NetApp BlueXP Console Terraform provider is in the Terraform registry, thereby reducing the overhead with initial setup and configuration.
In this section we’ll show you how to use the BlueXP Console Terraform provider to create a Connector and set up Cloud Volumes ONTAP. For this example, we are going to do this using an AWS deployment, though it is also possible in Azure and GCP.
Prerequisites
Here is what you’ll need to have set up before you get started:
- Terraform installed on a server
- AWS CLI installed on the server to authenticate to AWS services
- An account registered with https://cloud.netapp.com (it’s free to register)
- Account ID from the BlueXP Console portal (https://cloudmanager.netapp.com)
- A NetApp BlueXP token (https://services.cloud.netapp.com/refresh-token)
- Access keys and secret keys for a user account in AWS with permission to provision resources
- A custom IAM role with the permissions required for the deployment
Here are the reference links for defining permissions : https://mysupport.netapp.com/site/info/cloud-manager-policies https://occm-sample-policies.s3.amazonaws.com/Policy_for_Cloud_Manager_3.8.7.json
You will also need the following configuration files for the deployment:
- variables.tfThe variables for the deployment will be defined in this file
- Terraform.tfvarsThis is used for assigning value to the variables
- main.tfThis is the main Terraform module
- connector.tfTerraform file for creating the NetApp Cloud Connector
Using these configuration files, we will be deploying a BlueXP Console Connector and Cloud Volumes ONTAP in AWS.
A BlueXP Console Connector is a prerequisite for Cloud Volumes ONTAP deployment. First you need to deploy a Connector resource in the target cloud environment so that BlueXP Console can use that for deploying/managing Cloud Volumes ONTAP resources.
Content of files that will be used in this sample deployment is given below. Note that you should replace these variables with values specific to your environment:
Variables.tf
variable "token" {
}
variable "subnetid" {
}
variable "security_group" {
}
variable "region" {
}
variable "account" {
}
terraform.tfvarstoken= "B-SYPzTo5tBLSmG6bGLFHsTTdB7Txxxxddddddd"
subnetid= "subnet-047b3xxxxxxx"
security_group= "sg-09e9d16ebxxxxx"
region= "us-east-1"
account = "account-UFNSB1Rxx"
main.tf terraform {
required_providers {
netapp-cloudmanager = {
source = "NetApp/netapp-cloudmanager"
version = "20.12.0"
}
}
}
Connector.tf provider "netapp-cloudmanager" {
refresh_token = var.token
}
resource "netapp-cloudmanager_connector_aws" "cl-occm-aws" {
provider = netapp-cloudmanager
name = "netappoccm01"
region = var.region
key_name = "rahul_aws_test_terraform"
company = "NetApp"
instance_type = "t3.xlarge"
subnet_id = var.subnetid
security_group_id = var.security_group
iam_instance_profile_name = "cloudmanager-role"
account_id = var.account
associate_public_ip_address = false
}
Deploying the Connector and the Cloud Volumes ONTAP Instance
In this section we’ll detail the entire deployment, from setting up the Connector to the Cloud Volumes ONTAP instance. First, we’ll configure your AWS credentials. There are various options to configure AWS credentials, you can read here for more details on configuring AWS credentials.
1. In this example, we will use AWS CLI with the shared credentials file. $aws configure

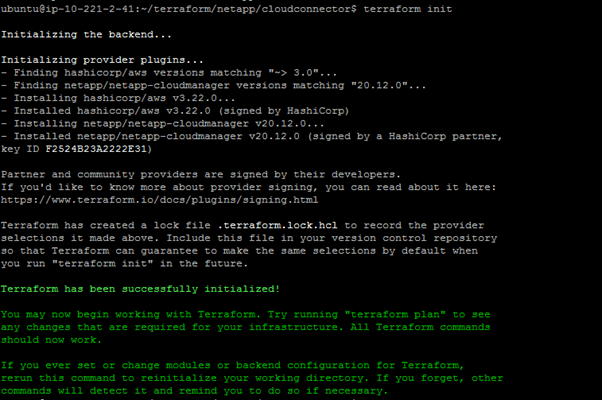
2. Now we are ready to initialize our plugins. To do that, run the following command: $terraform init
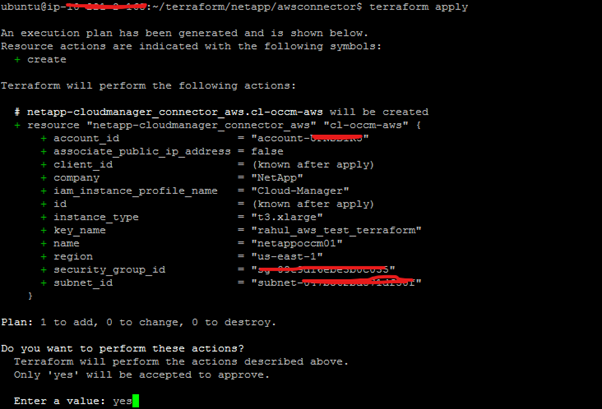
3. Once initialized, we will plan and apply our configuration using the following commands: $terraform plan -out connector
$terraform apply
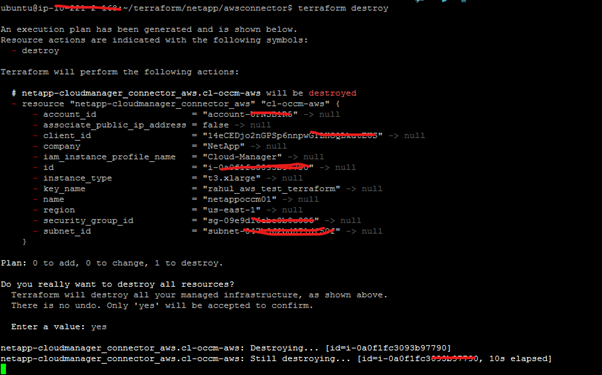
 Note: If you need to destroy a Connector instance created using Terraform you can do that easily with the destroy command:
$terraform destroy
4. We have successfully deployed our first cloud Connector and we are now ready to deploy either a Cloud Volumes ONTAP HA or single-node instance in AWS using Terraform.
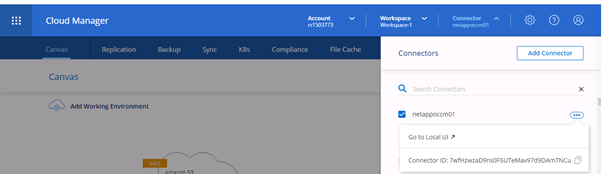
For the Cloud Volumes ONTAP deployment, we will need two additional attributes: the Connector ID and the VPC ID. The Connector ID can be obtained by clicking from within the BlueXP Console portal as shown below:
5. Create a cvo.tf file that will be used to deploy the Cloud Volumes ONTAP instance. This varies whether you’re using a single-node or HA deployment, so both are detailed below.
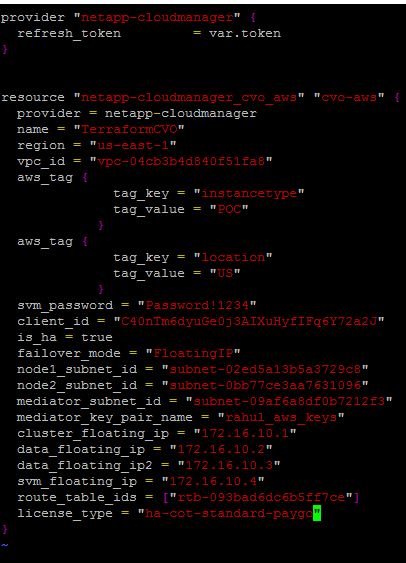
To create a cvo.tf file for an HA deployment: provider "netapp-cloudmanager" {
refresh_token = var.token
}
resource "netapp-cloudmanager_cvo_aws" "cvo-aws" {
provider = netapp-cloudmanager
name = "TerraformCVO"
region = "us-east-1"
vpc_id = "vpc-04cb3b4d840f51fcccv"
aws_tag {
tag_key = "instancetype"
tag_value = "POC"
}
aws_tag {
tag_key = "location"
tag_value = "US"
}
svm_password = "Password!1234"
client_id = "C40nTm6dyuGe0j3AIXuHyfIFq6Y72avvv"
is_ha = true
failover_mode = "FloatingIP"
node1_subnet_id = "subnet-02ed5a13bxxxx"
node2_subnet_id = "subnet-0bb77ce3axxxxx"
mediator_subnet_id = "subnet-09af6a8df0bxxxx"
mediator_key_pair_name = "rahul_aws_keys"
cluster_floating_ip = "172.16.10.1"
data_floating_ip = "172.16.10.2"
data_floating_ip2 = "172.16.10.3"
svm_floating_ip = "172.16.10.4"
route_table_ids = ["rtb-093bad6dc6b5ffxxx"]
license_type = "ha-cot-standard-paygo"
}
Note: For BYOL HA license you will use the following license type: platform_serial_number_node1 =””
platform_serial_number_node2= “”
license_type= ha-cot-premium-byol
To create a cvo.tf file for a single-node instance:
resource "netapp-cloudmanager_cvo_aws" "cvo-aws" {
provider = netapp-cloudmanager
name = "TerraformCVO"
region = "us-west-2"
subnet_id = "subnet-xxxxxxx"
vpc_id = "vpc-xxxxxxxx"
aws_tag {
tag_key = "instancetype"
tag_value = "POC"
}
aws_tag {
tag_key = "location"
tag_value = "US"
}
svm_password = "Password!1234"
client_id = "C40nTm6dyuGe0j3AIXuHyfIFq6Y72avvv"
license_type= “cot-premium-byol”
platform_serial_number= “<<replace with_BYOL_license key>>”
}
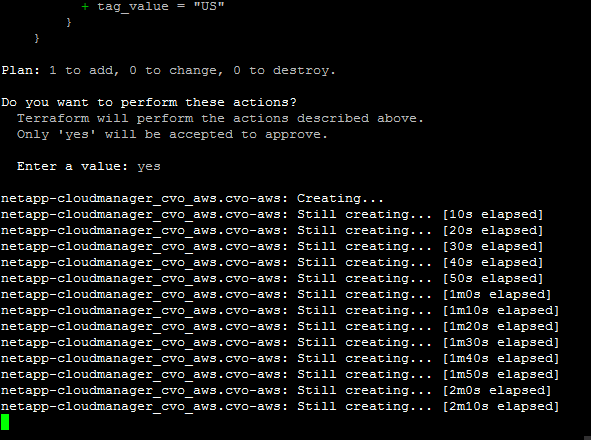
- Once the cvo.tf file is saved, run the Terraform plan and apply the following commands:
$terraform plan -out cvoha
$terraform apply cvoha
Summary
Cloud Volumes ONTAP has built-in automation capabilities that allows you to provision and consume cloud storage for public cloud resources. You can use your existing DevOps tools and solutions for the same by using NetApp BlueXP Console Terraform provider. This makes your Cloud Volumes ONTAP and BlueXP Console deployment more agile and flexible to meet your business demands.
