Share
Maintaining the balance between performance and cost is one of the major challenges faced by organizations when it comes to enterprise-level storage systems. What we’re talking about is unused, stale data that consumes most of the storage on hand. This heavily impacts the return on investment for new storage systems, such as NetApp’s All-Flash FAS (AFF) storage arrays.
Cloud storage offers a cheaper alternative to store unused data. But that’s the cloud, and your data is on-prem. Manually categorizing and migrating the data is going to have overheads that will cast a shadow over any of the benefits offered by the cloud. NetApp has a better way.
NetApp AFF and SSD-backed FAS storage systems can now be seamlessly integrated with Cloud Tiering, a service from NetApp that addresses the problem of discovering and shifting cold data from on-prem data centers into the cloud. Cloud tiering uses NetApp FabricPool technology to identify infrequently accessed data and tiers that data automatically to object storage in the cloud, including Amazon S3, without refactoring the application layer.
Amazon S3 uses a pay-as-you-go model and offers a cheaper and highly durable storage option for unused data, enabling organizations to leverage the all-flash, high-performance capacity of their AFF or SSD-backed FAS storage system to store more data of latency-sensitive applications. When the data moved to Amazon S3 is accessed by any application, it is seamlessly tiered back on premises, with virtually no impact on performance.
Configuring Cloud Tiering to Amazon S3
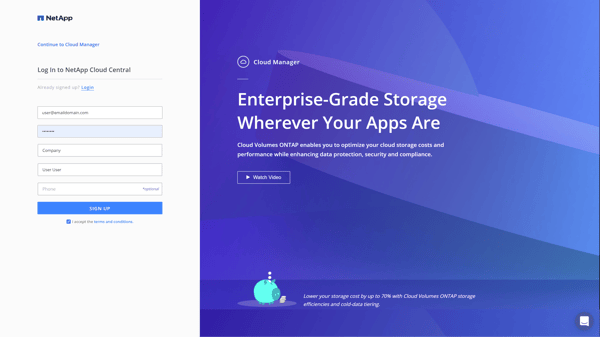
1. First off, we want to get situated on NetApp Cloud Manager. Cloud Manager is the central control plane from where you can orchestrate all of your ONTAP endpoints across the hybrid cloud, whether you have ONTAP equipment on-prem or in AWS, Azure, or Google Cloud. This certainly will be a helpful page to bookmark. In case you don’t have an account, start by signing up:
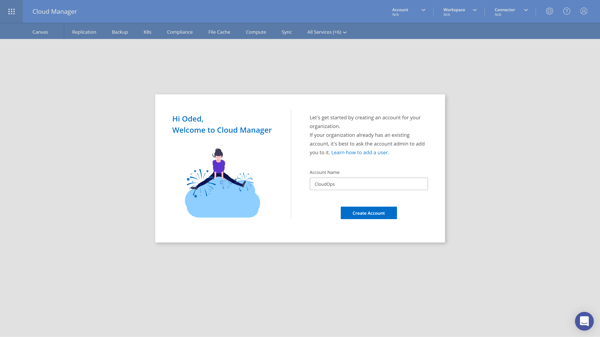
2. Once you’re signed up, you’ll be redirected to Cloud Manager and asked to create a NetApp Account. This account will be for your entire organization:
3. Once you create the account, you’ll be directed to the main Cloud Manager pane, the Canvas. If you’ve signed into Cloud Manager before, this pane is where you land after signing in with your existing credentials:
.png?width=600&name=3%20Empty%20Canvas%20-%20Add%20Working%20Env%20(1).png)
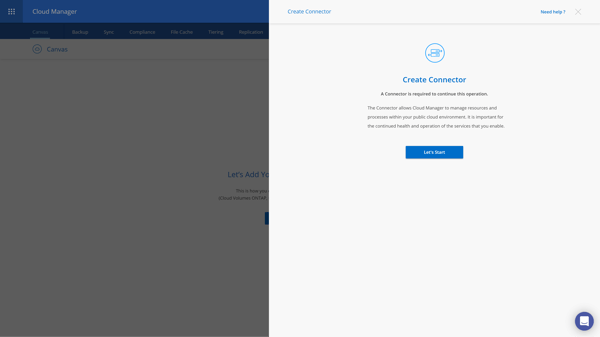
4. You'll start by creating a Connector. The Connector allows Cloud Manager to securely manage resources and processes within your cloud account and communicate with your cluster.
Navigate to the Connector tab and click on “Add Connector” and then on "Lets Start":
.png?width=600&name=4%20Create%20first%20Connector%20(1).png)
Note: If you have already created a Connector, select a Connector deployed in an AWS VPC that has network connectivity to your cluster. The Connector can also be deployed on-premises. For detailed instructions see the Cloud Tiering documentation.
5. On the next screen, you need to choose the cloud provider where the Connector will be deployed. There are options for AWS, Azure, or Google Cloud. Click on “AWS” and then on "Continue":

6. In the “Get Ready” section, all the AWS related information that you need to deploy the Connector is listed.
Click on “Required Permissions” to make sure your account has sufficient permissions. When done, click on “Continue”:
.png?width=600&name=7%20Create%20Connector%20-%20Get%20Ready%20(1).png)
7. Next, provide the Connector instance name and an AWS Access Key and AWS Secret Key. It’s important to note that NetApp does not save this information. When you’re done, click on “Continue”:
.png?width=600&name=8%20Create%20Connector%20-%20AWS%20Credentials%20(2).png)
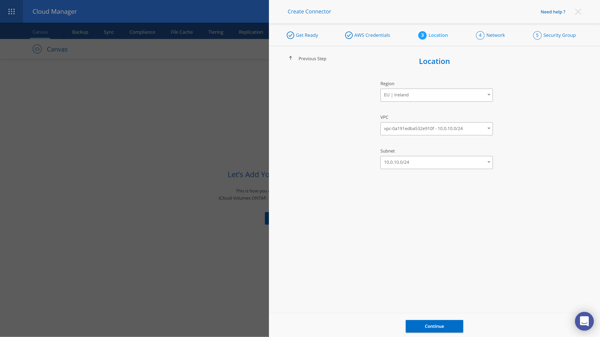
8. In the location section, provide the AWS region, VPC, and the subnet where the Connector will be created. Don’t forget to ensure your subnet connectivity so it can communicate with AWS services and with your on-prem ONTAP cluster. When you’re done, click “Continue”:
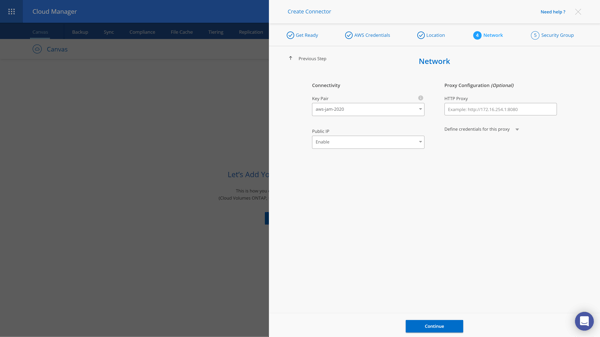
9. Next, you will define network information for the Connector instance such as key pair, public IP, and HTTP proxy, if needed. When done, click “Continue”:
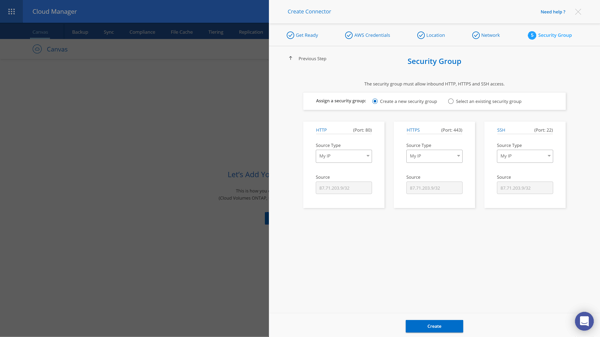
10. In the last section you will need to set up your Security Group, either by assigning an existing Security Group or creating a new one. A Security Group acts as a virtual firewall for your instance to control inbound and outbound traffic. When done, click “Create”:
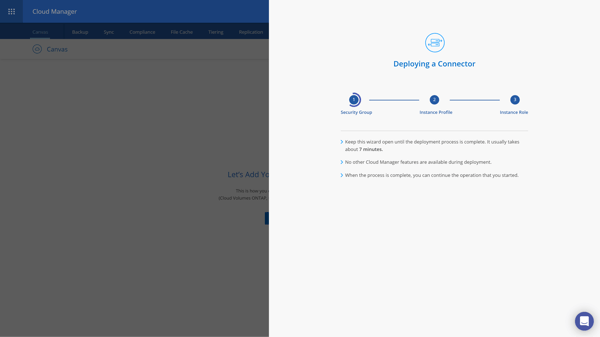
This will start the Connector creation process. This process takes about seven minutes from start to finish. If the process encounters any errors, they will be shown here. It is important that you do not close this page.
11. After the deployment is complete, click on “Continue” and you will be taken back to Cloud Manager’s Canvas. On the Connectors pane to the right, you will be able to see that the Connector is now active.
On the Canvas, click on “Add Working Environment” to discover your on-prem NetApp cluster:
.png?width=600&name=14%20Create%20Connector%20-%20Active%20(1).png)
12. Choose “On-Premises ONTAP” as the location of your cluster.
.png?width=600&name=15%20Add%20Working%20Env%20-%20On-Premises%20ONTAP%20(1).png)
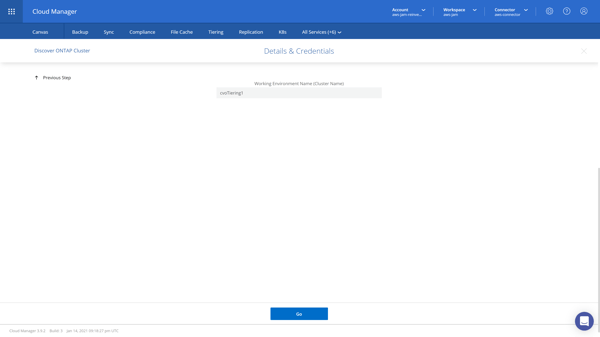
13. Next, provide the Cluster management IP, Username, and Password, to allow Cloud Manager to discover and communicate with your on-prem system. Click on "Add" to continue.

Verify the cluster name and click on “Go”:
Once your cluster has been discovered and added, you will be able to see it on the Canvas:
.png?width=600&name=18%20ONTAP%20Cluster%20add%20to%20Canvas%20(1).png)
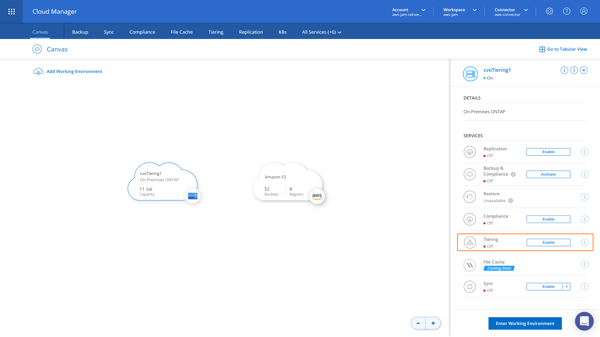
14. Click on the cluster once to open the right panel. This menu will show a list of services which you can enable for your ONTAP cluster. Locate the Tiering service and click on “Enable”:
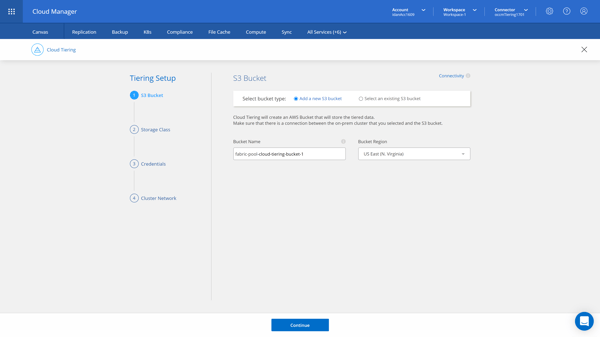
15. This will start you to the Setup Tiering flow (can also be started from the Tiering tab in Cloud Manager’s header menu). The first step in the Tiering Setup phase is to create an S3 bucket, where the tiered data is going to be stored, or select an existing bucket. In either case, make sure the S3 bucket has connectivity to your on-prem cluster:
Note: The fabric-pool prefix is required because the IAM policy for the Connector enables the instance to perform S3 actions on buckets named with that exact prefix.
16. Next, it’s time to select the S3 storage class that will be used. Cloud Tiering supports four S3 classes: Standard, Standard-Infrequent Access, One-Zone IA, and Intelligent-Tiering. Select the storage class you wish to use and then click “Continue”:
Note: Cloud Tiering always creates the bucket with the Standard storage class. In case, you choose one of the other classes supported, Cloud Tiering applies a lifecycle rule that moves objects that have never been accessed in the last 30 days from Standard to the selected storage class.

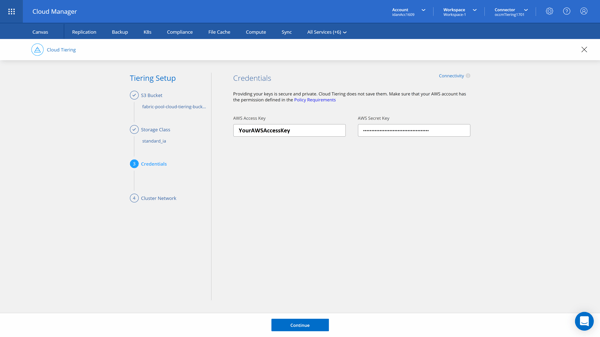
17. Next, provide your AWS access and secret keys, of an account with sufficient permissions, so that your on-prem cluster can tier data into and out of the S3 bucket. Click on “Continue”:
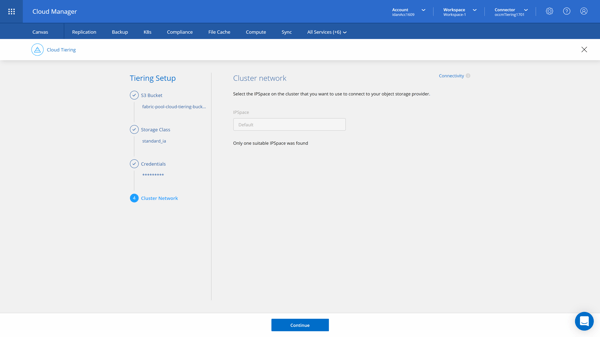
18. Next, you’ll select an IPSpace to be used by the cluster to connect to the Amazon S3 bucket.
An IPSpace is a logical container that is used to create administratively separate network domains for segregating different types of network traffic. Once an IPSpace is selected, click “Continue”:
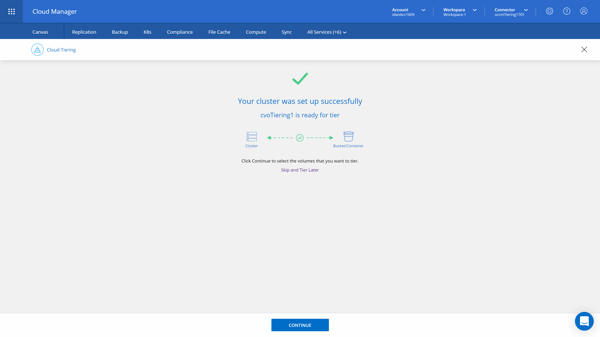
19. Once the Tiering Setup phase is completed, you’ll see the “Cluster was set up successfully” intermediate screen.
Click on “Continue” to move on to the Tier Volumes phase to configure the volumes:
20. On the volumes table, you will see a list of all the cluster’s volumes in your deployment:
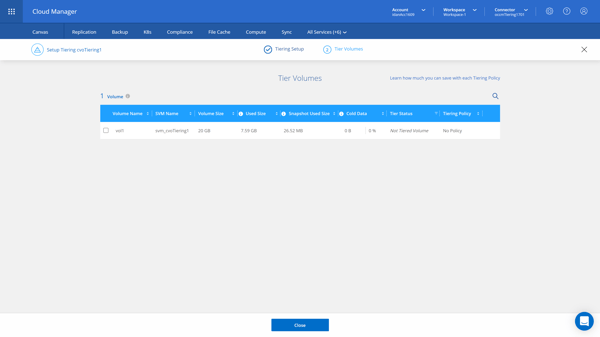
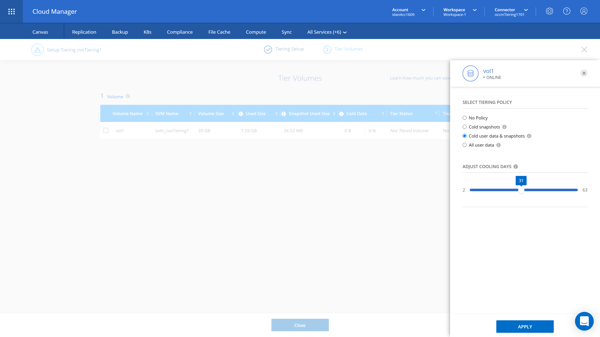
Select a volume and click the “pencil” icon to the right or any number of volumes and click “Modify selected volumes” on top of the volumes table to configure the tiering settings. These settings include the tiering policy for that volume and the number of cooling days (determines how many days must pass before inactive data is considered cold and eligible for tiering).
There are several different tiering policies to choose from.
Once set click on “Apply”:
21. Once you are done configuring the tiering policies for the required volumes, click on “Close” and you will be directed to the main Cloud Tiering page, the Clusters dashboard.
This dashboard will provide you with useful high-level information about current savings caused by already tiered data, potential savings for data not yet tiered and operational health. You can click on the ellipsis, on the right side of the cluster’s card, and select Cluster Info to get more information:
.png?width=600&name=27%20Back%20to%20CT%20Clusters%20Dashboard%20Tab%20(1).png)
%20Through%20Clusters%20Dashboard%20-%20Cluster%20Info.png?width=600&name=30%20(Optional)%20Through%20Clusters%20Dashboard%20-%20Cluster%20Info.png)
22. To set up a tiering fullness threshold or activate Inactive Data Reporting (IDR) if needed, click on the ellipsis, located on the right side of the cluster’s card, and select “Manage Aggregates” from the opened menu:
%20Through%20Clusters%20Dashboard%20-%20Manage%20Aggregates.png?width=600&name=28%20(Optional)%20Through%20Clusters%20Dashboard%20-%20Manage%20Aggregates.png)
23. Click the “Pencil” on the far-right column of the intended aggregate to open a right pane menu where you can set the fullness threshold and IDR for that aggregate.
Cloud Tiering won’t tier data located in volumes hosted on this aggregate until the aggregate’s used capacity reaches this threshold (default is 50%). This is a very useful feature because it avoids early tiering expenses for aggregates that still have a lot of storage room in them. Click on "Apply":
%20Through%20Manage%20Aggregates%20-%20Tiering%20Threshold%20and%20IDR.png?width=600&name=29%20(Optional)%20Through%20Manage%20Aggregates%20-%20Tiering%20Threshold%20and%20IDR.png)
24. Once back to the Clusters Dashboard, you can click on Cloud Tiering’s “On-Prem Overview” tab for an aggregated view from all of your on-premises clusters. This information provides a clear tiering-related picture of your deployments and enables you to take proper actions to control your storage resources efficiently.
%20CT%20On-Prem%20Overview%20Tab.png?width=600&name=31%20(Optional)%20CT%20On-Prem%20Overview%20Tab.png)
25. Finally, Cloud Tiering’s Licensing tab summarizes all the licensing information each cluster has, including license type and provider. For more information visit the Setup Licensing for Cloud Tiering page.
%20CT%20Licensing%20Tab.png?width=600&name=32%20(Optional)%20CT%20Licensing%20Tab.png)
Benefits of Cloud Tiering
With NetApp Cloud Tiering you can tier inactive cold data to a cloud-based object storage. Cloud Tiering allows you to choose the type of data to be tiered - cold snapshot data, cold user and snapshots data of your volume, or all data in the volume. In addition to the cost savings opportunities, Cloud Tiering offers additional benefits to organizations depending on specific use cases:
- The tiering is done transparently at the storage layer. That means no additional configuration or refactoring is required for your enterprise applications to benefit from the technology. It is essentially a zero-effort data extension to the cloud.
- There is no learning curve involved as customers can continue to use their familiar processes, tools, and technology to access data.
- Using Cloud Tiering allows you to optimize your on-premises AFF storage usage so you can host more workloads on it instead of just for storing cold data. In effect, the capacity can be scaled up to 50x.
- Cloud storage uses a pay-as-you-go model that drastically reduces your overall storage costs. There is no upfront investment required and, as per statistics, an average of 70% of data can be moved to low-cost cloud object storage, freeing up your on-prem cluster.
- Cloud Tiering is integrated into NetApp Cloud Manager from where you can easily discover and manage tiering on your on-prem systems, as well as configure other data services for it such as Cloud Backup and Cloud Compliance. All from a single pane of glass.
Try Cloud Tiering Yourself
With this low-touch automated tiering capability, Cloud Tiering for NetApp AFF and SSD-backed FAS systems can act as an entry point for organizations implementing a hybrid cloud architecture. In addition to addressing datacenter space concerns, it also helps reduce your storage TCO and can be valuable when you are considering a shift from CAPEX to OPEX investment model for storage.
