Share
Recently I worked on a requirement with an AWS customer who is running SQL Server on EC2 instances (unmanaged) wherein Dev/QA teams who require multiple copies of production SQL database. They want to test the application code, execute queries, validate schema changes, run performance testing, and more. Sounds a familiar use case, right?
Let’s take a step back and review the overall process. Developers require the production database in the development environments. Usually, a restore of the production database backup is performed into development and users are given access to perform their operations. This is time consuming as it involves either restoring from snapshots or using different disk mechanisms either of which affects the overall time and effort.
However, this customer knew exactly what he wanted. Yes, I am talking about Amazon FSx for NetApp ONTAP. FSx for ONTAP exposes enterprise class features that customers have been using on premises within their AWS VPCs to create temporary, writable copies for any given use case. The clones reflect the current, point-in-time state of the data and there is no initial copy process or lazy restores from S3 required. These clones, which can also be application consistent clones, can give additional users access to data without giving them permissions to the production data.
This is a big and effective use case that can be easily achieved using FSx for ONTAP, which is an AWS first party service and that’s the beauty it brings to the table. There are many customers exploring and using this functionality today in AWS for SQL servers running on EC2 instances. Keep in mind, the same use case is applicable for any other database.
In this blog, let’s dive deep into this specific scenario and the steps involved so it can be easily replicated in your environment. Clone creation is possible via FSx for ONTAP CLI which will be crash consistent, however we focus on using NetApp SnapCenter® software (application-consistent database backup management) with SQL Server on EC2 with Amazon FSx for NetApp ONTAP for creating clones for test/development and the clone lifecycle management capability which provides automatic, scheduled cloned database resynchronization and deletion.
Clone using NetApp SnapCenter
With the NetApp SnapCenter clone workflow, you can bring up SQL databases nearly instantly in AWS and verify the cloned database for consistency and data integrity. This is a great way for DevOps teams to quickly verify how things will work during a rollout or while troubleshooting production issues without consuming additional storage space due to the efficiency of FlexClone capability in FSx for ONTAP. Cloning and shutting down the database is a quick and easy process that you can perform as often as needed. This is completely isolated from the production environment, which means production access continues as normal while validation efforts progress on the other side. Clones can also be created using crash-consistent storage Snapshot copies.
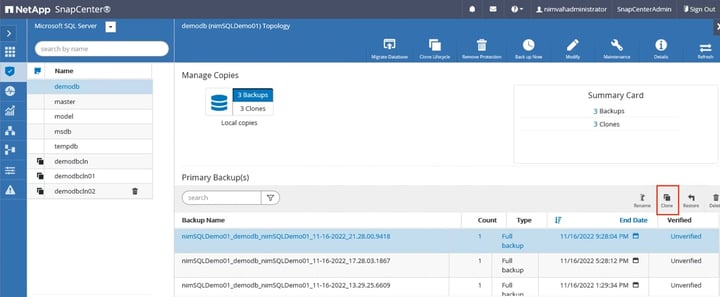
The steps to create clones is as follows:
- Use the clone workflow in NetApp SnapCenter with the latest log backup for multiple copies.
- Select the database or resource group.
- From the Manage Copies page, select the backup from either the primary or secondary (SnapMirror) file system.
- Select the backup, and then click Clone.
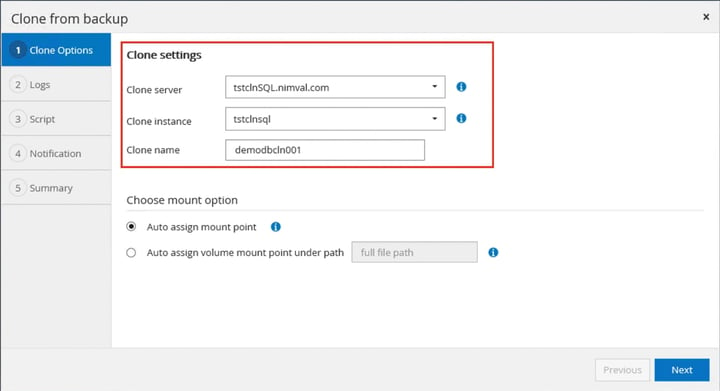
- On the Clone Options page, update the clone settings by providing the Clone server, Clone instance, Clone name, and the appropriate mount path.
- On the Logs page, select the appropriate option.
- After you are done, monitor the operation’s progress by clicking Monitor > Jobs.
 The previous screenshot covers cloning to the same SQL server EC2 instance.
 The previous screenshot shows cloning to alternate SQL server EC2 instance.
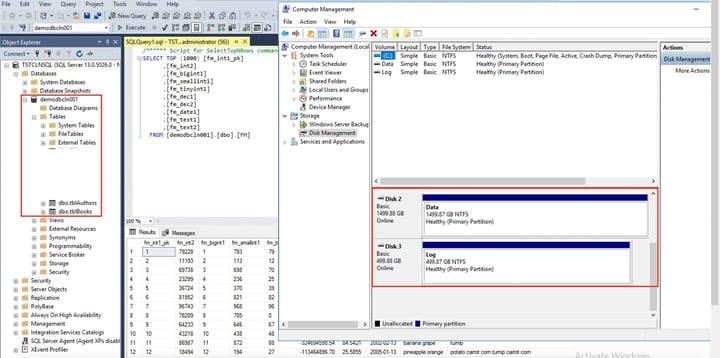
The process is as simple as that and can also be achieved using PowerShell. This is the capability that AWS and NetApp brings to the table: a reduction in development and test cycles, an improvement in the time to market, less use of storage capacity, and a minimization of administrative and management tasks.
Clone Life Cycle using NetApp SnapCenter
Now how about scheduling recurring clone operations aka Clone life cycle. The process is straight forward.
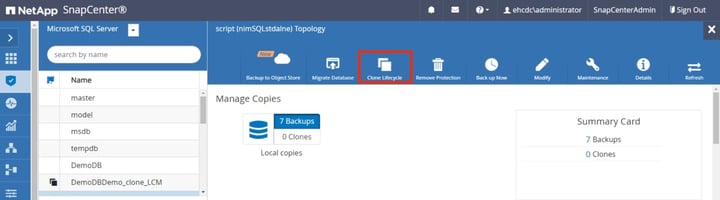
- Login to SnapCenter and in the left navigation pane, click Resources, and then select Microsoft SQL Server from the list.
- In the Resources page, select either Database or Resource Group from the View list.
- Select the resource group or database, and then click Clone Lifecycle.
- Specify the Clone job name, clone server, clone instance, clone suffix. Along with this, choose whether to automatically assign a mount point or volume mount point under a path. Choosing to auto assign a volume mount point under a path enables to provide a specific directory. The mount points will be created within that directory.
Note: SnapCenter enables to schedule multiple clone operations to run simultaneously across multiple SQL servers.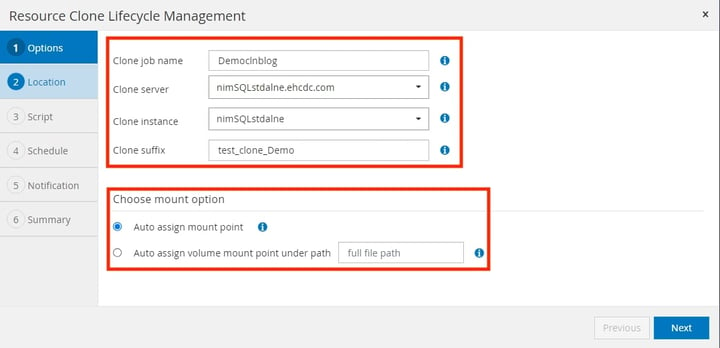
- In the Location page, select Primary or Secondary (SnapMirror) to create a clone.
- In the Script page, enter the path of the prescript or postscript that should be run before or after the clone operation, respectively.
- In the Schedule page, select Configure schedule. Update the schedule based on recurrence and retention including whether the clones must be deleted after the schedule expires.
- In the Notification page, from the Email preference drop-down list, select the scenarios in which the emails should be sent out. Also specify the sender and receiver email addresses, and the subject of the email.
- Review the summary, and then click Finish.
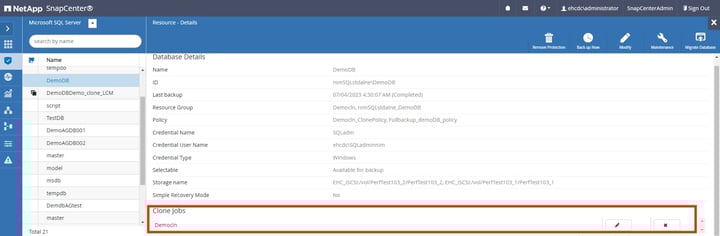
This will create a clone job that can be accessed and modified by selecting the database or resource group and click on Details.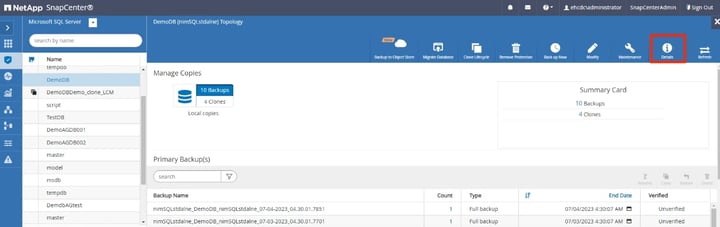
Note: During a clone life cycle workflow, a new snapshot is created with copy only option within SnapCenter.
Split Clone using NetApp SnapCenter
Cloned database can be easily split from the parent resource if it needs to be made an independent copy. The clone that is split becomes independent of the parent resource.
- Within SnapCenter, from the left navigation pane, click Resources. In the Resources page, select the database from the list.
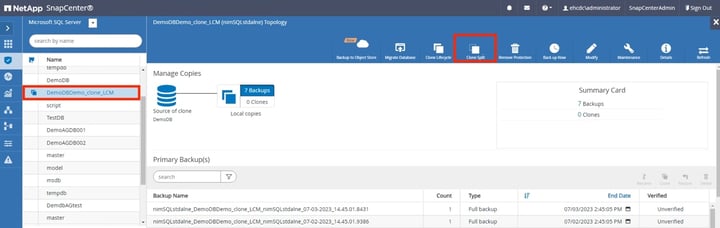
- From the Manage Copies view, select the cloned resource (In this blog, DemoDBDemo-Clone_LCM is used.), and then click "Clone Split"
- Review the estimated size of the clone that is to be split and the required space available on the aggregate, and then click Start.
That covers the clone operation procedure.
Pre and Post-Scripts
Now, let’s double-click on pre- or post-script option against a clone database. This can be for data movement/notification requests like automating alerts, sending logs, or for data modification requirements like deleting or hiding a table or a column within the database or even for data masking approaches. Data masking use case is outside of the scope of this blog and will be covered in a future blogpost.
All prescripts and postscripts that are run as part of SnapCenter operations are executed on the plug-in host. Therefore, the scripts must be located on the plug-in host or on a SMB share accessible by the plug-in host. The script path is validated at the time the script is executed. Scripts are specified in backup or clone job policies. When a clone job is started, the policy automatically associates the script with the resources being cloned. A single script can be coded as both a prescript and a postscript and can call other scripts.
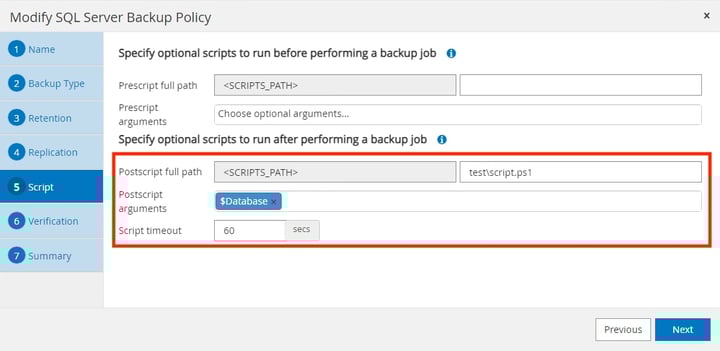
To enable pre- or post-scripts using PowerShell in the appropriate clone jobs, these 3 pre-requisites should be met.
- Access the SnapCenter server and locate the web.config file. The path for web.config file is at C:\Program Files\NetApp\SnapCenter WebApp. Update the key usePowershellProcessforScripts to true.
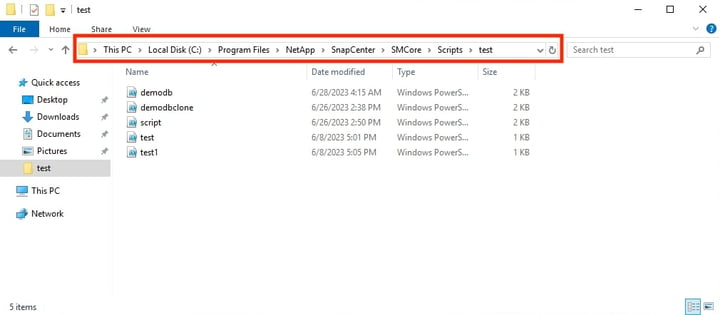
- Ensure the script is placed in the appropriate location. It should be on the SQL server plug-in host for that specific database and should be under “C/program files/NetApp/Snapcenter/SMcore/scripts/<folder name>/scriptname.ps1.
- Ensure the account running SnapCenter SMCore Service on SQL server plug-in host is to set the account that has sysadmin rights. By default, local account is used to run the SMcore service on SQL server plug-in host. This would meet the need to execute any script at the SQL server host and OS level, however if the script needs to be executed against a specific database or multiple databases, the local account should be changed to an account that has sysadmin role.
Note: With this approach, there is no need to specify passwords in the script as it would use windows authentication in the PowerShell connection string.
Recently a customer chose to deploy SQL Server databases running on EC2 on FSx for ONTAP to leverage Snapshots and clone functionality and reduced their cloning time from hours to minutes along with boosting their production performance. Another customer chose to deploy SQL Server Availability groups (AOAG) in a storage hybrid model with one copy of the database residing on EBS and the second copy residing on FSx for ONTAP to strictly meet their cloning requirements. Clone life cycle solved their pain point and enabled them to ease their migration efforts while focusing on infrastructure optimization rather than worrying about clone jobs.
To summarize, Amazon FSx for NetApp ONTAP along with a SQL Server database enables you to run production database in AWS with high performance, data protection, database cloning, and block-based disaster recovery capabilities, allowing you to avoid what used to be a long and cumbersome process.
Conclusion
In this blog, we provided detailed step by step guidance of clone life cycle using SnapCenter while using FSx for ONTAP as a storage option for SQL Server running on an EC2 instance.
Thank you for reading this blog post! If you have any comments or questions, don’t hesitate to leave them in the comments section.
