Share
What Are Kubernetes Persistent Volumes and Persistent Volume Claims?
A Kubernetes persistent volume (PV) is an object that allows pods to access persistent storage on a storage device, defined via a Kubernetes StorageClass. Unlike regular volumes, which are transient in nature, PVs are persistent, supporting stateful application use cases. A PV is a resource object in a Kubernetes cluster which continues to exist even after the pods using it have been destroyed.
PVs must be requested through persistent volume claims (PVCs), which are requests for storage. A PVC is essentially a request to mount a PV meeting certain requirements on a pod. PVCs do not specify a specific PV—instead, they specify which StorageClass the pod requires. Administrators can define StorageClasses that indicate properties of storage devices, such as performance, service levels, and back-end policies.
A major advantage of the PVC pattern in Kubernetes is that it allows developers to dynamically request storage resources, without being aware of the implementation of underlying storage devices.
Related content: Read our guide to Kubernetes StorageClass
In this article:
- Persistent Volume Claims: Static vs. Dynamic Provisioning
- Creating a Persistent Volume Claim and Binding to a Persistent Volume
- Kubernetes PVC Errors: Common Causes and Resolution
- Kubernetes Storage Optimization with Cloud Volumes ONTAP
Persistent Volume Claims: Static vs. Dynamic Provisioning
To bind a pod to a PV, the pod must contain a volume mount and a PVC. These declarations allow users to mount PVs in pods without knowing the details of the underlying storage equipment.
There are two options for mounting PVs to a pod:
- Static configuration involves administrators manually creating PVs and defining a StorageClass that matches the criteria of these PVs. When a pod uses a PVC that specifies the StorageClass, it gains access to one of these static PVs.
- Dynamic configuration occurs when there is no static PV that matches the PVC. In this case, the Kubernetes cluster provisions a new PV based on the StorageClass definitions.
Related content: Read our guide to Kubernetes shared storage
Creating a Persistent Volume Claim and Binding to a Persistent Volume
This tutorial demonstrates how PVs and PVCs work. It is a summary of the complete tutorial available in the Kubernetes documentation.
1. Setting up a node
Set up a Kubernetes cluster with a single node and ensure that the kubectl command line has a connection to the control plane. Create a directory on the node like this:
Copied!sudo mkdir /mnt/data
Create an index.html file in the directory.
2. Creating a persistent volume
Create a YAML file like the following to define a PV.
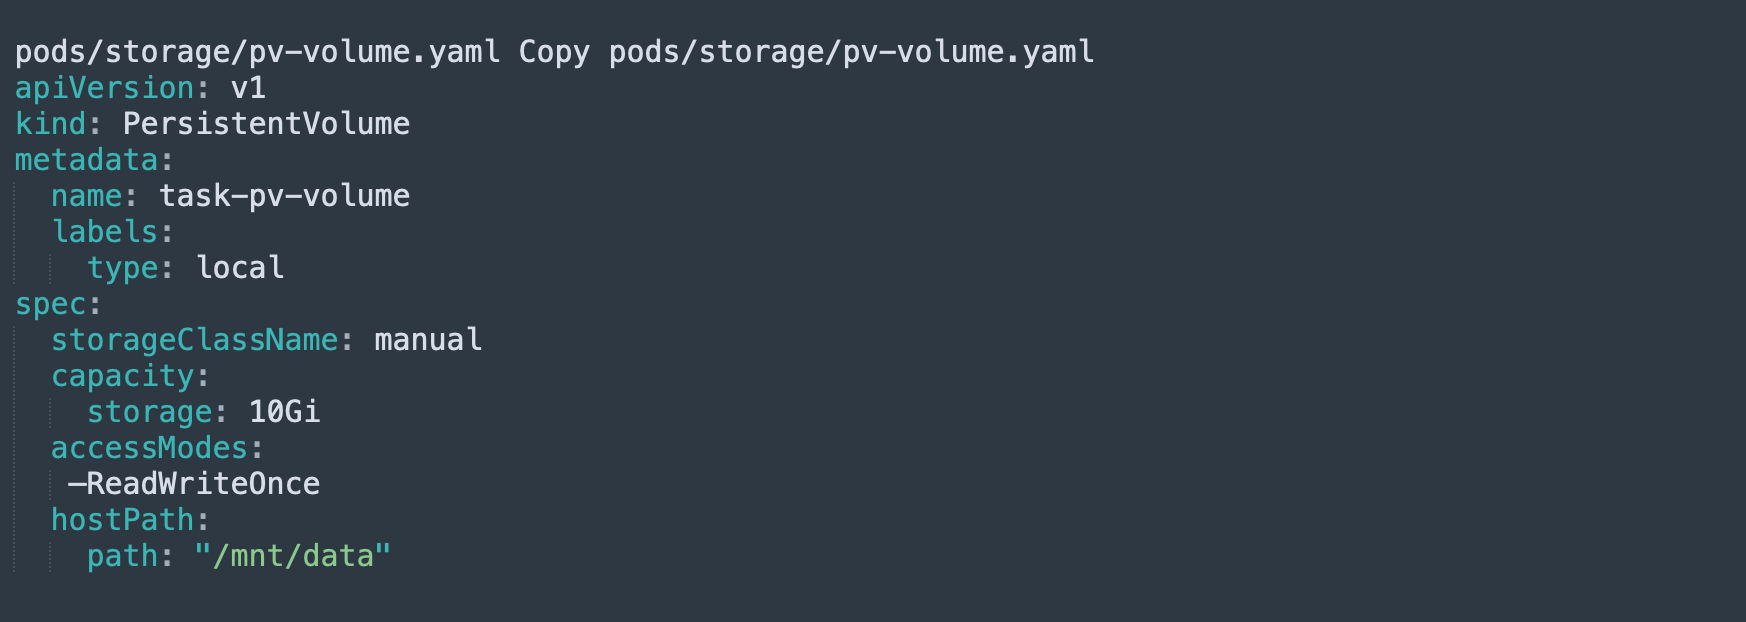
Run this command to create the PV on your node:
Copied!kubectl apply -f https://k8s.io/examples/pods/storage/pv-volume.yaml
3. Creating a persistent volume claim and binding it to a persistent volume
Create a PVC that requires a PV, subject to the following conditions to match the PV you created earlier:
- 3 GB or more of storage capacity
- Enable read/write access
Create a YAML file for the PVC, like the following.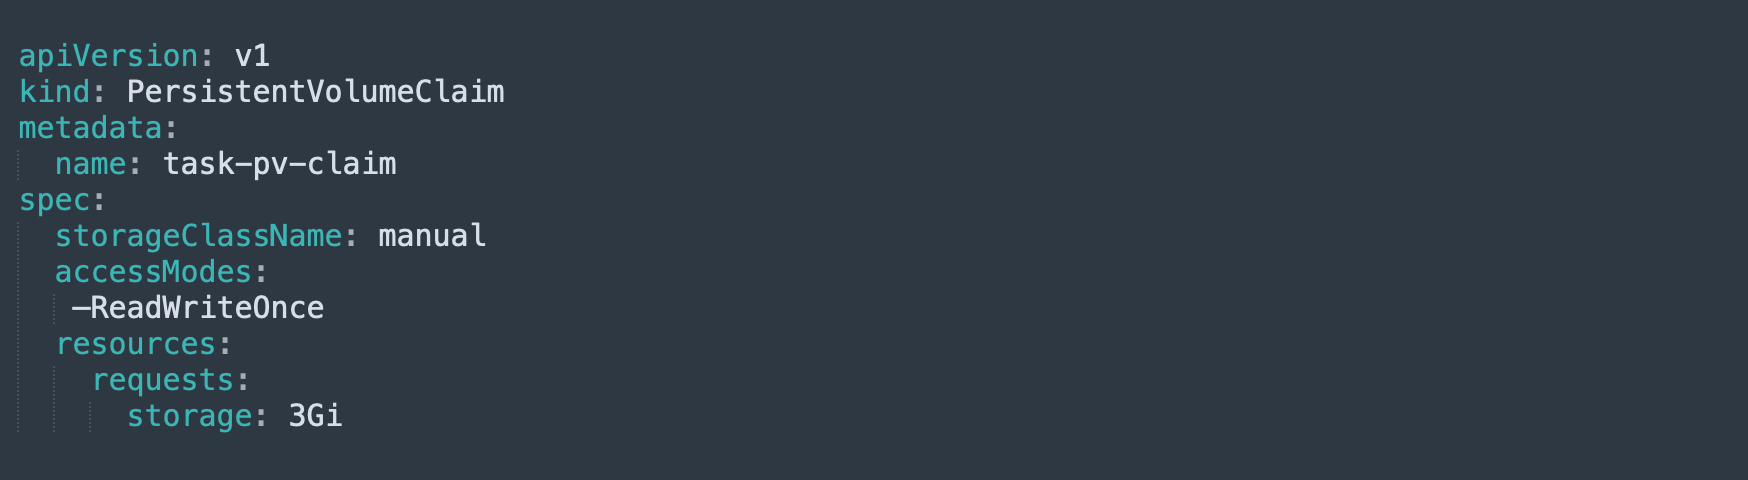
Run this command to apply the PVC:
Copied!kubectl apply -f https://k8s.io/examples/pods/storage/pv-claim.yaml
When you create a persistent volume claim, the Kubernetes control plane finds the correct PV. If found, it will bind the PVC to the PV.
Check the status of the previously created PV by running:
Copied!kubectl get pv task-pv-volume
If the binding is successful, the output should look like this:

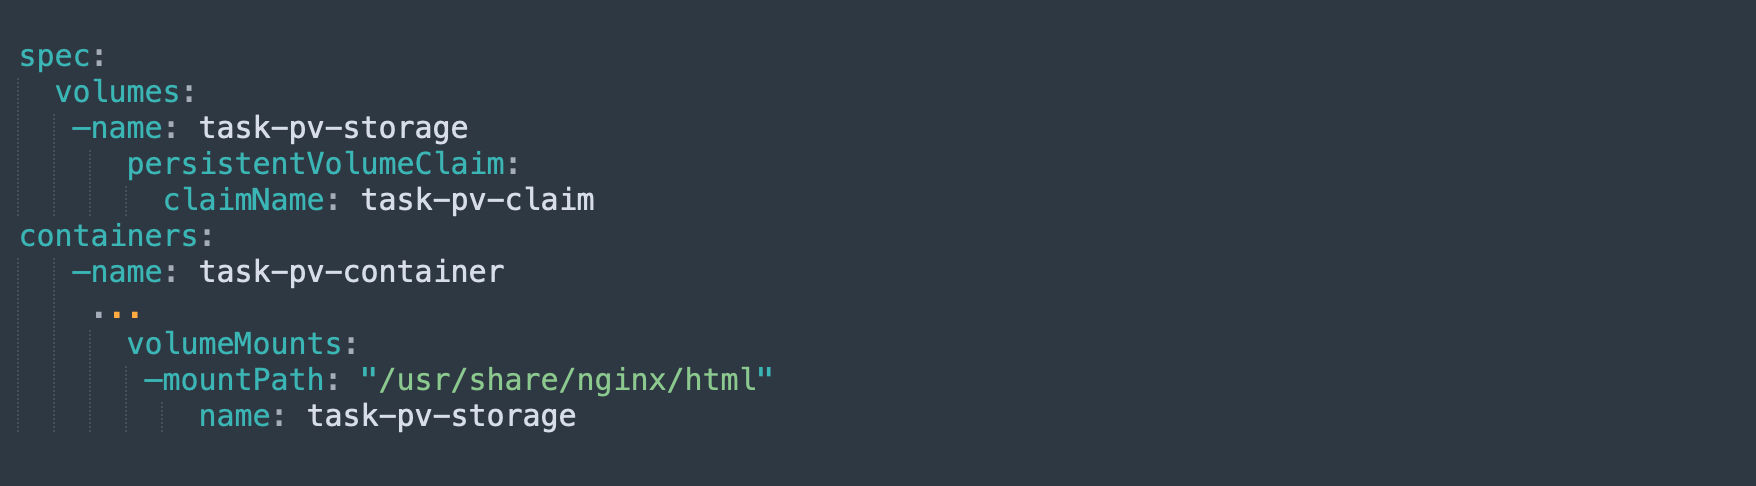
4. Creating a pod and mounting the persistent volume claim
Finally, create a pod that uses the PVC. Run the pod with the NGINX image, specifying the PVC you created beforehand in the relevant section of the pod’s specification:
Use a bash command to install curl in your pod, and run this command:
Copied!curl http://localhost/
The output should display the contents of the index.html file created in step 1. It should show that the new pod can access data in the PV via the PVC.
Kubernetes PVC Errors: Common Causes and Resolution [C]
Kubernetes PVC can be complex to use, resulting in errors that may be difficult to diagnose and address. PVC errors are generally related to three broad categories - issues with creation of PVs, issues with provisioning of PVs, and changes in PV or PVC specifications.
The most common errors related to PVCs are FailedAttachVolume, FailedMount, and CrashLoopBackOff.
FailedAttachVolume and FailedMount Errors
These two errors indicate that a pod was unable to mount a PV. The difference is that FailedAttachVolume occurs when a volume fails to detach from a previous node, and FailedMount occurs when a volume fails to mount on the required path.
There are numerous possible causes of these two errors, including failure on the new node, too many disks attached to the new node, a network partitioning error, and failure of storage devices on the previous node.
Diagnosing the problem
To diagnose the cause of issues such as FailedAttachVolume and FailedMount, run the command describe pod <name> and search the Events section for the message indicating an error. The message should also provide information about the cause.
Resolving the problem
Kubernetes cannot address the FailedAttachVolume and FailedMount errors automatically, so you will need to handle the problem manually:
- If the cause of the error is Failure to Detach- use the storage device’s interface to detach the volume manually.
- If the error is Failure to Attach or Mount- check for a network partitioning issue or incorrect network path. If this is not the issue, try to get Kubernetes to schedule the pod on another node, or investigate and fix the problem on the new node.
CrashLoopBackOff Errors Resulting from the PersistentVolumeClaim
CrashLoopBackOff indicates that a pod crashed, restarted, and crashed again repeatedly. In some cases, this error occurs as a result of corrupted PersistentVolumeClaims.
Diagnosing the problem
To identify whether a CrashLoopBackOff error is due to a PVC, check the logs from the previous container instance that mounted the PV, check deployment logs, and if necessary, run a shell on the container to identify why it is crashing.
Resolving the problem
If CrashLoopBackOff is the result of an issue with a PVC, try the following steps:
- Scale the deployment to 0 instances to enable debugging.
- Get the identifier of the failed PVC using this query: Copied!
kubectl get deployment -o jsonpath="{.spec.template.spec.volumes[*].persistentVolumeClaim.claimName}" failed-deployment - Create a new pod for debugging and run a shell using this command: Copied!
exec -it volume-debugger sh - Identify the volume currently mounted in the /datadirectory and fix the issue causing the pod to crash.
- Exit the shell, delete the debugging pod, and scale the deployment back to the required number of replicas.
Kubernetes Storage Optimization with Cloud Volumes ONTAP
NetApp Cloud Volumes ONTAP, the leading enterprise-grade storage management solution, delivers secure, proven storage management services on AWS, Azure and Google Cloud. Cloud Volumes ONTAP capacity can scale into the petabytes, and it supports various use cases such as file services, databases, DevOps or any other enterprise workload, with a strong set of features including high availability, data protection, storage efficiencies, Kubernetes integration, and more.
In particular, Cloud Volumes ONTAP supports Kubernetes Persistent Volume provisioning and management requirements of containerized workloads.
Learn more about how Cloud Volumes ONTAP helps to address the challenges of containerized applications in these Kubernetes Workloads with Cloud Volumes ONTAP Case Studies.

