Share
With the recent announcement about general availability of VMware Cloud on AWS integration with Amazon FSx for NetApp ONTAP from both AWS and VMware, organizations are gearing up to add FSx for ONTAP as a datastore to their new and existing software-defined datacenters (SDDC; should be v1.20 and above) to optimize current and future deployments.
This blog walks you through the steps necessary to provision and attach FSx for ONTAP as a NFS datastore for VMware Cloud on AWS.
The high-level deployment steps are as follows:
Before you provision and attach FSx for ONTAP as a NFS datastore, you must first set up a VMware on Cloud SDDC environment or get an existing SDDC upgraded to v1.20 or above. For more information, see Getting Started With VMware Cloud on AWS.
After VMware Cloud is ready and connected to an AWS virtual private cloud (VPC), you must deploy Amazon FSx for NetApp ONTAP into a newly designated VPC rather than the original connected or existing default VPC.
- Create Amazon FSx for ONTAP in a designated VPC.
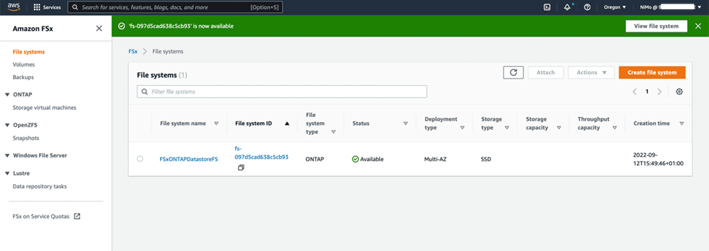
To create and mount the Amazon FSx for NetApp ONTAP file system, open the Amazon FSx console at https://console.aws.amazon.com/fsx/, select Create file system, and specify the SSD storage capacity, provisioned SSD IOPs, and throughput capacity based on your requirements.
Note: If you are not sure about capacity or throughput, don’t worry. Start with a small capacity and throughput and then scale to whatever level is required. There is no need to add additional hosts or perform rebalancing; adding capacity and throughput only requires the click of a button.
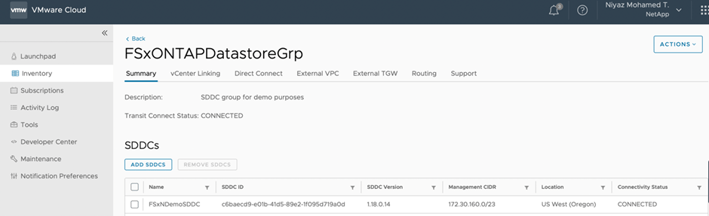
- Create an SDDC group.
After the file systems and SVMs have been created, use VMware Console to create an SDDC group. Adding the first member to an SDDC Group creates a VMware Managed Transit Gateway (VTGW) and assigns it to the group.
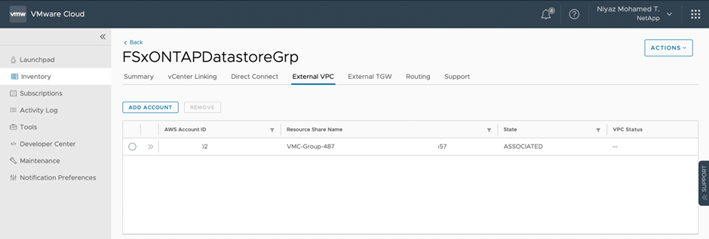
- Configure TGW attachment to the designated VPC hosting FSx for ONTAP.
Attach the newly created designated VPC to the SDDC group. To do so, select the External VPC tab within the VMware cloud console and follow these instructions for attaching an External VPC to the group. This process can take 10-15 minutes to complete.
As part of the external VPC process, you are prompted via the AWS console to a new shared resource via the Resource Access Manager. The shared resource is the AWS Transit Gateway managed by VMware Transit Connect. Click Accept resource share.
After the External VPC is in an associated state, go back to the AWS Console, go to the VPC service page, and navigate to the VPC that was used for provisioning the FSx for ONTAP file system. Here you create a transit gateway attachment by clicking Transit Gateway Attachment in the navigation pane on the right.
Make sure that DNS Support is checked under VPC Attachment and select the VPC in which FSx for ONTAP was deployed. After this is complete, switch to VMware Cloud Console, navigate back to the SDDC Group > External VPC tab. Select the AWS account ID used for FSx, select the VPC, and click Accept.
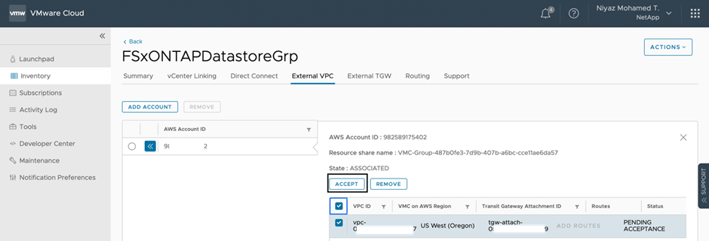
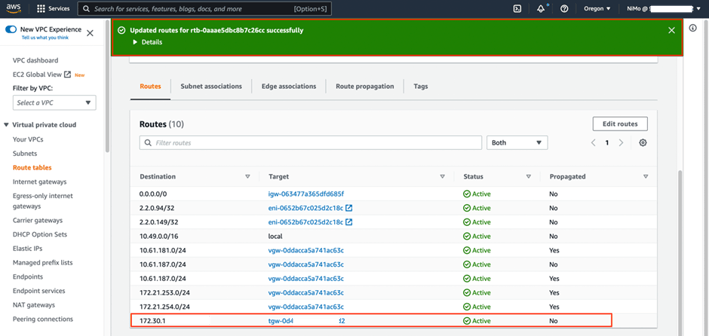
Select the Routes column, click the Add Routes option, and add the required routes:
- A route for the floating IP range for Amazon FSx for the NetApp ONTAP floating IPs.
- A route for the newly created external VPC (designated VPC for FSx for ONTAP) address space.
- Configure routing between AWS VPC and SDDC. Also configure designated VPC’s security groups.
Back in the AWS console, create the route back to the SDDC by locating the designated VPC in the VPC service page and select the main route table for the VPC.
Also update the inbound rule of the security group associated with the FSx for ONTAP filesystem to allow the CIDR block of the SDDC infrastructure. Make sure NFS and ICMP traffic is enabled from the SDDC CIDR to avoid connectivity issues.
- Attach an NFS volume as a datastore to the SDDC cluster.
After the file system is provisioned and connectivity is in place, access the VMware Cloud Console to mount the NFS datastore.
- In the VMC Console, open the Storage tab of the SDDC.
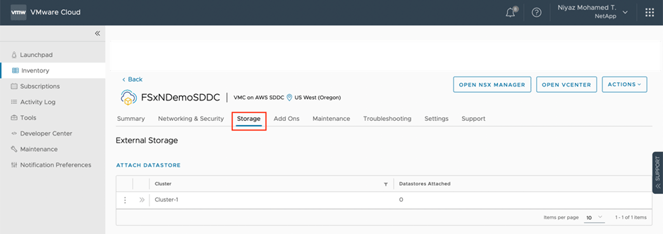
- Click ATTACH DATASTORE and fill in the required values.
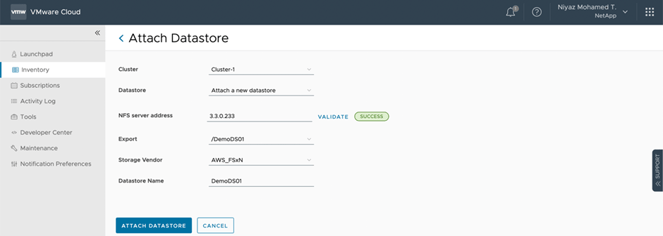
Note: NFS server address is the NFS IP address which can be found under the FSx > Storage virtual machines tab > Endpoints within AWS console.
-
Click ATTACH DATASTORE to attach the datastore to the cluster.
-
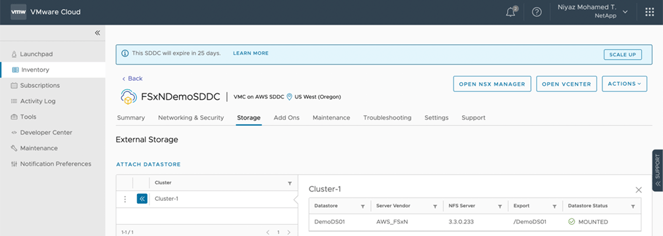
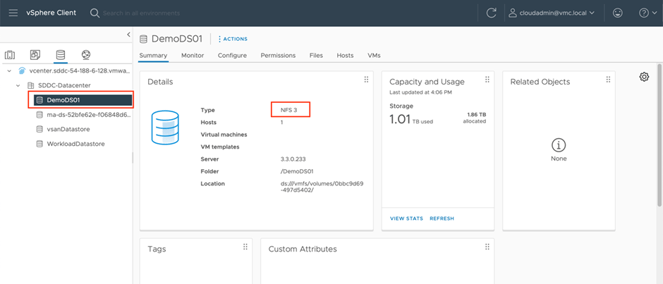
Validate the NFS datastore by accessing vCenter as shown below:
- In the VMC Console, open the Storage tab of the SDDC.
This blog covers the high-level steps necessary to configure Amazon FSx for ONTAP with VMware Cloud on AWS. Amazon FSx for ONTAP provides excellent options to deploy and manage application workloads along with file services while reducing the TCO by making data requirements seamless to the application layer. Whatever the use case, choose VMware Cloud on AWS along with Amazon FSx for ONTAP for rapid realization of cloud benefits, consistent infrastructure and operations from on-premises to AWS, bidirectional portability of workloads, and enterprise-grade capacity and performance. It is the same familiar process and procedures used to connect storage. Remember, it is just the position of the data that changed along with new names; the tools and processes all remain the same, and Amazon FSx for ONTAP helps to optimize the overall deployment.
To learn more about this process, feel free to follow the detailed, step-by-step documentation at NetApp Docs and also this detailed walkthrough video.