Share
For SAP users looking to orchestrate their deployment using AWS, Amazon FSx for NetApp ONTAP (FSx for ONTAP) provides enterprise features NetApp users have trusted for years, now available through cutting-edge AWS resources. Thanks to the AWS Launch Wizard, setting up that deployment is easier than ever.
In this blog we’ll give you a complete walkthrough on how to set up your SAP deployment with FSx for ONTAP using the AWS Launch Wizard.
Read on to find out more, or use the links below to jump down:
- Amazon FSx for ONTAP: A Short Intro
- What Is AWS Launch Wizard?
- How to Use AWS Launch Wizard to Set Up a SAP Deployment with Amazon FSx for NetApp ONTAP
- Review and Deploy
- Get More from SAP with AWS and NetApp
Amazon FSx for ONTAP: A Short Intro
Amazon FSx for NetApp® ONTAP® is the future of NetApp on AWS. It’s a fully managed service that brings all of the enterprise-grade ONTAP features that organizations around the world have relied on for years, built to run natively on highly performant and available SSD-based AWS storage resources.
The combination gives you the features that you know from ONTAP with the simplicity of a managed service that has complete integration with the rest of the AWS ecosystem. When it comes to SAP, FSx for ONTAP provides a host of benefits:
- Highly-performant storage with sub-millisecond latency
- Easy data replication thanks to NetApp SnapMirror®
- Snapshot copies that protect your SAP data
- Instant, writable data clones which aren’t available using other AWS storage options
- Automatic data tiering to lower-cost storage tiers for infrequently used data
- Full integration with the entire AWS ecosystem so you can plug your SAP data into AWS service offerings for AI/ML, business insights, analytics, and much more.
For more details about FSx for ONTAP, check out the FSx for ONTAP documentation.
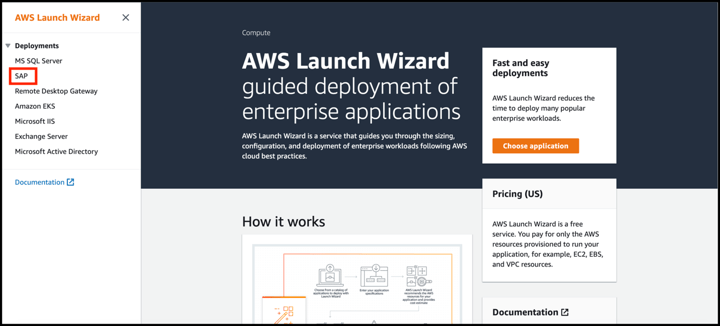
What Is AWS Launch Wizard?
AWS Launch Wizard is basically a guided entryway to AWS for third-party applications (in this case, that’s SAP HANA). The major benefit that AWS Launch Wizard provides is that it takes out all the hard work of identifying the AWS resources that you need to provision to get your deployment going on AWS.
Instead of manually setting up AWS services, all the options available are offered directly through the wizard for you to select. Once you pick out your preferred AWS service (in this case FSx for ONTAP), AWS Launch Wizard will do the rest of the work, provisioning and configuring your service automatically so you can get your application started on AWS in no time.
How to Use AWS Launch Wizard to Set Up a SAP Deployment with Amazon FSx for NetApp ONTAP
Now let’s show you how to get your SAP deployment with FSx for ONTAP resources set up using the AWS Launch Wizard.
For more detailed steps, check out the AWS user guide for AWS Launch Wizard for SAP.
Prerequisites
We won’t go into detail about them here, but make sure you have these prerequisites in place before you run AWS Launch Wizard for SAP.
We’re going to take this step by step after that. Let’s see how it’s done.
Opening a SAP Workload in AWS Launch Wizard
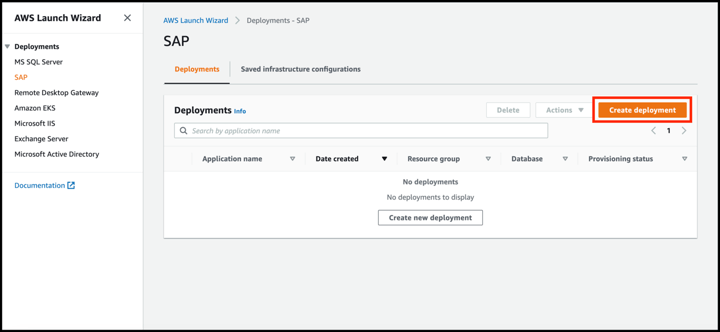
- To begin, go to the AWS console and find the AWS Launch Wizard utility in the service options. Click on it and it will bring you to the AWS Launch Wizard page.
- On the AWS Launch Wizard page, head to the panel on the left side of the screen and select “SAP” from the options available.
- The SAP page will open up, and now you’ll be able to create your SAP deployment by clicking on the “Create deployment” button.
How to Configure Your SAP Infrastructure
The next steps will deal with how your SAP infrastructure is defined.
- On the Review Permissions page, check all of the info that appears and make sure that you have the correct IAM role and role policy.
If it all checks out, click “Next” to proceed.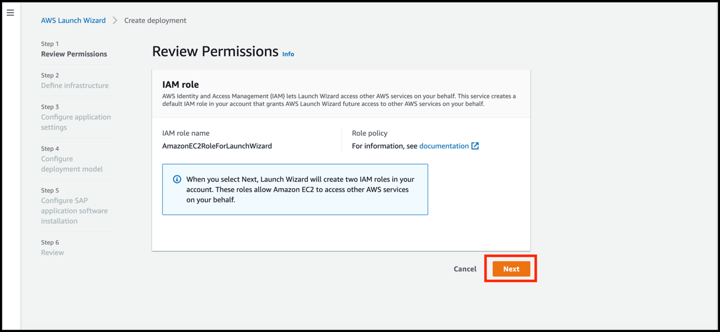
- Next, you’ll provide the basics about your deployment: give your deployment a name and describe what it will be used for. That last point is optional, but if added, Launch Wizard will extend that description to all of the resources that you create for this deployment during the set-up process.
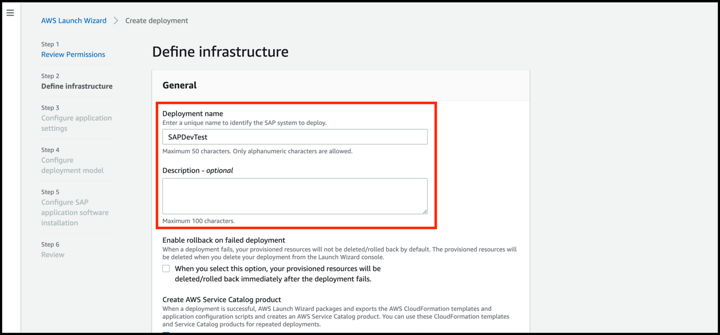
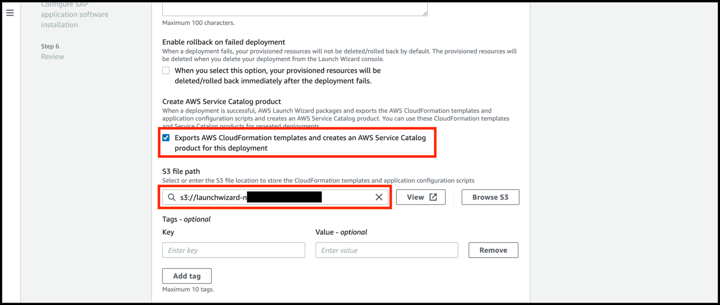
- Scroll down to Create AWS Service Catalog product heading.
If you think that you’ll ever want to redeploy this same deployment configuration—that could be useful for setting up additional SAP systems via AWS CloudFormation, using Launch Wizard to create disaster recovery copies, or for transparency—tick the box for "Exports AWS CloudFormation templates and creates an AWS Service Catalog product for this deployment" here.
If you select this option, provide an Amazon S3 file path that will be used to retain the CloudFormation templates.
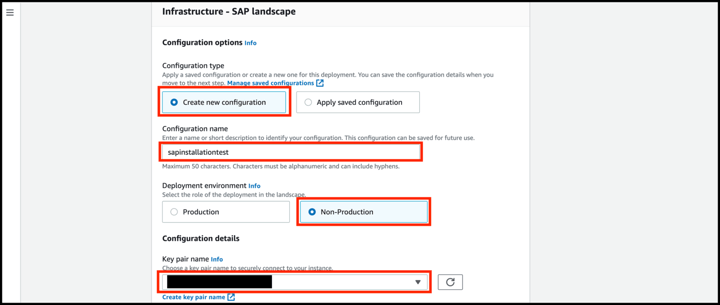
- Scroll down to the Infrastructure-SAP landscape section. Since we’re starting this configuration from scratch, choose the “Create a new configuration” option.
- Next, give the configuration a name and choose whether it will be used for production or non-production.
-
In the Configuration details section, add a key pair name. If you want to use an existing eye, you’ll find it available by clicking the dropdown menu to the right of the field.
If you’re creating a new key pair name, click the link below the field.
-
Next, in the Virtual Private Cloud (VPC) section, find the VPC where you want your SAP instance to be deployed from the options in the drop-down menu.
In the same section, select two Availability Zones (AZs) from the drop-down menus. You also need to choose one private subnet, at minimum (you can choose two if that’s suitable for your deployment).
When you’re done, click the "Verify connectivity" button to continue.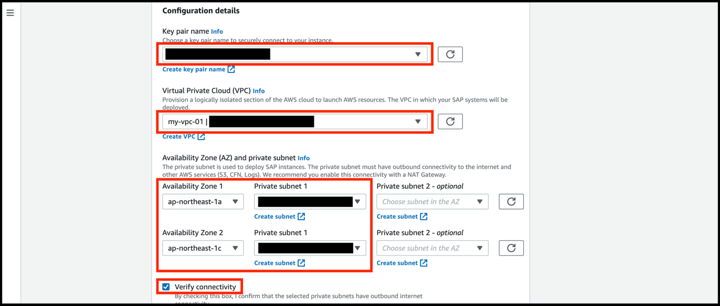
- In the Security Groups section, you have two options.
If you want the wizard to create all the security groups needed for the installation automatically, tick the “Create new security groups” option.
If you prefer to use your own security groups, if you have existing ones, you can select them from the drop-down menu. These selections can be applied to database and application servers, respectively.
You can also add a proxy You can also add a proxy server here, but that is optional.
To provide external user access, you need to assign an IP address and a security group for that in the “Connectivity to external systems or users” section.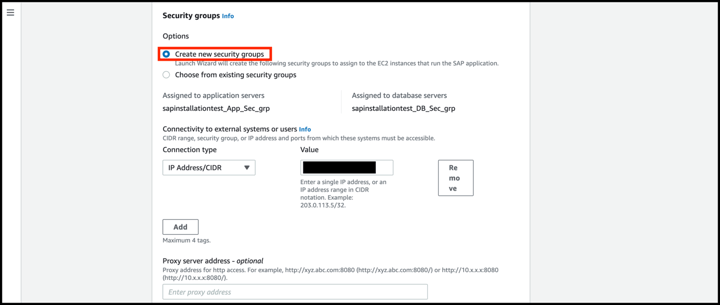
- Scrolling down, you can add tags if you want. These can help find your resources and clarify usage and ownership.
Under Time zone, enter the one that makes sense for your deployment.
For EBS encryption, you can enable encryption for the EBS volumes your SAP deployment will use. Just select “enable” from the drop-down menu.
Next, enter a domain name for the servers being used in the SAP deployment.
Then, under SAP landscape settings, add a SAPSYS Group ID.
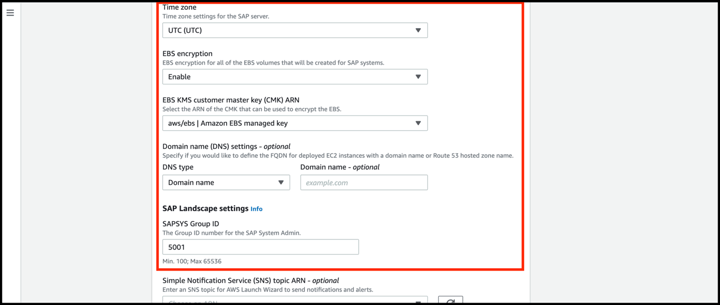
- If you’d like to get updates about the installation while it’s underway, you have the option to provide an ARN under “Simple Notification Service (SNS) topic ARN.”
When you’re done, click the “Next” button. Your SAP infrastructure has now been defined.

How to Set Up Your Application Settings
In this section we’ll show you how to define your application settings.
- Under application type, you can choose between a NetWeaver stack on HANA or a HANA database. We’ll show you how to set up both, starting with NetWeaver.
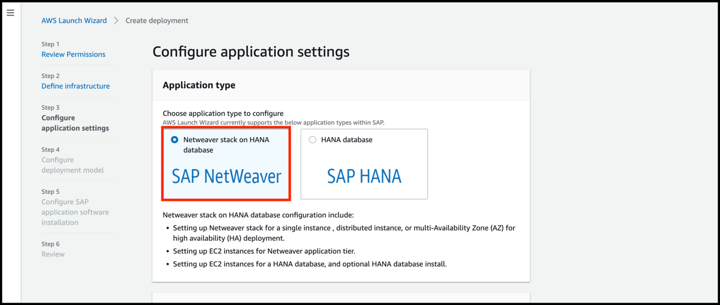
- Setting up NetWeaver:
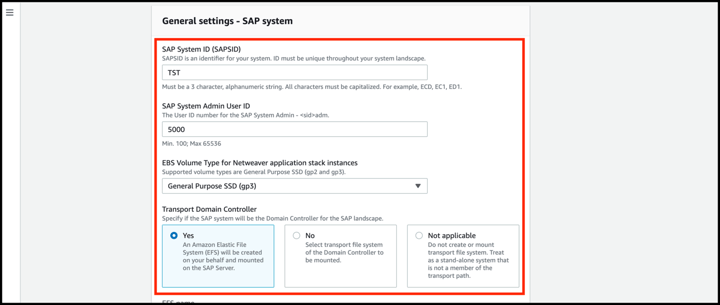
Define the basic settings for NetWeaver, including the SAP system ID, your admin’s ID, and the type of EBS volume that you’d prefer to use. This choice will largely depend on your own system requirements.
Under Transport Domain Controller, you’ll select your preference for using the SAP system as a domain controller for the SAP landscape.
When you select “Yes”, the wizard will create and use a new EFS volume to use. Select “No” and an existing EFS volume will be used. Selecting “Not applicable” standalone is the option to choose if you plan on using an existing transport directory in an FSx for NetApp ONTAP volume. Note, this is the recommended option to use for Multi-AZ ONTAP instances.
- Setting up SAP HANA:
Enter the basic details of the HANA deployment, i.e., the system ID and your HANA instance.
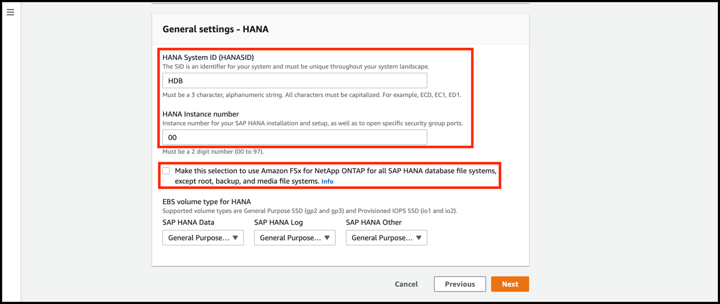
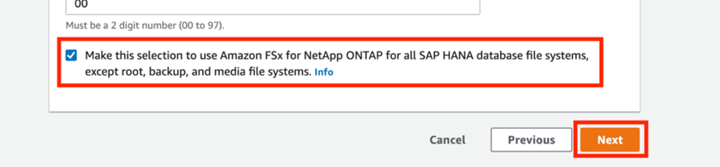
- Tick the box that will allow you to use FSx for ONTAP for your SAP HANA database file systems.
When you’re done, click “Next” to proceed.
Adding Deployment Details
In this step you’re going to configure the details of your deployment.
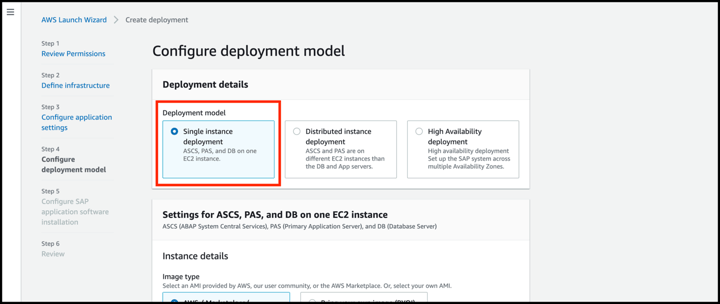
- First, pick a deployment model. The options include:
- A single instance using a single Amazon EC2 compute instance
- A distributed instance, which uses multiple EC2 instances
- A high availability instance that will set up SAP across multiple AZs
For this walkthrough, we’re going to select the single instance option.
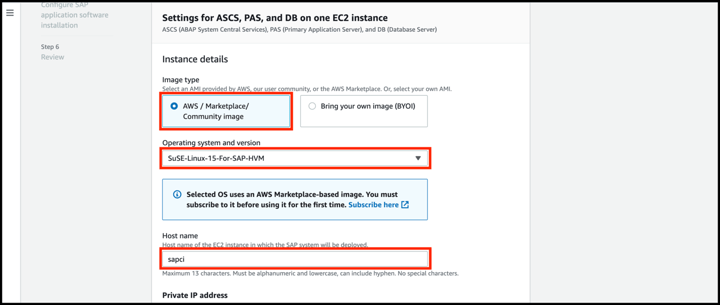
- Next is the section for ASCS, PAS, and DB on one EC2 instance settings.
Start by selecting your preferred image type (either one provided by AWS or to bring your own) Select the type of AMI (AWS Market community Image) you want to use.
Next, select the operating system and version that you’re using. If you want to use an OS that’s offered on the AWS marketplace, you’ll have to have one set up already. You can also choose to bring your own license.
Add a host name.
- Scrolling down, we’ll get to the section on sizing your instance.
To auto select an instance type based on your established memory capacity and vCPU number, choose the "Based on infrastructure requirements" option. To pick your own EC2 instance from the available list, select the "Based on instance type" option.For our walkthrough, we are going to go with the latter and use our own instance, choosing the “r6i.12xlarge” instance type from the drop-down menu.
In the Amazon FSx for NetApp ONTAP storage section, we’ll determine the base storage capacity of the SAP HANA system. This is set automatically based on the compute instance selected previously, though it can be changed manually to suit your needs.
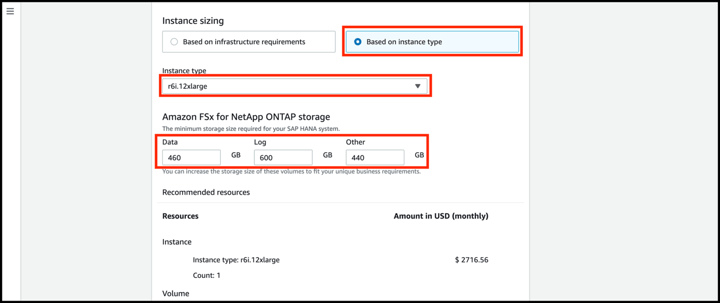
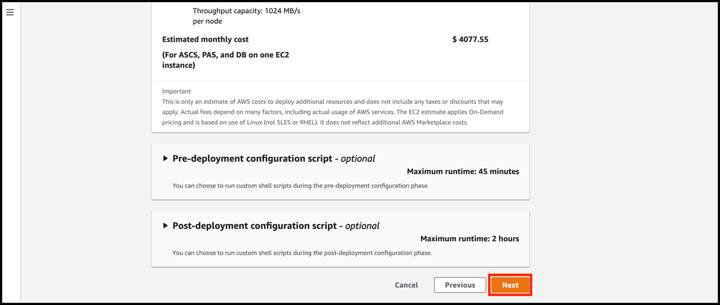
- Scrolling down, you’ll be presented with an estimated total cost for the deployment. Make sure that you’re fully aware of the costs you’ll be estimated to pay for the service monthly before you start using it.
The number you see in the image below is determined using the on-demand cost model. When you’re done, click the “Next” button.
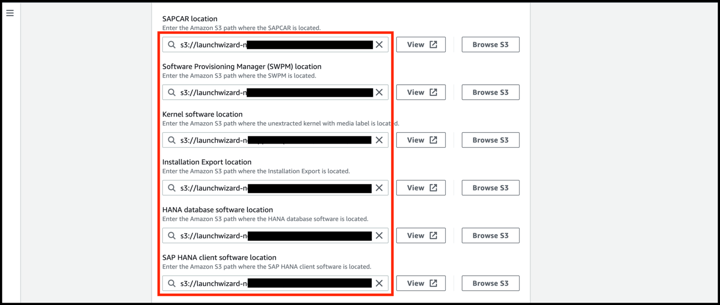
Configuring Your SAP Application Software
Now you’ll configure the details of your SAP application.
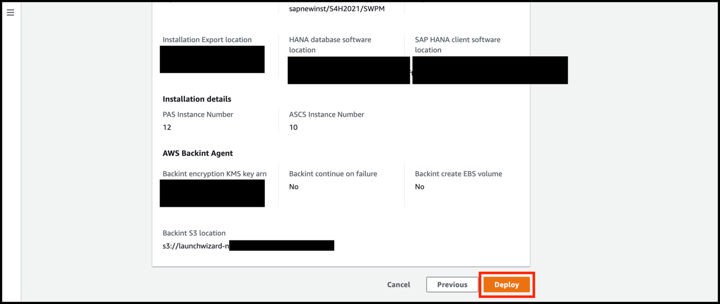
- In the SAPCAR location section, enter the file paths that connect to the install media used by SAP (as specified in the prerequisites).
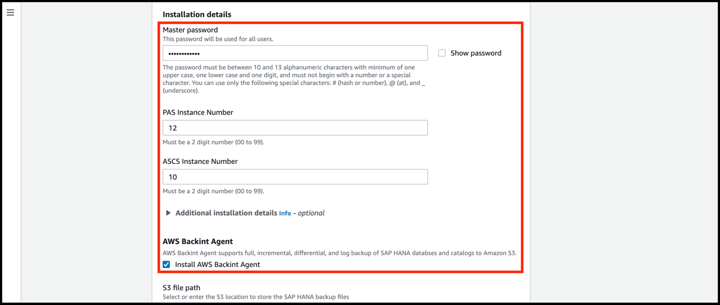
- Under Installation details, create a master password that will be commonly used for anyone using the deployment.
Next add a two-digit instance number (anything from 00 to 99) for your SAP system.
Next, note the box for “Install AWS Backint Agent.” This relates to data protection: it’s highly recommended for SAP systems to be backed up using consistent snapshots. If you aren’t using snapshots for some reason, AWS Backint Agent can give you some protection.
If you aren’t using snapshots to protect your system, or if you want the redundant protection, tick the box for “Install AWS Backint Agent.” Then provide an Amazon S3 bucket file path where the backups will be saved.
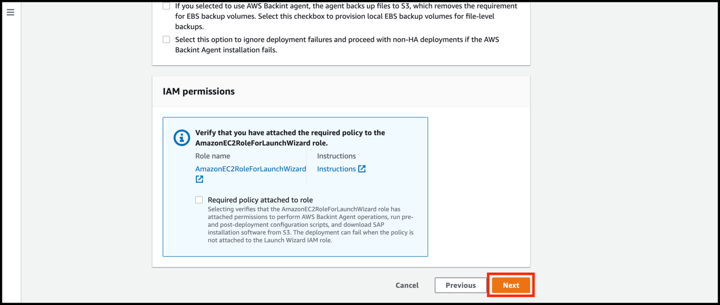
- Under IAM permissions, make sure that you are using the correct role name and then click the "Next" button.
Review and Deploy
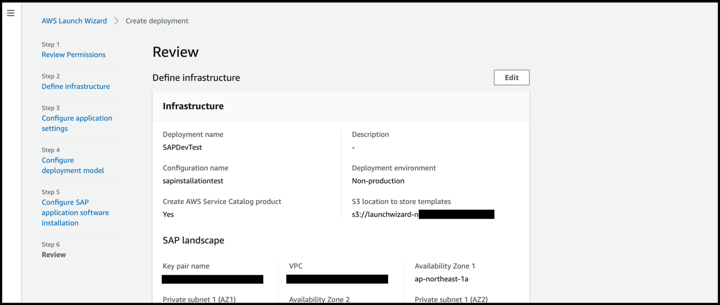
The final step to the process is to review all of the set up that we’ve gone through in the previous steps.
- Review the information entered. Use the edit button at the upper right to edit any incorrect details.
- If all the details are correct, click the “Deploy” button at the bottom of the page. Your installation will now commence.
- You can check in with the installation as it is underway through the AWS Launch Wizard.
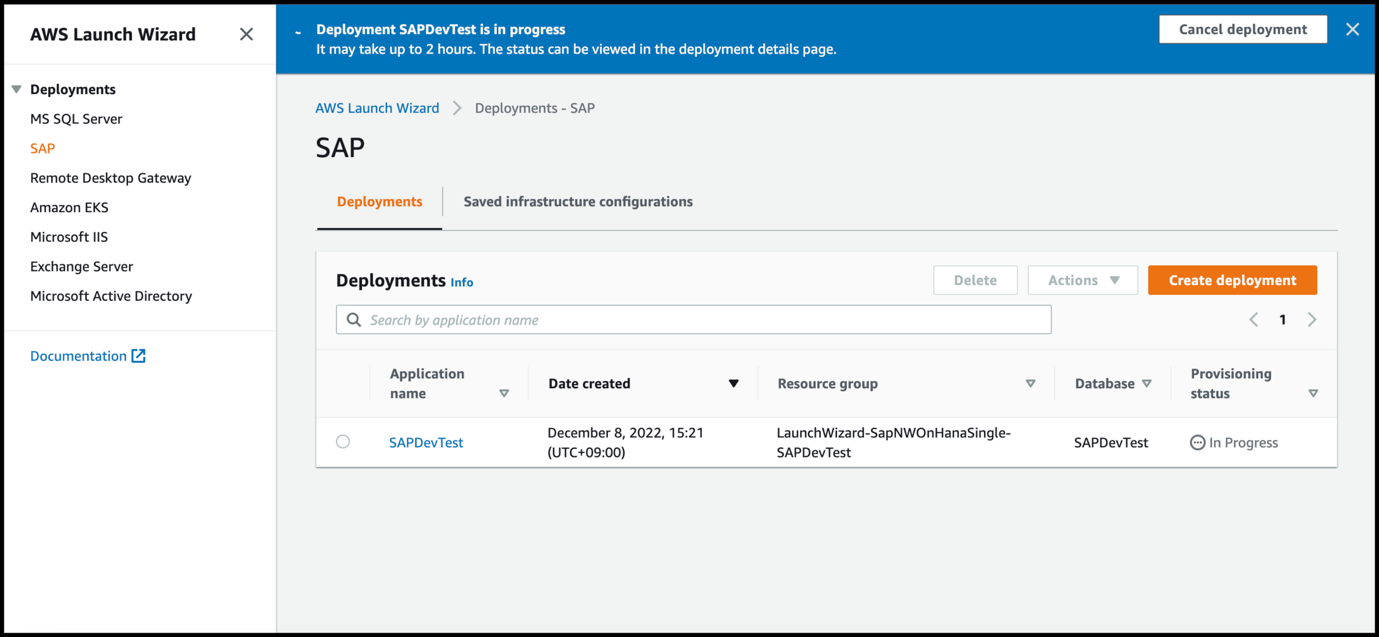
When the installation finishes up, you’ll see the status of the job in the Launch Wizard now listed as complete. If you opted to get SNS topic ARN, when the install is done you’ll also be notified via a message.
And that’s it, you’re done! Enjoy using your SAP deployment.
Get More from SAP with AWS and NetApp
As we’ve seen above, thanks to AWS Launch Wizard, your SAP deployment on FSx for ONTAP can be set up and ready to go in just a few easy steps. Once you do that you have the entire AWS ecosystem with all of the enterprise-grade benefits of NetApp ONTAP a click away.
Still interested in how you can get started? To read more about using AWS and NetApp to support your SAP workloads—plus the chance to download a free ebook on the subject—visit the SAP on AWS page here.
