Share
The popularity of containerized technology has been surging recently, and with it, the need for reliable persistent storage solutions. Stateful workloads that demand cost efficiency, high throughput, and high IOPS not only need reliability, but also a system that’s capable of running on top of containers and container orchestration platforms.
When using Cloud Volumes Service, you can easily provision persistent volumes directly from Docker and Kubernetes without the middleman (or, in this case, the middle application). It’s as simple as creating the volume to be exported and—using the Cloud Volumes Service UI or CLI —mounting it directly from either Kubernetes or Docker.
NFS Storage for Containers
Both Docker and Kubernetes have volume plug-ins that use NFS as their storage file system. Those volumes can be mounted by multiple containers or pods simultaneously. This allows persistent data stored on the volumes to be used for the integrated functionalities of applications running on top of running sets of pods or containers.
NetAppⓇ Cloud Volumes Service for AWS provides an enterprise-grade solution for NFS storage in the cloud, while also easing the process of administering the storage stack. It allows you to address two problems at once by offering both high performance and ease of management. Everything you need is housed in the Cloud Volumes Service UI or CLI, where you can perform all the functions you need from a single site.
The Cloud Volumes Service UI is the key to efficient container data storage.
Accessing Cloud Volumes from Kubernetes
Configuring access to a persistent NFS cloud volume exported by NetApp Cloud Volumes Service for AWS takes just two easy steps:
- Create the volume using the Cloud Volumes Service UI
- On your Kubernetes master host, you’ll configure a persistent volume, a persistent volume claim, and the pod resource that’s going to use the volume.
In the tutorial below, we show you how to access your cloud volumes from Kubernetes using a small open-source Kubernetes cluster deployment installed on top of two Amazon EC2 nodes running Ubuntu 18.04.
Creating a Cloud Volume from the Cloud Volumes Service UI
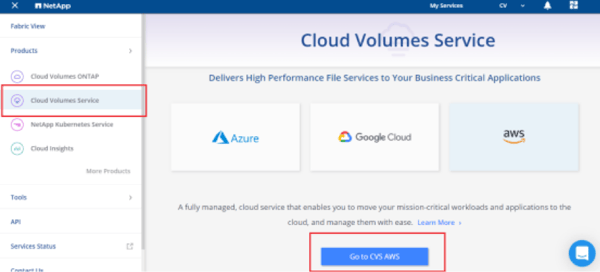
Log into your Netapp Cloud Central account and select the Cloud Volumes Service option:
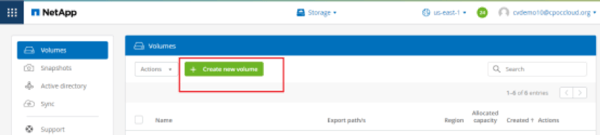
Create the new NFS volume to be exported and enter all the volume details and the export policy.
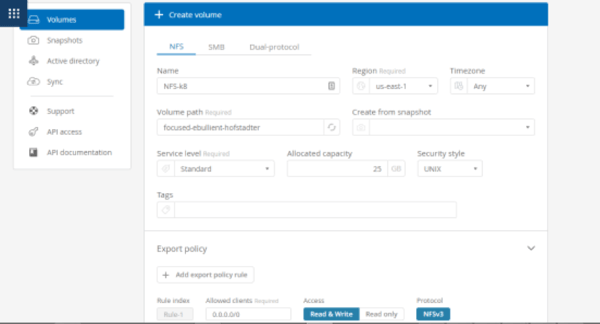
Make note of the export path and server IP address.
On the Cloud Volumes Service side, that’s all you have to do. Next, we have to complete the Kubernetes half of the setup.
Provisioning the Cloud Volume in Kubernetes
Kubernetes has an API object implementation called the PersistentVolume subsystem. That API consists of two objects: PersistentVolume and PersistentVolumeClaim. The PersistentVolume is a unit of storage provisioned by an administrator. It has a lifecycle that is independent from the lifecycle of any pod associated with it. PersistentVolumeClaim is a request by a user for storage resources with some general characteristics, such as access modes and storage size.
Pods use these claims to request available persistent volumes. You can go more granular and create StorageClasses that let you specify the quality of service or backup policies. For the purposes of this walkthrough, we are going to create a PersistentVolume pointing to our NetApp Cloud Volumes Service for AWS export and then create a PersistentVolumeClaim to call for it, and finally, create a pod that will make use of the cloud volume.
We used the .yaml content below and created the PersistentVolume by applying the command kubectl apply -f /path/filename.yaml as shown below:
apiVersion: v1

kind: PersistentVolume

   metadata:

 name: nfspv

spec:

   capacity:
     storage: 100Gi

volumeMode: Filesystem

accessModes:
     - ReadWriteMany

persistentVolumeReclaimPolicy: Retain

storageClassName: netapppv

mountOptions:
   - hard
   - nfsvers=3

nfs:
   path: /focused-ebullient-hofstadter

   server: 172.16.0.4

You can use a tool such as Lint in order to validate indentation and syntax in your YAML file.
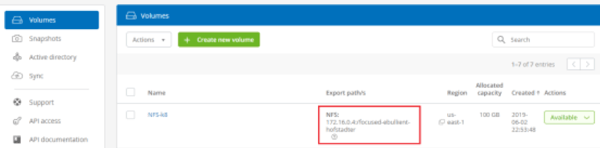
Once complete, verify that the volume was created and that its status is “Available”:

NFS
If you need any guidance for working with API object syntax, the Kubernetes project has documents available that you can refer to:
Our next step is to create the PersistentVolumeClaim. We used the API call below in a .yaml file and applied the kubectl apply -f /path/filename.yaml command:
apiVersion: v1

kind: PersistentVolumeClaim

metadata:

   name: netappclaim

spec:

   accessModes:

      - ReadWriteMany

   volumeMode: Filesystem

   resources:

      requests:

         storage: 100Gi

   storageClassName: netapppv

Notice the StorageClassName must be the same in both the PersistentVolume file and the PersistentVolumeClaim file so that they both can be bound by the Kubernetes service.


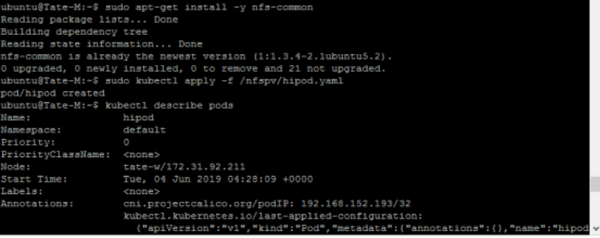
Now that the claim has been bound to the persistent volume, we can create a pod that uses that claim as its persistent storage by specifying the PersistentVolumeClaim name “netappclaim” in one of the pod’s API call attributes:
kind: Pod
apiVersion: v1
metadata:
name: hipod
spec:
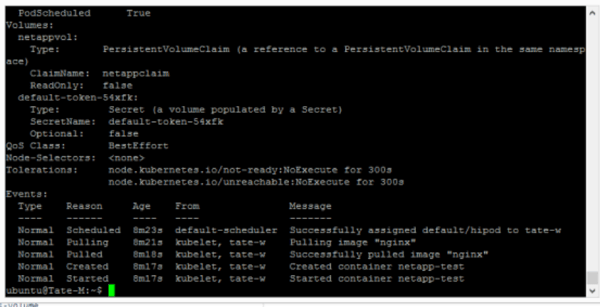
volumes:
- name: netappvol
persistentVolumeClaim:
claimName: netappclaim
containers:
- name: netapp-test
image: nginx
ports:
- containerPort: 80
name: "http-server"
volumeMounts:
- mountPath: ¨/tate/nfs¨
name: netappvol
You need to install the NFS client on every node in the Kubernetes cluster before the pod can mount the exported cloud volume.
Testing the Configuration
Following the steps below, you can test the configuration:
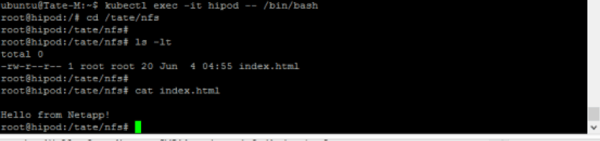
- First, create an index.html file on the mount path of the pod hipod

- Delete the pod from the Kubernetes cluster by applying the command kubectl delete pod hipod:

- Next, recreate the pod by using the same .yaml file shown before the configuration test and connect it to the volume again. You’ll now be able to confirm that the file is still there.
Accessing Cloud Volumes from Docker
Docker also has a volume driver that supports NFS for local and remote mounting, with no need for any other plugin to run in-between the two. Below, we show you how to create a single container, specifying all the volume information and mount details. This process also applies to the creation and mounting of a volume for a Docker service.
Create the container or service and specify all the mount information and mounting options.
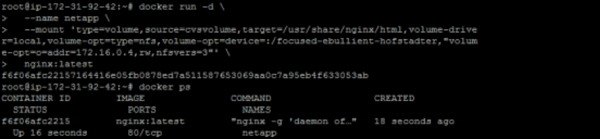
docker run -d \

   --name netapp \

   --mount 'type=volume,source=cvs,target=/usr/share/nginx/html,volume-driver=local,volume-opt=type=nfs,volume-
opt=device=:/focused-ebullient-hofstadter,"volume-opt=o=addr=172.16.0.4,rw,nfsvers=3"' \

   nginx:latest
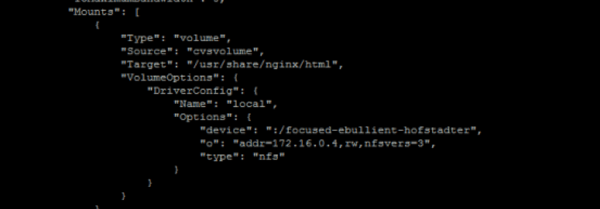
The command above creates an nginx container with the name netapp which mounts the volume named cvsvolume to the internal container’s /usr/share/nginx/html path. It specifies the NFS NetApp server path as :/focused-ebullient-hofstadter and the IP address 172.16.0.4, both of which can be obtained from the export path in the Cloud Volumes Service UI or CLI for that particular volume:
The first mount section from the docker inspect netapp command output confirms that the volume has been mounted to the desired NFS server.
We can also verify this by following these two steps:
- Access the container’s shell using the docker exec -it netapp /bin/bash command.
- Navigate to the container’s path where the volume has been mounted:
cd /usr/share/nginx/html
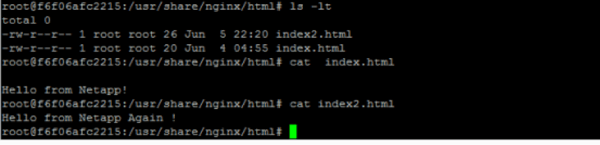
In the image above, we’re able to see the previous index.html file created when first mounting the cloud volume to our Kubernetes pod and an additional index2.html file created for this container. We then delete the container, remove the cvsvolume, and create a new container called netapp2, pairing it to the same volume.

Again, we browse to the /usr/share/nginx/html path in order to confirm that the files previously created are still there.

As you can see, it’s a simple process, but if you haven’t worked with Docker that much, you may want to reference the Docker docs, where you’ll get very detailed and clear information about everything related to Docker. You can also visit the Linux Manual pages for detailed information about the mount and NFS options.
Cutting-edge Container Tech Deserves Cutting-edge Storage
Containers are the future, but they still rely on a solid storage utility for stateful workloads. Cloud Volumes Service for AWS provides a storage option that has been tested against highly demanding workloads with very strong results. And since both Kubernetes and Docker have internal volume drivers that allow containerized data to persist on cloud volumes, this cutting edge technology finally has cloud-based storage to match.
Get Started With Cloud Volumes Service
Request a demo or visit Cloud Volume Service for AWS to find out more.