Subscribe to our blog
Thanks for subscribing to the blog.
September 28, 2022
Topics: Astra Advanced16 minute readKubernetes Protection
There are countless studies showing that shortening feedback loops and delivering software quickly and reliably are extremely strong indicators of overall organizational performance. For over a decade, CloudBees has been at the forefront of improving their customers’ organizational performance by enabling reliable testing, building, and shipping of code through CloudBees CI.
Many organizations have become so reliant on automation and continuous integration tools that outages (whether of the CI system or the underlying infrastructure) can cost hundreds of thousands of dollars lost in developer productivity. Therefore it’s important to have an enterprise disaster recovery plan in place for your CI system, which historically has been challenging for stateful cloud-native applications.
NetApp® Astra™ Control provides application-aware data protection, mobility, and disaster recovery for Kubernetes. It’s available both as a fully managed service (Astra Control Service) and as self-managed software (Astra Control Center). It enables administrators to easily protect, back up, migrate, and create working clones of Kubernetes applications, through either its UI or robust APIs. As we’ll see later in this blog post, Astra Control meets the most stringent enterprise disaster recovery requirements with its low RPO (1-hour snapshot and backup frequency) and RTO (about 15 minutes in the scenario described this blog, although production use cases with larger datasets may take longer to restore).
Astra Control, part of the Astra suite of products from NetApp, is a perfect complement to CloudBees CI to keep your organization productive even when disaster strikes.
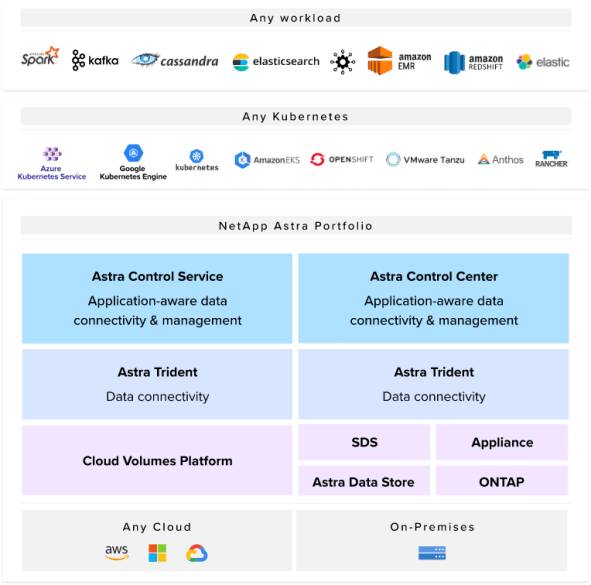
NetApp Astra Portfolio
Prerequisites
This blog will show how easy it is to protect and clone CloudBees CI with Astra Control. If you plan on following step-by-step, you’ll need the following resources prior to getting started:
- An Astra Control Center (on-premises environments) or Astra Control Service (NetApp managed service) instance
- Two supported Kubernetes clusters (we’ll be using GKE private clusters in this walkthrough)
- The NetApp Astra Control Python SDK installed on a system of your choice
Kubernetes Cluster Management
The toolkit.py script in the Astra Control Python SDK provides an easy-to-use command line interface to interact with Astra Control resources, including listing applications, creating backups, and managing clusters, all of which we’ll use today. It’s also capable of many more functions, so be sure to check out the toolkit documentation. Additionally, all of the actions carried out in this blog can be done through Astra Control’s robust GUI if that’s your preference.
If your Kubernetes clusters are already managed by Astra Control, you can skip to the next section.
First, let’s list some of our available resources.
(toolkit) $ ./toolkit.py list clusters
+-----------------+--------------------------------------+---------------+----------------+
| clusterName     | clusterID                            | clusterType   | managedState   |
+=================+======================================+===============+================+
| useast1-cluster | bda5de80-41d0-4bc2-8642-d5cf98c453e0 | gke           | unmanaged      |
+-----------------+--------------------------------------+---------------+----------------+
| uswest1-cluster | b204d237-c20b-4751-b42f-ca757c560d2a | gke           | unmanaged      |
+-----------------+--------------------------------------+---------------+----------------+
(toolkit) $ ./toolkit.py list storageclasses
+---------+-----------------+--------------------------------------+---------------------+
| cloud   | cluster         | storageclassID                       | storageclassName    |
+=========+=================+======================================+=====================+
| GCP     | useast1-cluster | 0f17bdd2-38e0-4f10-a351-9844de4243ee | netapp-cvs-standard |
+---------+-----------------+--------------------------------------+---------------------+
| GCP     | useast1-cluster | f38b57e1-28c3-4da7-b317-944ba4dc5fbb | premium-rwo         |
+---------+-----------------+--------------------------------------+---------------------+
| GCP     | useast1-cluster | 18699272-af9e-42a8-9abc-91ac0854fe90 | standard-rwo        |
+---------+-----------------+--------------------------------------+---------------------+
| GCP     | uswest1-cluster | 0f17bdd2-38e0-4f10-a351-9844de4243ee | netapp-cvs-standard |
+---------+-----------------+--------------------------------------+---------------------+
| GCP     | uswest1-cluster | 3a923be5-f984-434e-9b2b-cea956d04a15 | premium-rwo         |
+---------+-----------------+--------------------------------------+---------------------+
| GCP     | uswest1-cluster | add41cb7-d9f5-49f0-a4ea-cddf2d2383df | standard-rwo        |
+---------+-----------------+--------------------------------------+---------------------+
Note that our clusters are currently in an unmanaged state. With the toolkit, it’s a simple process to manage a cluster and set our default storage class to use NetApp Cloud Volumes Service by using the clusterID and storageclassID gathered from the previous two commands.
(toolkit) $ ./toolkit.py manage cluster bda5de80-41d0-4bc2-8642-d5cf98c453e0 0f17bdd2-38e0-4f10-a351-9844de4243ee
{"type": "application/astra-managedCluster", "version": "1.1", "id": "bda5de80-41d0-4bc2-8642-d5cf98c453e0", "name": "useast1-cluster", "state": "pending", "stateUnready": [],
... output trimmed
(toolkit) $ ./toolkit.py manage cluster b204d237-c20b-4751-b42f-ca757c560d2a 0f17bdd2-38e0-4f10-a351-9844de4243ee
{"type": "application/astra-managedCluster", "version": "1.1", "id": "b204d237-c20b-4751-b42f-ca757c560d2a", "name": "uswest1-cluster", "state": "pending", "stateUnready": [],
... output trimmed
(toolkit) $ ./toolkit.py list clusters
+-----------------+--------------------------------------+---------------+----------------+
| clusterName     | clusterID                            | clusterType   | managedState   |
+=================+======================================+===============+================+
| useast1-cluster | bda5de80-41d0-4bc2-8642-d5cf98c453e0 | gke           | managed        |
+-----------------+--------------------------------------+---------------+----------------+
| uswest1-cluster | b204d237-c20b-4751-b42f-ca757c560d2a | gke           | managed        |
+-----------------+--------------------------------------+---------------+----------------+
After running a manage cluster command for each cluster, we can verify that our clusters are now in a managed state.
Deploying and Protecting CloudBees CI
Now that Astra Control is managing our Kubernetes clusters, it will automatically discover any namespaces running on the cluster, giving users the ability to define applications, create protection policies to set snapshot and backup schedules, and make on-demand snapshots or backups. The toolkit also has a function (deploy) which combines all of these actions into a single command, which we’ll use to deploy CloudBees.
First, we’ll set our kubectl context to the us-east1 Kubernetes cluster, which is where we’ll be deploying the CloudBees CI application.
$ kubectl config use-context gke_astracontroltoolkitdev_us-east1-b_useast1-cluster
Switched to context "gke_astracontroltoolkitdev_us-east1-b_useast1-cluster".
$ kubectl config get-contexts
CURRENT   NAME                                                    CLUSTER                                                 AUTHINFO                                                NAMESPACE
*         gke_astracontroltoolkitdev_us-east1-b_useast1-cluster   gke_astracontroltoolkitdev_us-east1-b_useast1-cluster   gke_astracontroltoolkitdev_us-east1-b_useast1-cluster
          gke_astracontroltoolkitdev_us-west1-b_uswest1-cluster   gke_astracontroltoolkitdev_us-west1-b_uswest1-cluster   gke_astracontroltoolkitdev_us-west1-b_uswest1-cluster
Next, we’ll deploy the CloudBees CI app with the toolkit. By default, the cloudbees/cloudbees-core helm chart deploys a fully fault tolerant CloudBees CI operations center, which can then deploy and manage the entire lifecycle of any number of managed controllers or team controllers. The CloudBees CI operations center also handles licensing, single sign-on, shared build agents, cross-controller triggers, and more.
(toolkit) $ ./toolkit.py deploy -n cloudbees-core cloudbees-core cloudbees/cloudbees-core --set OperationsCenter.HostName=cloudbees-core.netapp.com --set ingress-nginx.Enabled=true
Hang tight while we grab the latest from your chart repositories...
...Successfully got an update from the "gitlab" chart repository
...Successfully got an update from the "cloudbees" chart repository
...Successfully got an update from the "bitnami" chart repository
Update Complete. ⎈Happy Helming!⎈
namespace/cloudbees-core created
Context "gke_astracontroltoolkitdev_us-east1-b_useast1-cluster" modified.
NAME: cloudbees-core
LAST DEPLOYED: Thu Jun  2 13:25:00 2022
NAMESPACE: cloudbees-core
STATUS: deployed
REVISION: 1
TEST SUITE: None
NOTES:
1. Once Operations Center is up and running, get your initial admin user password by running:
  kubectl rollout status sts cjoc --namespace cloudbees-core
  kubectl exec cjoc-0 --namespace cloudbees-core -- cat /var/jenkins_home/secrets/initialAdminPassword
2. Visit http://cloudbees-core.netapp.com/cjoc/

3. Login with the password from step 1.

For more information on running CloudBees Core on Kubernetes, visit:
https://go.cloudbees.com/docs/cloudbees-core/cloud-admin-guide/
Waiting for Astra to discover the namespace.. Namespace discovered!
Managing app: cloudbees-core. Success!
Setting hourly protection policy on 855d7fb2-5a7f-494f-ab0b-aea35344ad86
Setting daily protection policy on 855d7fb2-5a7f-494f-ab0b-aea35344ad86
Setting weekly protection policy on 855d7fb2-5a7f-494f-ab0b-aea35344ad86
Setting monthly protection policy on 855d7fb2-5a7f-494f-ab0b-aea35344ad86
For detailed information on the toolkit.py deploy command, please view the documentation, but in summary the above command:
- Updates the helm repositories on the local system.
- Uses helm to deploy the CloudBees CI app within the cloudbees-core namespace.
- Sets optional values, including specifying a hostname and deploying an Nginx Ingress Controller (if you’re using a GKE private cluster, be sure to open port 8443 from the master to worker nodes).
- Manages the entire cloudbees-core namespace.
- Creates a protection policy with hourly, daily, weekly, and monthly snapshot and backup schedules to automatically protect the cloudbees-core application. These policies can be modified to increase or decrease the number of snapshots and/or backups to automatically retain.
Verifying the Deployment
After five to ten minutes, you should see that the persistent volume claims are bound, and the pods are in a running state.
$ kubectl get pvc
NAME                  STATUS   VOLUME                                     CAPACITY   ACCESS MODES   STORAGECLASS          AGE
jenkins-home-cjoc-0   Bound    pvc-7de62816-71ba-4633-a9e2-1382848a8dde   300Gi      RWO            netapp-cvs-standard   7m5s
$ kubectl get pods
NAME                                                      READY   STATUS    RESTARTS   AGE
cjoc-0                                                    1/1     Running   0          7m7s
cloudbees-core-ingress-nginx-controller-d4784546c-4p59v   1/1     Running   0          7m7s
You can also grab information about the services and ingress controller (if you chose to deploy one in your environment).
$ kubectl get svc
NAME                                                TYPE           CLUSTER-IP       EXTERNAL-IP     PORT(S)                      AGE
cjoc                                                ClusterIP      172.17.43.180    <none>          80/TCP,50000/TCP             7m16s
cloudbees-core-ingress-nginx-controller             LoadBalancer   172.17.114.255   35.237.41.216   80:31652/TCP,443:30600/TCP   7m16s
cloudbees-core-ingress-nginx-controller-admission   ClusterIP      172.17.2.190     <none>          443/TCP                      7m16s
$ kubectl get ingress
NAME   CLASS   HOSTS                       ADDRESS         PORTS   AGE
cjoc   nginx   cloudbees-core.netapp.com   35.237.41.216   80      7m22s
$ kubectl describe ingress
Name:             cjoc
Labels:           app.kubernetes.io/instance=cloudbees-core
                  app.kubernetes.io/managed-by=Helm
                  app.kubernetes.io/name=cloudbees-core
                  helm.sh/chart=cloudbees-core-3.43.3_fbed12c3e4b0
Namespace:        cloudbees-core
Address:          35.237.41.216
Default backend:  default-http-backend:80 (172.18.0.5:8080)
Rules:
  Host                       Path  Backends
  ----                       ----  --------
  cloudbees-core.netapp.com
                             /cjoc   cjoc:80 (172.18.0.14:8080)
Annotations:                 kubernetes.io/tls-acme: false
                             meta.helm.sh/release-name: cloudbees-core
                             meta.helm.sh/release-namespace: cloudbees-core
                             nginx.ingress.kubernetes.io/app-root: /cjoc/teams-check/
                             nginx.ingress.kubernetes.io/proxy-body-size: 50m
                             nginx.ingress.kubernetes.io/proxy-request-buffering: off
                             nginx.ingress.kubernetes.io/ssl-redirect: false
Events:
  Type    Reason  Age                    From                      Message
  ----    ------  ----                   ----                      -------
  Normal  Sync    6m22s (x2 over 7m22s)  nginx-ingress-controller  Scheduled for sync
In the above output, we can see our ingress controller received an IP of 35.237.41.216, has a hostname of cloudbees-core.netapp.com, and the CloudBees CI operations center can be reached at a path of /cjoc. Through our organization’s DNS provider, or local hosts file, we can set cloudbees-core.netapp.com to resolve to 35.237.41.216:
$ ping cloudbees-core.netapp.com
PING cloudbees-core.netapp.com (35.237.41.216): 56 data bytes
64 bytes from 35.237.41.216: icmp_seq=0 ttl=102 time=40.095 ms
64 bytes from 35.237.41.216: icmp_seq=1 ttl=102 time=25.388 ms
64 bytes from 35.237.41.216: icmp_seq=2 ttl=102 time=25.996 ms
64 bytes from 35.237.41.216: icmp_seq=3 ttl=102 time=25.734 ms
^C
--- cloudbees-core.netapp.com ping statistics ---
4 packets transmitted, 4 packets received, 0.0% packet loss
round-trip min/avg/max/stddev = 25.388/29.303/40.095/6.234 ms
Finally, we can gather our unique initial CloudBees password with the following command (as detailed in the output from the toolkit deploy command above) for use in the next step.
$ kubectl exec cjoc-0 --namespace cloudbees-core -- cat /var/jenkins_home/secrets/initialAdminPassword
b828f4e2488443999e4c4b3ecc5e0cdc
CloudBees CI Setup
Now that we’ve successfully deployed and protected CloudBees CI through the Astra SDK toolkit, it’s time to complete the initial setup. Point your web browser to the host and path found from the describe ingress command above.
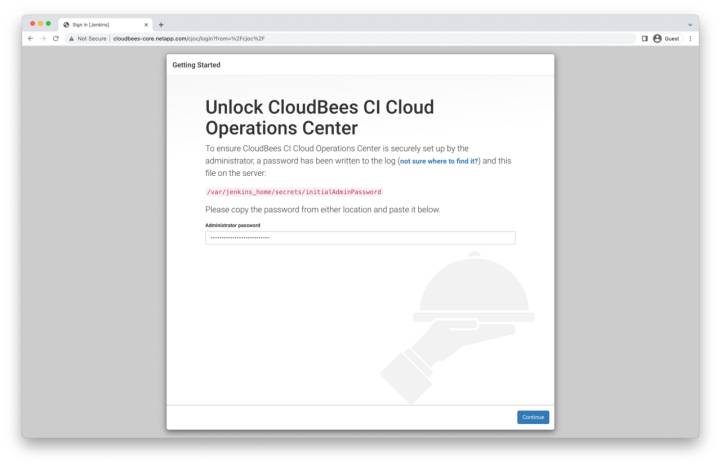
Unlocking CloudBees CI
To unlock CloudBees, paste in the temporary password gathered from the previous step and click continue.
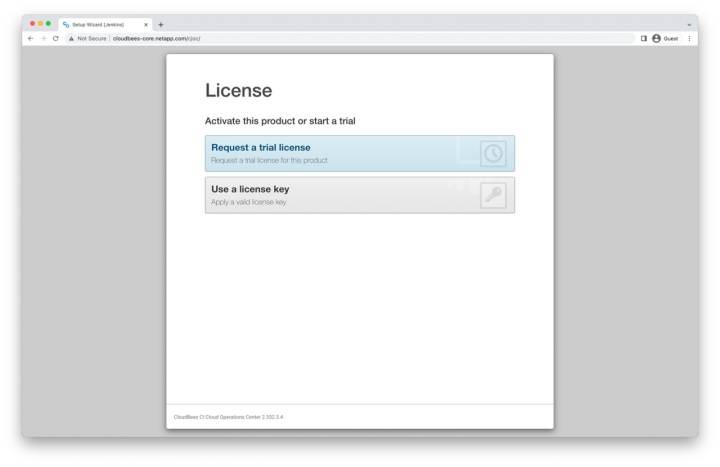
Selecting a License
On the License page, select the license type that’s appropriate for your use case. Here, we’ll be using a trial license.
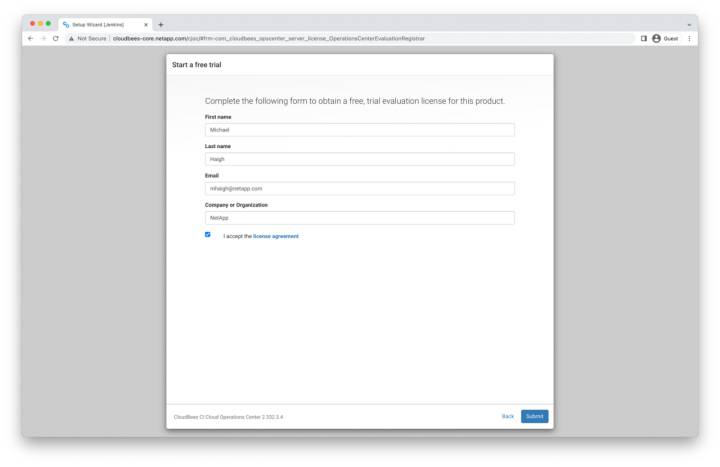
Start a Free Trial
To start your free trial, enter your name, email, and organization name, accept the license agreement, and then click submit.
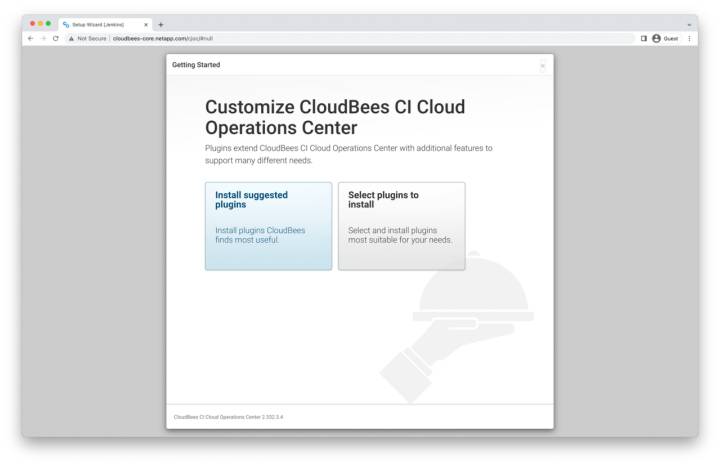
Install Plugins
Depending upon your use case, either install the suggested plugins, or manually select plugins (you can always install or remove plugins later). Here, we install the suggested plugins.
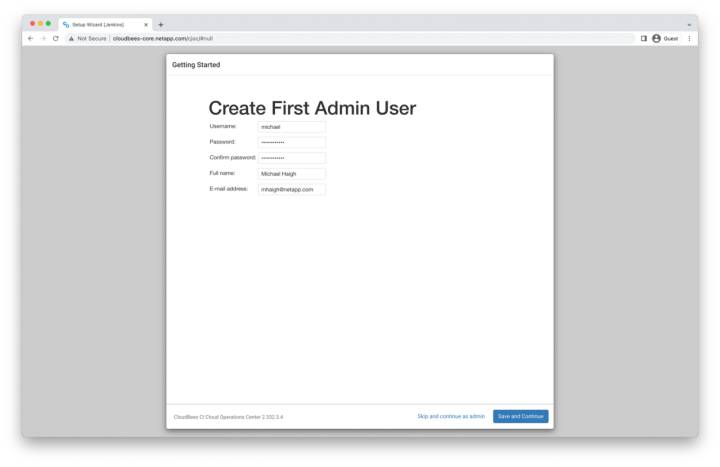
Creating an Admin User
To create the initial admin user, specify a username, password, and enter your full name and email (additional users can be created later). Then click save and continue.
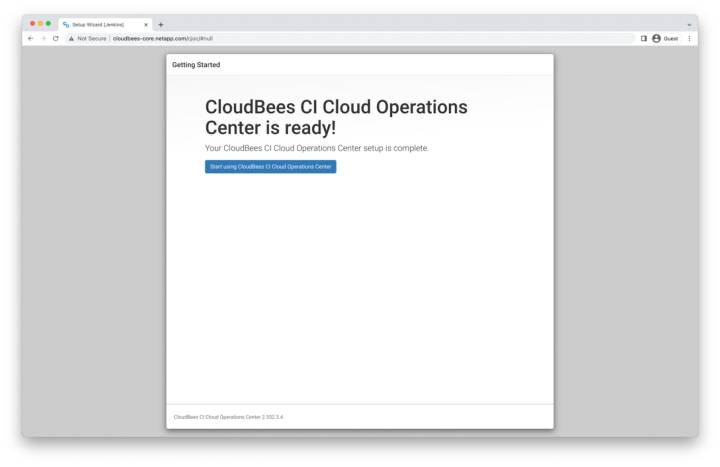
CloudBees CI is Ready!
CloudBees CI is now set up. Click Start using CloudBees CI Cloud Operations Center to go to the CloudBees CI homepage.
CloudBees Controller Creation
As mentioned earlier, the operations center can deploy and manage the entire lifecycle of any number of managed or team controllers. Now that our CloudBees CI operations center is up and running, let’s deploy a new controller.
Managed controllers provide built-in fault tolerance with automatic restart when they’re unhealthy; role-based access control, which can be managed on either the operations center or the controller itself; sophisticated credential and authorizations capabilities; and more. If you’re not sure about the number of controllers to deploy, CloudBees recommends starting with one controller per team.
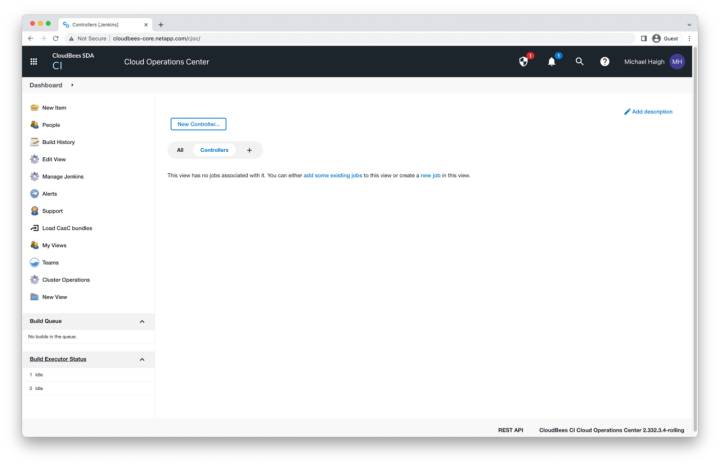
CloudBees Cloud Operations Center
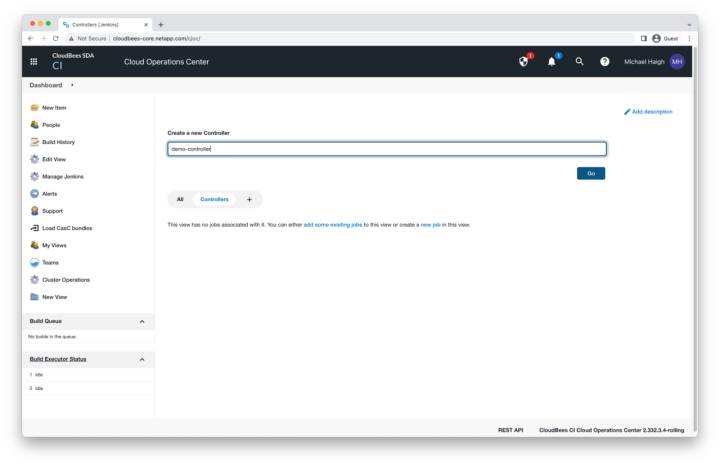
On the operations center homepage, click the New Controller button in the middle pane.
Name the New Controller
Name the controller according to the business practices of your organization (here we use demo-controller). Then click Go.
Configure the Controller
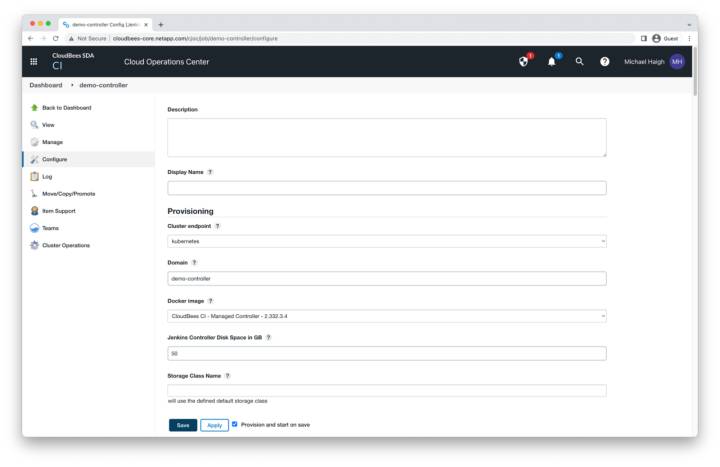
The page that opens contains many fields for configuring the controller. You can modify any of the fields according to your organization’s business practices. in this example, we leave all fields as their default values. The two most relevant fields for Astra Control are the Storage Class Name dropdown (leaving it blank will have Kubernetes use the default storage class, which is netapp-cvs-standard on these example GKE clusters), and Namespace (leaving it blank will utilize the same namespace as the operations center, which is cloudbees-core in our example). Click Save.
Controller Connected
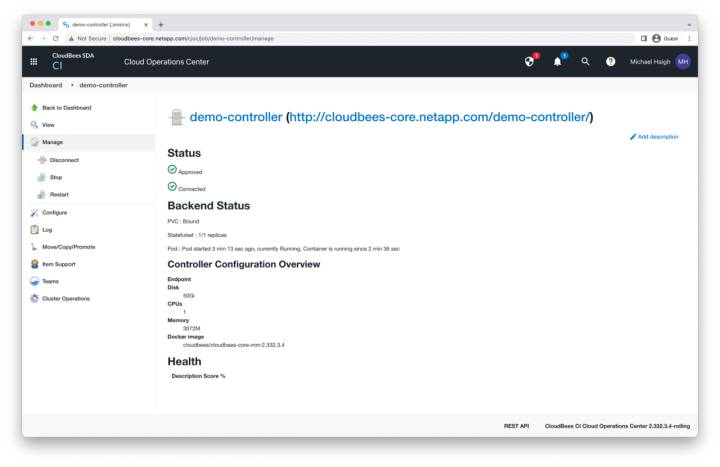
After a couple of minutes, the Controller status should be in an approved and connected state. If you instead receive an error stating failed to provision master / timed out, make sure that your GKE master nodes can communicate with your worker nodes over port 8443.
Click on view in the left pane or the demo-controller link to open the controller page.
Choose Controller Plugins
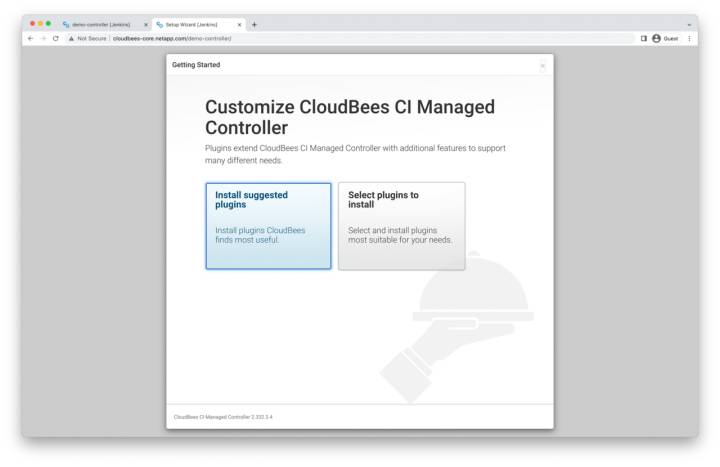
As with the operations center installation, you’ll be prompted to choose your plugin installation method. Choose according to your organization’s business practices (plugins can also be modified later). In this example we’ll select install suggested plugins.
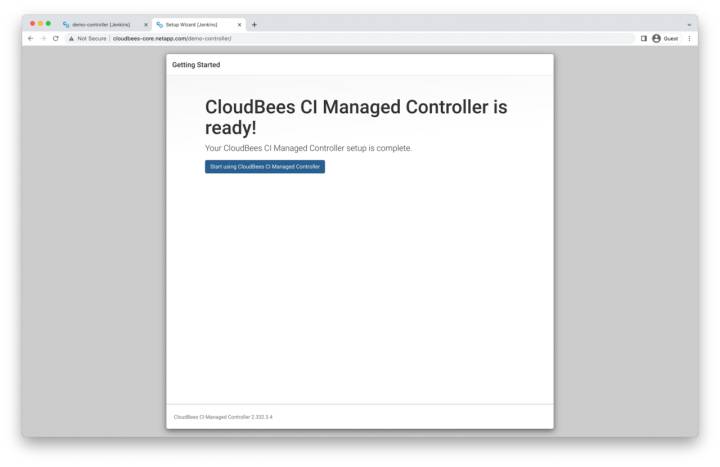
Controller Ready
When the plugin installation is complete, our controller is ready for use. Click start using CloudBees CI Managed Controller.
CloudBees Pipeline Creation
Now that our controller is operational, we create a demo pipeline to show the robust backup and DR capabilities of Astra Control.
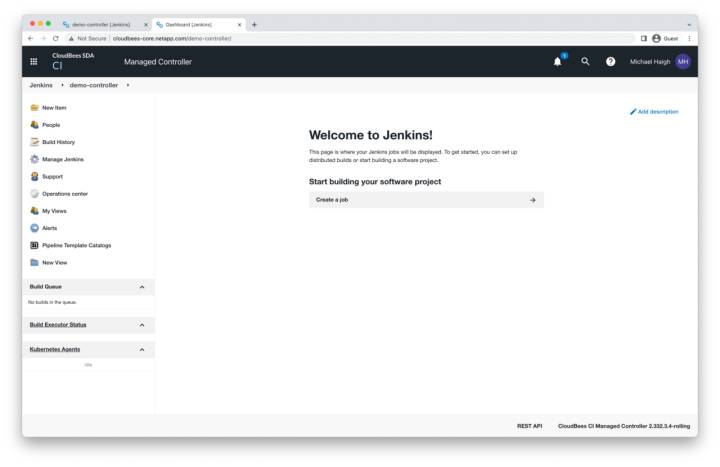
Controller Homepage
On the controller homepage, click the new item link in the left pane.
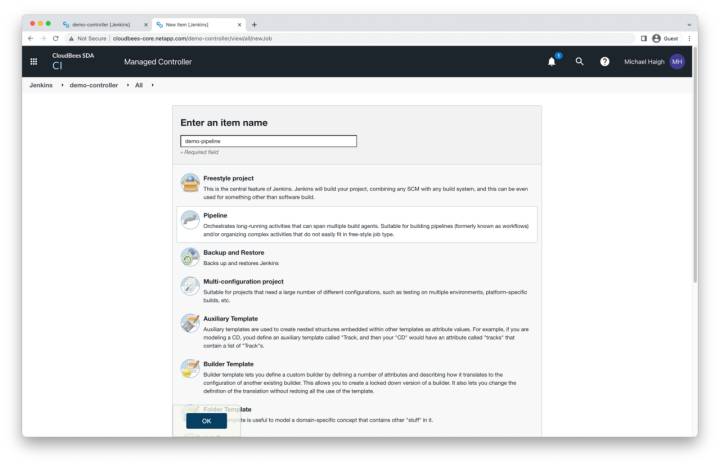
Name the Pipeline
Name the item according to your business practices (for example, demo-pipeline), select the pipeline option (second from the top), and click OK.
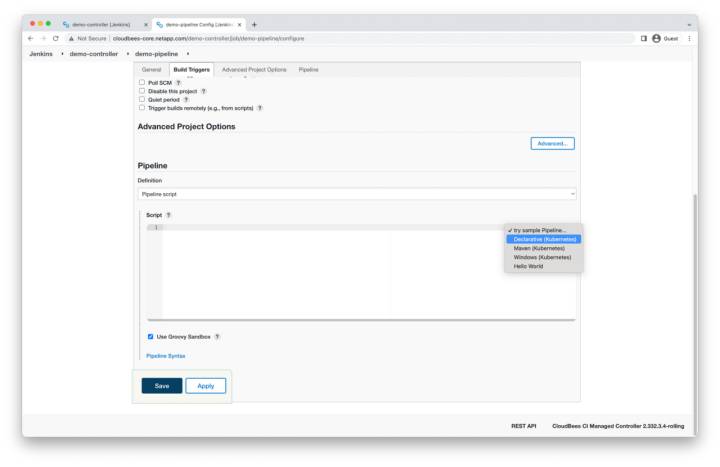
Sample Pipeline Script
On the next page, leave all fields as default and scroll to the bottom. In the pipeline script area, click the try sample pipeline button on the right, and select declarative (Kubernetes).
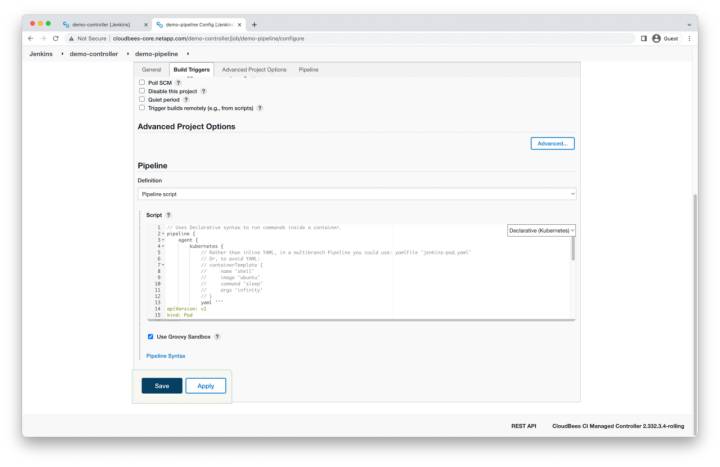
Declarative Pipeline
A sample declarative pipeline will be automatically entered into the script box, which simply prints the hostname of the container running the pipeline job. Click save.
CloudBees Pipeline Execution
All aspects of our demo Cloudbees environment—operations center, managed controller, and pipeline—have now been created. Our final step before we initiate a backup and clone operation is to execute the pipeline.
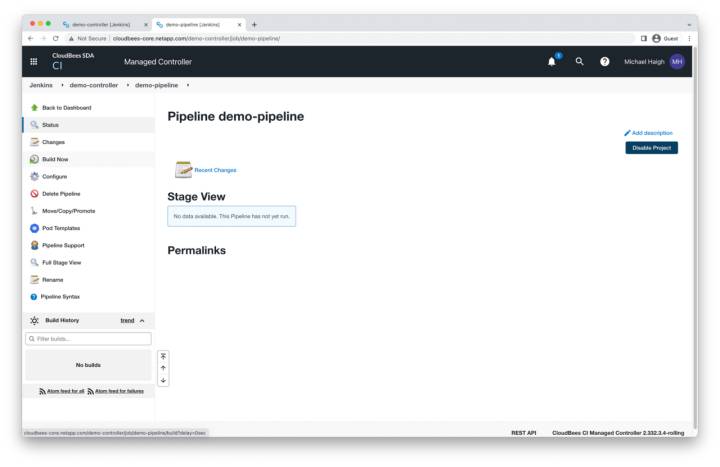
Pipeline – Build Now
In the left pane of the demo-pipeline page, click build now.
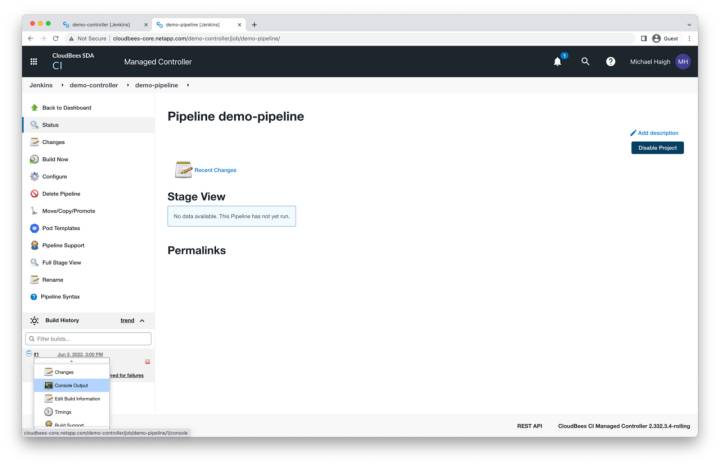
Build History
In the lower left corner, under the build history section, hover over the #1 build, click the down arrow icon, and then click console output.
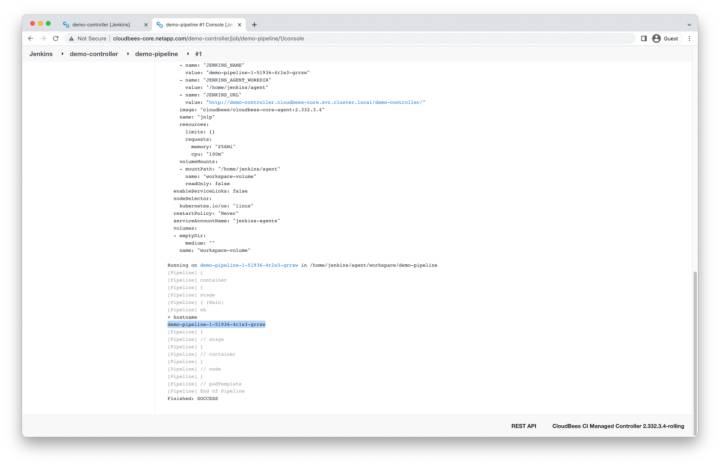
Console Output
After about 30 seconds, the build will complete. A large portion of the output is dedicated to the build agent pod YAML. Scroll all the way to the bottom to display the pod’s hostname.
Astra Out-of-Band Backup
We’ve now successfully deployed all our CloudBees resources and executed our pipeline. Let’s head back to the CLI and use the toolkit.py script to list our application backups.
(toolkit) $ ./toolkit.py list backups
+--------------------------------------+---------------------------+--------------------------------------+---------------+
| AppID                                | backupName                | backupID                             | backupState   |
+======================================+===========================+======================================+===============+
| 855d7fb2-5a7f-494f-ab0b-aea35344ad86 | hourly-khyqj-bgwxr        | dc372dc6-a02e-4b5c-9e12-262a3d349ec5 | completed     |
+--------------------------------------+---------------------------+--------------------------------------+---------------+
Note that we do have an automated hourly backup from our protection policy, however since we just executed the pipeline, let’s proceed with creating an out-of-band backup.
(toolkit) $ ./toolkit.py create backup 855d7fb2-5a7f-494f-ab0b-aea35344ad86 after-pipeline-completion
Starting backup of 855d7fb2-5a7f-494f-ab0b-aea35344ad86
Waiting for backup to complete............................................................................complete!
(toolkit) $ ./toolkit.py list backups
+--------------------------------------+---------------------------+--------------------------------------+---------------+
| AppID                                | backupName                | backupID                             | backupState   |
+======================================+===========================+======================================+===============+
| 855d7fb2-5a7f-494f-ab0b-aea35344ad86 | hourly-khyqj-bgwxr        | dc372dc6-a02e-4b5c-9e12-262a3d349ec5 | completed     |
+--------------------------------------+---------------------------+--------------------------------------+---------------+
| 855d7fb2-5a7f-494f-ab0b-aea35344ad86 | after-pipeline-completion | b3a7edab-680a-4e6f-9fe2-feea190ca703 | completed     |
+--------------------------------------+---------------------------+--------------------------------------+---------------+
One simple command and we’re ready for any sort of disaster! We can also verify from the Astra Control GUI that our application is in a healthy, fully protected state.
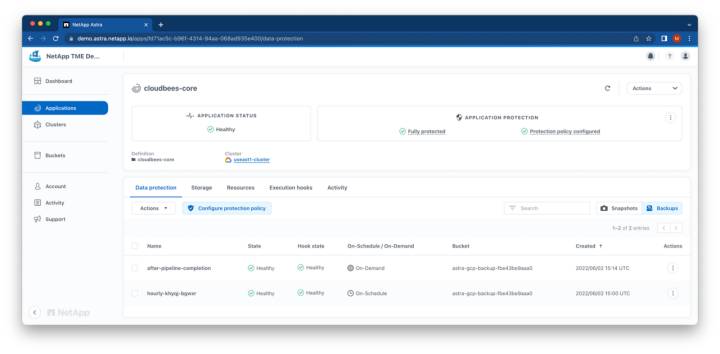
Astra Control Application Data Protection
Disaster Strikes!
Whether it’s a public cloud outage, natural disaster, or employee error, disasters and subsequent outages are bound to eventually occur. Having an enterprise-grade disaster recovery solution like Astra Control to minimize downtime is paramount.
In this demo, we simulate an employee error for our disaster, by “accidentally” deleting the wrong GKE cluster from the GCP console.
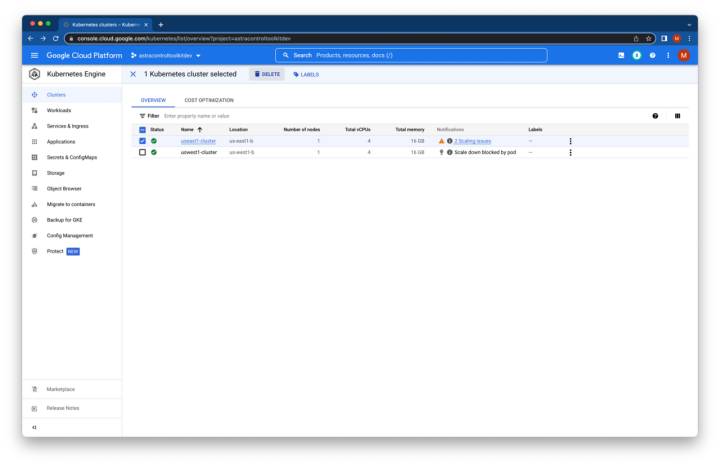
Google Kubernetes Engine Console
Navigate to the Kubernetes Engine area of the GCP console, select the cluster running the cloudbees-core application (in our case, useast1-cluster), and then click delete.
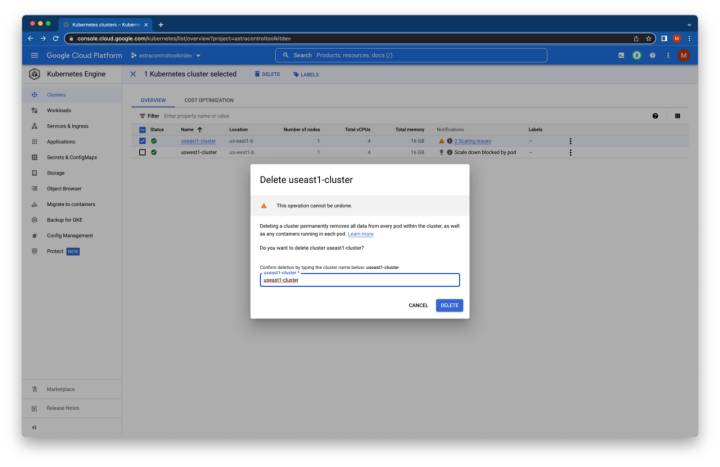
Delete GKE Cluster
In the pop-up window, enter the cluster name and then click delete. After a couple of minutes, the cluster should disappear from the UI.
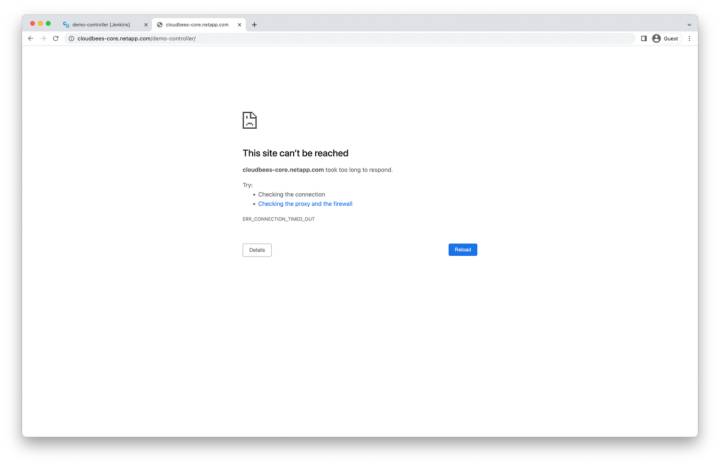
CloudBees Application Unreachable
We can also verify that our application is unreachable by refreshing the CloudBees UI.
Disaster Recovery with Astra Control
We’re now ready to recover our CloudBees application via toolkit.py clone command! First, we run a couple of list commands to gather UUIDs.
(toolkit) $ ./toolkit.py list backups
+--------------------------------------+---------------------------+--------------------------------------+---------------+
| AppID                                | backupName                | backupID                             | backupState   |
+======================================+===========================+======================================+===============+
| 855d7fb2-5a7f-494f-ab0b-aea35344ad86 | hourly-khyqj-bgwxr        | dc372dc6-a02e-4b5c-9e12-262a3d349ec5 | completed     |
+--------------------------------------+---------------------------+--------------------------------------+---------------+
| 855d7fb2-5a7f-494f-ab0b-aea35344ad86 | after-pipeline-completion | b3a7edab-680a-4e6f-9fe2-feea190ca703 | completed     |
+--------------------------------------+---------------------------+--------------------------------------+---------------+
(toolkit) $ ./toolkit.py list clusters
+-----------------+--------------------------------------+---------------+----------------+
| clusterName     | clusterID                            | clusterType   | managedState   |
+=================+======================================+===============+================+
| useast1-cluster | bda5de80-41d0-4bc2-8642-d5cf98c453e0 | gke           | managed        |
+-----------------+--------------------------------------+---------------+----------------+
| uswest1-cluster | b204d237-c20b-4751-b42f-ca757c560d2a | gke           | managed        |
+-----------------+--------------------------------------+---------------+----------------+
Next, we’ll clone our application, specifying the new cloned app name (which will also be used for the destination namespace), our destination cluster ID of the failover uswest1-cluster, and the backup ID we initiated earlier.
(toolkit) $ ./toolkit.py clone --cloneAppName cloudbees-core --clusterID b204d237-c20b-4751-b42f-ca757c560d2a --backupID b3a7edab-680a-4e6f-9fe2-feea190ca703
Submitting clone succeeded.
Waiting for clone to become available..........Cloning operation complete.
(toolkit) $ ./toolkit.py list apps
+----------------+--------------------------------------+-----------------+----------------+---------+-----------+
| appName        | appID                                | clusterName     | namespace      | state   | source    |
+================+======================================+=================+================+=========+
| cloudbees-core | 855d7fb2-5a7f-494f-ab0b-aea35344ad86 | useast1-cluster | cloudbees-core | removed |
+----------------+--------------------------------------+-----------------+----------------+---------+
| cloudbees-core | 2fb97715-7087-4338-bf88-3b4a4d740ebb | uswest1-cluster | cloudbees-core | ready   |
+----------------+--------------------------------------+-----------------+----------------+---------+
The default clone command will loop and wait for the new application to go into a ready state. However, there’s also an option to run the command in the background to return the command prompt to the user. The application being in a ready state means that Astra Control has initiated the creation of the necessary resources on the destination cluster, however it still may take several more minutes for all the necessary data to be replicated from the backup source.
Cloned Application Verification
Since we just saw that our application is in a ready state, it’s time to verify that our new application is an exact copy of our previous instance. First, let’s switch our kubectl context to the us-west1 Kubernetes cluster in the cloudbees-core namespace.
$ kubectl config get-contexts
CURRENT   NAME                                                    CLUSTER                                                 AUTHINFO                                                NAMESPACE
*         gke_astracontroltoolkitdev_us-east1-b_useast1-cluster   gke_astracontroltoolkitdev_us-east1-b_useast1-cluster   gke_astracontroltoolkitdev_us-east1-b_useast1-cluster   cloudbees-core
          gke_astracontroltoolkitdev_us-west1-b_uswest1-cluster   gke_astracontroltoolkitdev_us-west1-b_uswest1-cluster   gke_astracontroltoolkitdev_us-west1-b_uswest1-cluster
$ kubectl config set-context gke_astracontroltoolkitdev_us-west1-b_uswest1-cluster --namespace=cloudbees-core
Context "gke_astracontroltoolkitdev_us-west1-b_uswest1-cluster" modified.
$ kubectl config use-context gke_astracontroltoolkitdev_us-west1-b_uswest1-cluster
Switched to context "gke_astracontroltoolkitdev_us-west1-b_uswest1-cluster".
$ kubectl config get-contexts
CURRENT   NAME                                                    CLUSTER                                                 AUTHINFO                                                NAMESPACE
          gke_astracontroltoolkitdev_us-east1-b_useast1-cluster   gke_astracontroltoolkitdev_us-east1-b_useast1-cluster   gke_astracontroltoolkitdev_us-east1-b_useast1-cluster   cloudbees-core
*         gke_astracontroltoolkitdev_us-west1-b_uswest1-cluster   gke_astracontroltoolkitdev_us-west1-b_uswest1-cluster   gke_astracontroltoolkitdev_us-west1-b_uswest1-cluster   cloudbees-core
We can now verify that our persistent volume claims are bound and our pods are in a running state. Note: if your PVCs or pods are not in a bound/running state, it’s likely the data from the backup source is still replicating to your destination cluster. Wait a couple of minutes and try again.
$ kubectl get pvc
NAME                             STATUS   VOLUME                                     CAPACITY   ACCESS MODES   STORAGECLASS          AGE
jenkins-home-cjoc-0              Bound    pvc-4ddf8e01-bb01-400c-a0dd-7218cf49acb7   300Gi      RWO            netapp-cvs-standard   20m
jenkins-home-demo-controller-0   Bound    pvc-22412e20-4b34-4cd7-a830-5181d440f86f   300Gi      RWO            netapp-cvs-standard   20m
$ kubectl get pods
NAME                                                      READY   STATUS    RESTARTS   AGE
cjoc-0                                                    1/1     Running   0          5m38s
cloudbees-core-ingress-nginx-controller-d4784546c-fkqnd   1/1     Running   0          4m25s
demo-controller-0                                         1/1     Running   0          4m25s
We can also get our new service and ingress information.
$ kubectl get svc
NAME                                                TYPE           CLUSTER-IP       EXTERNAL-IP     PORT(S)                      AGE
cjoc                                                ClusterIP      172.17.124.190   <none>          80/TCP,50000/TCP             7m34s
cloudbees-core-ingress-nginx-controller             LoadBalancer   172.17.131.80    34.168.79.172   80:31891/TCP,443:32163/TCP   5m50s
cloudbees-core-ingress-nginx-controller-admission   ClusterIP      172.17.27.63     <none>          443/TCP                      7m34s
demo-controller                                     ClusterIP      172.17.226.88    <none>          80/TCP,50001/TCP             7m34s
$ kubectl get ingress
NAME              CLASS   HOSTS                       ADDRESS         PORTS   AGE
cjoc              nginx   cloudbees-core.netapp.com   34.168.79.172   80      3m45s
demo-controller   nginx   cloudbees-core.netapp.com   34.168.79.172   80      3m45s
Although DNS failover is a critical component of any enterprise DR solution, it is outside the scope of this blog. It is therefore left to the reader to update their organization’s DNS provider (or local hosts file) to have cloudbees-core.netapp.com resolve to 34.168.79.172.
$ ping cloudbees-core.netapp.com
PING cloudbees-core.netapp.com (34.168.79.172): 56 data bytes
64 bytes from 34.168.79.172: icmp_seq=0 ttl=52 time=145.526 ms
64 bytes from 34.168.79.172: icmp_seq=1 ttl=52 time=73.742 ms
64 bytes from 34.168.79.172: icmp_seq=2 ttl=52 time=73.348 ms
64 bytes from 34.168.79.172: icmp_seq=3 ttl=52 time=73.766 ms
^C
--- cloudbees-core.netapp.com ping statistics ---
4 packets transmitted, 4 packets received, 0.0% packet loss
round-trip min/avg/max/stddev = 73.348/91.596/145.526/31.137 ms
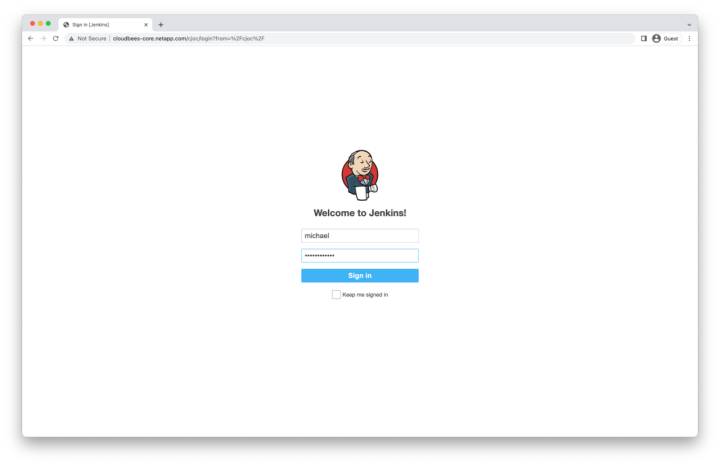
Operations Center Login
Navigate back to your operations center hostname and sign in with the user created at the beginning of this demo.
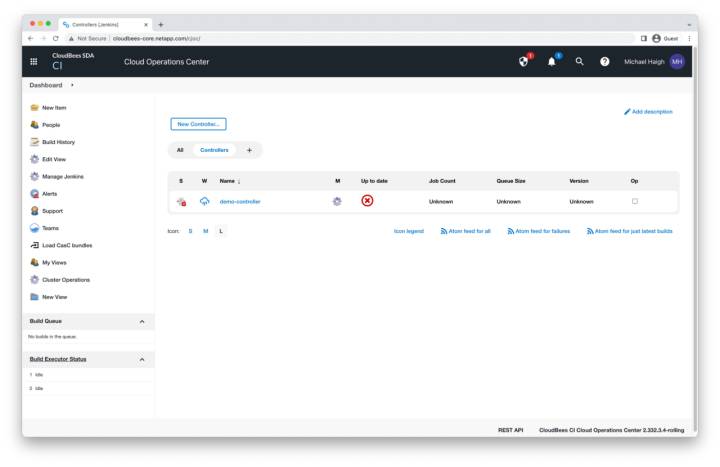
Operations Center Homepage
Select the demo-controller that we created earlier.
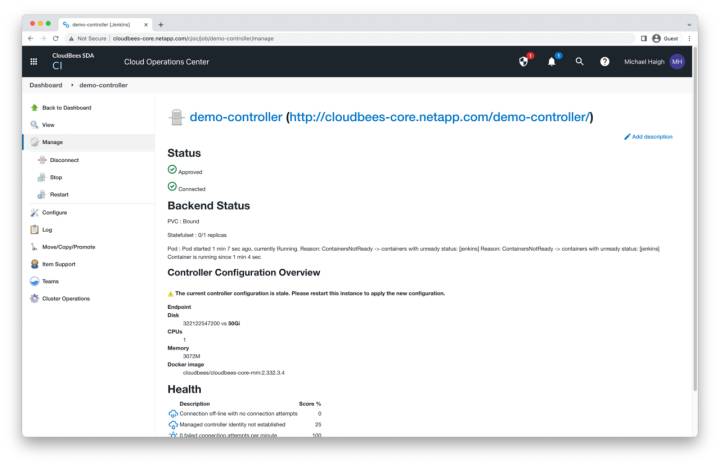
Controller Connected
Click the view button on the left pane, or the demo-controller link along the top of the window.
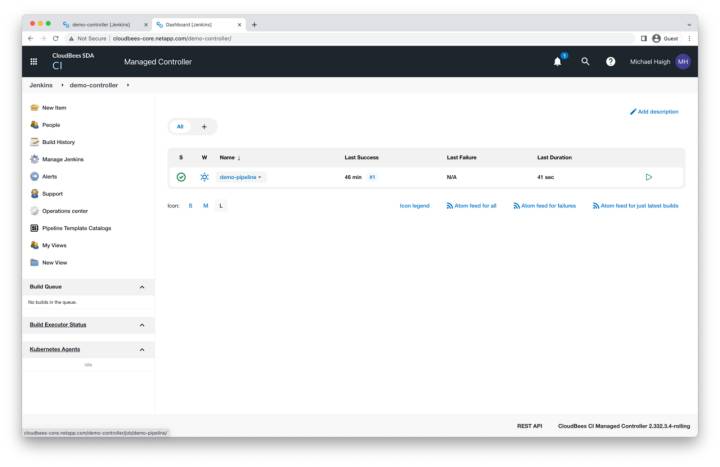
Restored Demo Pipeline
The demo-pipeline we created earlier is restored. Select it.
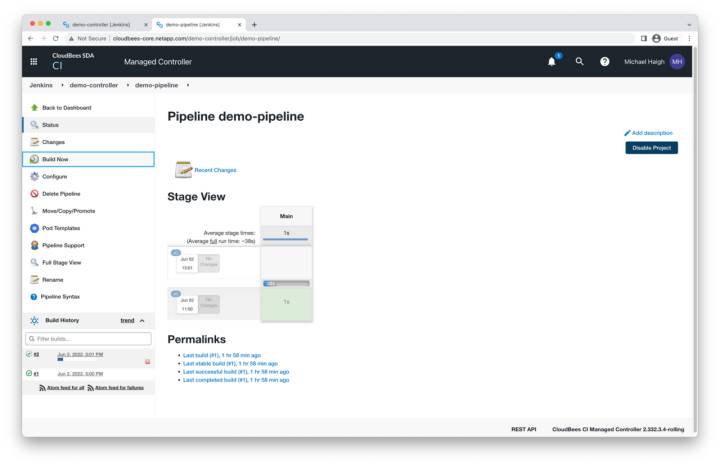
Pipeline Restored
The pipeline page shows the information from our previous build #1. We can click build now to create a new build #2.
Summary
Thanks for making it this far! To summarize, we saw how easy Astra Control and its python SDK makes:
- Deploying production-grade applications
- Protecting those applications from all types of disasters
- Quickly recovering from disaster by restoring the application
Although this blog used GKE and Astra Control Service, this same great functionality is available with EKS and AKS on Astra Control Service, and with Astra Control Center and on-premises Kubernetes environments, including Rancher, Red Hat OpenShift, and VMware Tanzu.
Authors: Sheng Sheen, Global Partner SA Leader at CloudBees and Michael Haigh, Senior Technical Marketing Engineer at NetApp.
